Overview
Rich Text Editor is used in various fields across record types such as Use Cases, User Stories, Requirements, and more. Fields like Description, Acceptance Criteria, etc., support rich formatting and allow to insert content such as tables, images, links, and diagrams.
This article explains the capabilities of the Rich Text Editor, including:
- Format text and paragraphs
- Insert links, images, tables, and diagrams
- Work with traceability and artifact links
- Add glossary terms and equations
- Use keyboard shortcuts
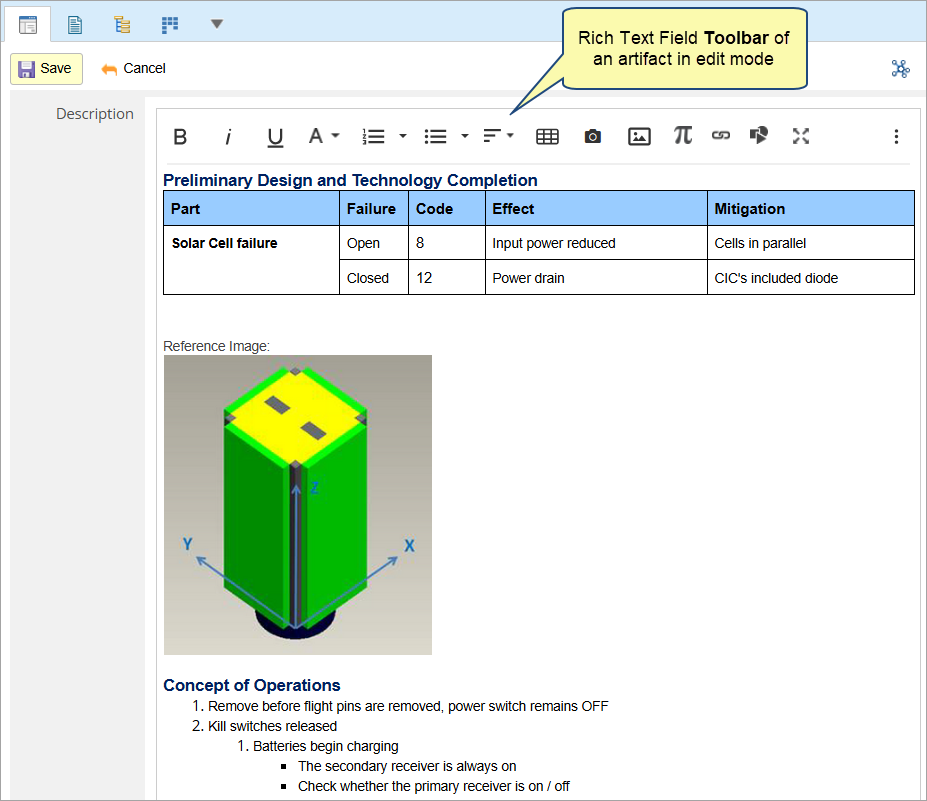
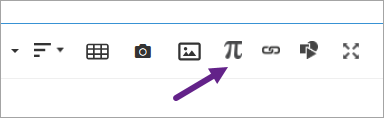
The toolbar shown in the image below represents the options available in full screen mode.
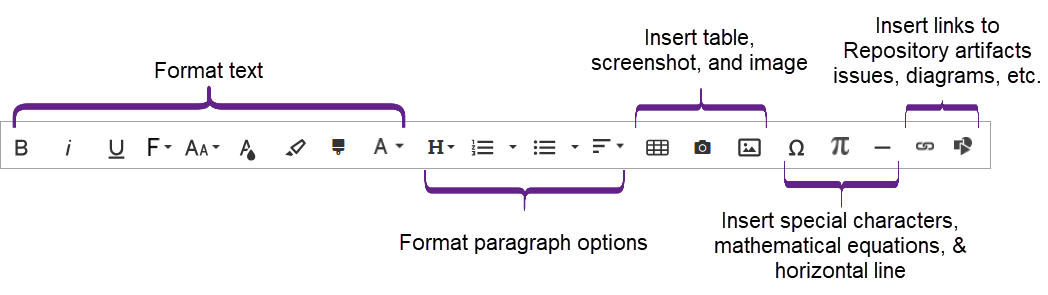
Some options appear only in Full Screen mode or under the More menus (More Text, More Paragraph).
This article covers the following topics.
- Formatting Text and Paragraphs
- Organizing Content
- Inserting Content (Images, Diagrams, Links & Tables)
- Working with Tables
- Linking to Artifacts
- Glossary, Special Characters & Equations
- Accessibility & Shortcuts
- Best Practices
- FAQs
Formatting Text and Paragraphs
Select text and apply any of the following formatting options. You can also place the caret at a location, select some formatting options, and start typing. The text will have the specified formatting until you change it. You can also use keyboard shortcuts.
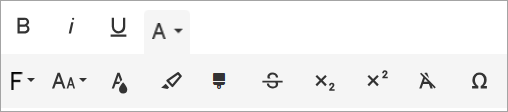
- Bold, Italic, Underline, Strikethrough
- Font family and size (available in Full Screen mode)
- Font and Background colors
- Subscript and Superscript
- Clear Formatting
- Format Painter: Copy formatting from one section and apply it elsewhere (similar to Microsoft Word).
Two usage patterns are available:
-
- Single-use (single-click): Copies formatting once and applies it to the next selected text.
- Continuous-use (double-click): Keeps the painter active so you can apply formatting to multiple selections until you press Esc or deactivate it.
Organizing Content
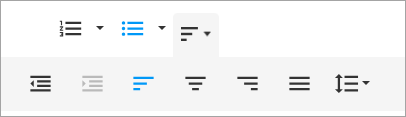
- Apply Headings or normal paragraph styles
- Create Ordered Lists or Unordered Lists
- Adjust alignment (left, center, right, justified)
- Indent and Outdent using buttons or keyboard shortcuts
- Insert Horizontal Lines for visual separation
Inserting Content
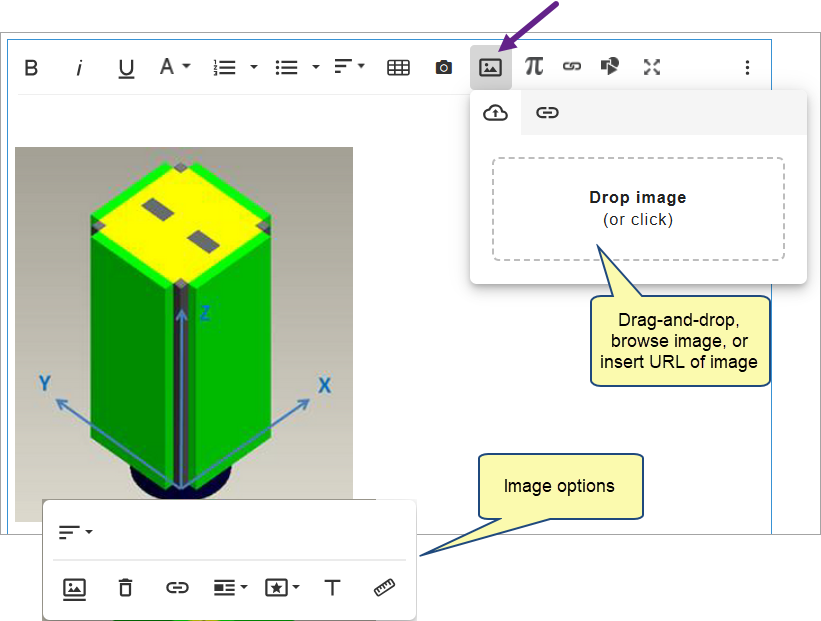
Add Images
- Use drag-and-drop, browse image or insert image URL.
- You can also copy-paste image.
- Resize images, add captions, and apply styles.
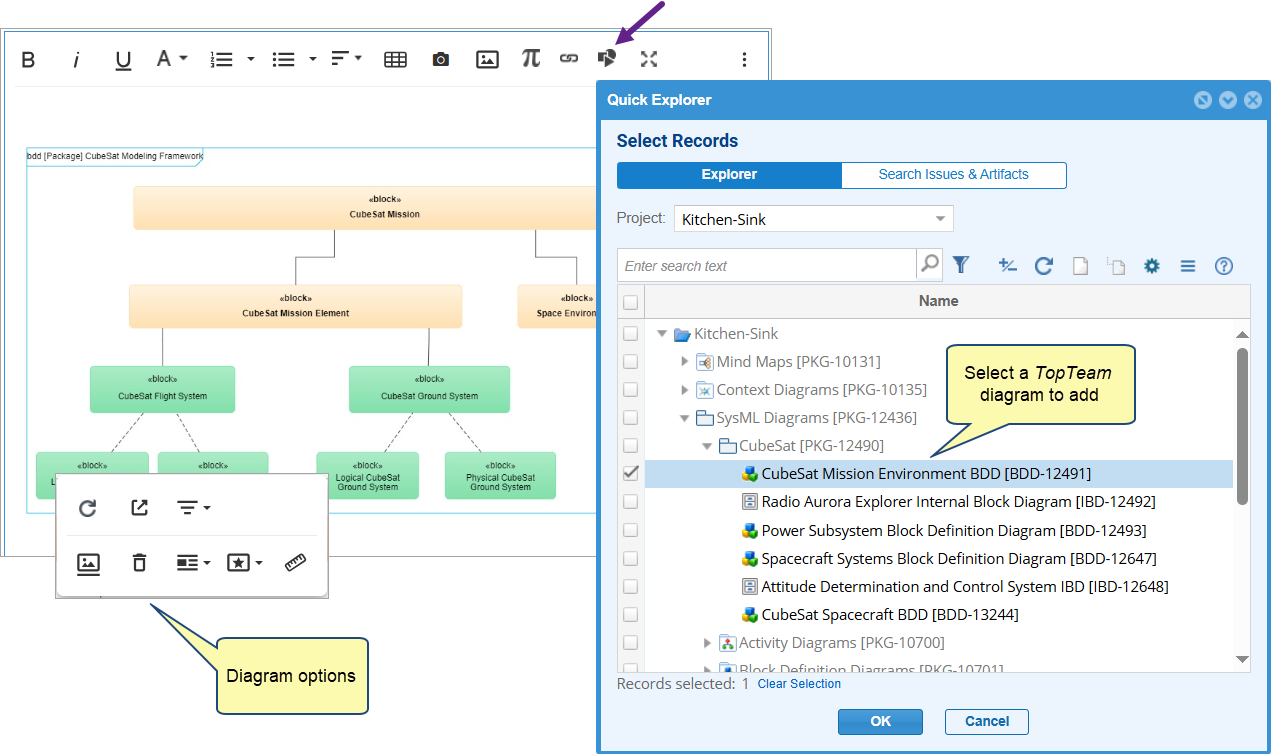
Add Diagrams
- Use Insert TopTeam Diagram to insert diagram (e.g., Mind Maps, Business Process).
- Browse and select the diagram record.
- The diagram appears as an image in the editor and retains reference to its source.
- Resize the inserted diagram to adjust its display within the editor.
- Refresh the inserted diagram to update it with the lates changes made to the source diagram.
For more on refreshing and updating diagrams, see Insert TopTeam Diagram topic.
Add Links
Use Insert Link for adding artifacts and issues as links, add diagrams and external URLs.
For more details, see Inserting Linking to Artifacts topic.
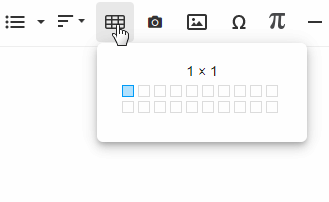
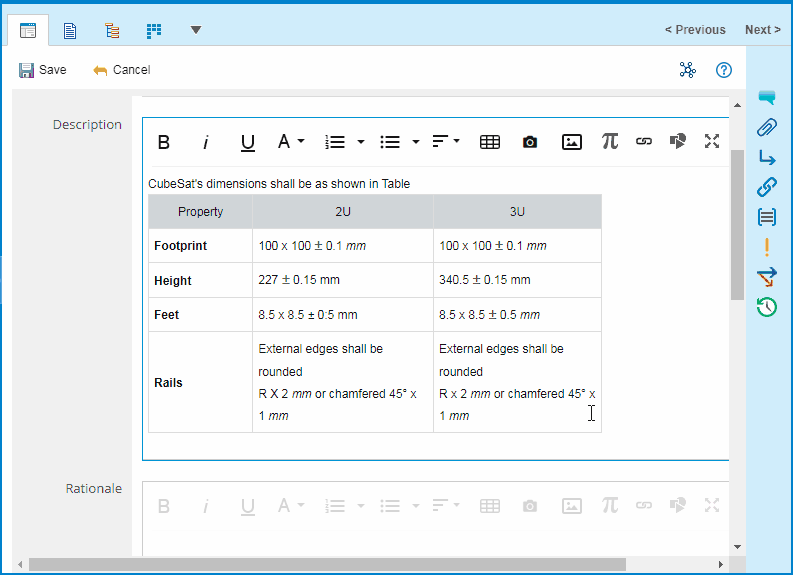
Add Tables
Use the Insert Table icon to choose a layout.
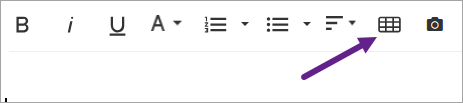
For more details, see the next topic – Working with Tables.
4. Working with Tables
Insert a Table
Drag to select rows and columns.
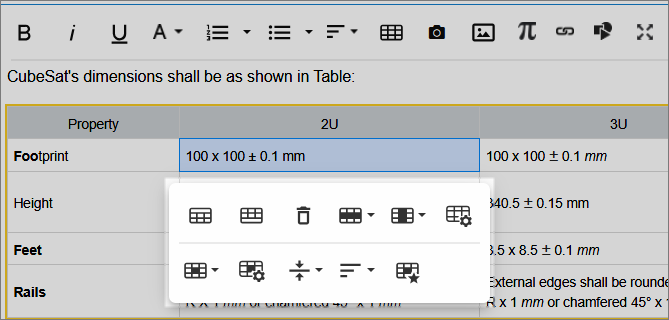
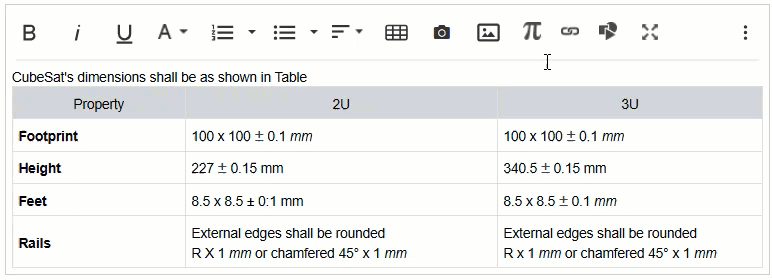
Edit & Format a Table
Click inside a cell to view in-place editing toolbar.
Resize Columns
Drag cell borders to adjust width.
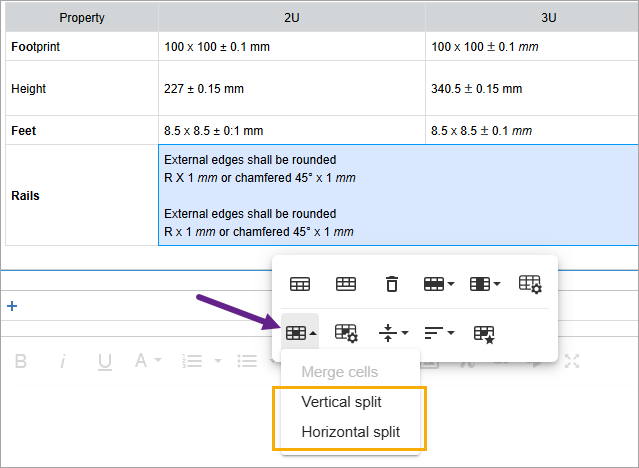
Merge/Split Cells
- Select multiple cells → Click Merge.

- Also, use Split Cell to divide.
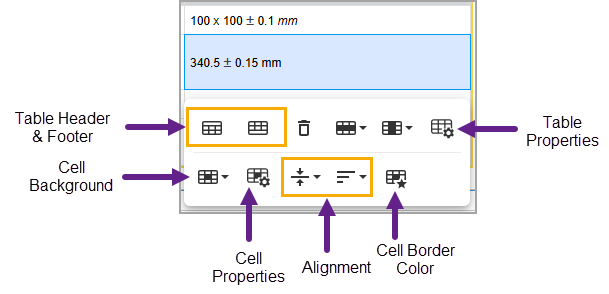
Apply Table Styles
- Use Table Header & Footer options
- Apply Cell Background colors
- Configure Cell Properties (background, dimensions, and padding)
- Set Alignment (horizontal and vertical)
- Change Cell Border Color
- Adjust Table Properties (background, border, dimensions, and table style)
- Add or remove Rows and Columns
5. Linking to Artifacts
Rich Text fields allow you to create traceable links to other artifacts or issues using multiple methods—whether by selecting existing artifacts or by converting text into new artifacts. These features streamline traceability and provide deep integration across TopTeam modules.
Add As from Selected Text
Use the Add As feature to convert selected text into new artifacts such as Requirements, Issues, Use Cases, and more.
- Highlight any relevant text in a rich text field or comment.
- Select Add As from the Link menu or right-click context menu.
- The Add As wizard opens, allowing you to specify the type, name, and other properties of the new artifact.
- Once saved, a hyperlink to the newly created record is automatically inserted in the rich text.
|
NOTE
|
When linking, traceability is automatically created if rules exist. Learn more. |
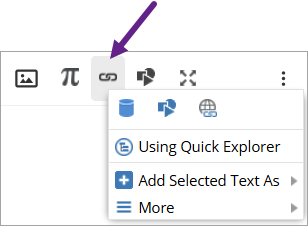
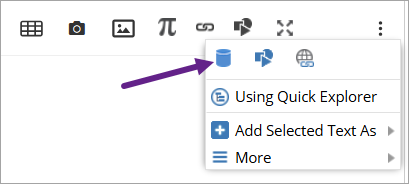
Insert Record Links
You can insert links to existing records using any of the following methods:
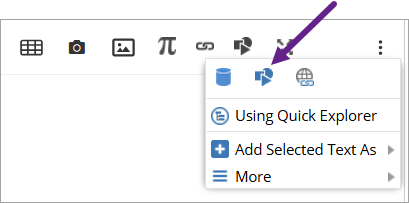
a. Using Quick Explorer
Quick Explorer is a floating window that provides access to repository artifacts across all record types.
- Launch Quick Explorer from the toolbar or context menu.
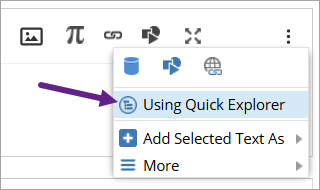
- Browse or search for relevant artifacts.
- Insert them into a rich text field using:
- Copy-Paste: Copy one or more records from Quick Explorer and paste into a rich text area. Learn more
- Drag-and-Drop: Simply drag selected items into the rich text field to insert links. Learn more
Each inserted link includes a clickable title and, if applicable, traceability metadata.
|
TIP
|
Ideal for quickly referencing related Use Cases, Requirements, or Design elements from within text. |
b. Insert Record Link
This option allows you to link an existing artifact or issue (e.g., Requirement, Test Case, Defects, etc.) directly into the text.
- Click Insert Record Link from the toolbar.
- Select records and insert them to the field.
- A link with the record names is added at the cursor location.
|
NOTE
|
A trace link is also created if traceability rules are configured for the selected artifact types. Learn more. |
|
HELP
|
How to create traceability by inserting Artifacts & Issues Link in Rich Text Fields. |
c. Insert TopTeam Diagram
Insert a diagram (e.g., Mind Map, Business Process, UI Wireframe) as visual references.
Refresh Diagram: To reflect updates made to the original diagram, use Refresh Diagram from the link context menu.
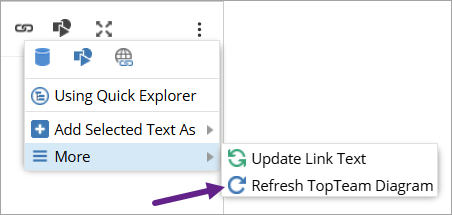
See Add Diagrams topic.
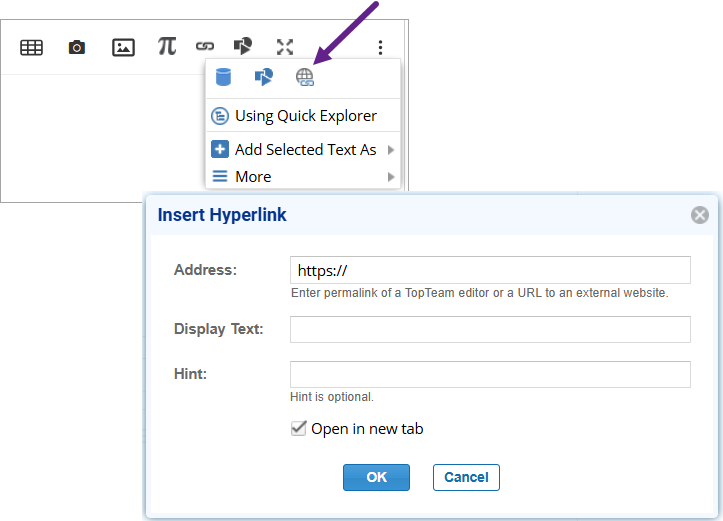
d. Insert Hyperlink to External URLs
You can also add external links using Insert Hyperlink:
- Select a piece of text → Click Insert Hyperlink
- Enter the URL, display text, and optional tooltip.
- A clickable external link is inserted.
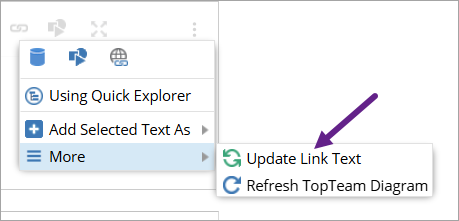
e. Update Link Text
If you have inserted a record link and want to customize the displayed text:
- Select the link → Click Update Link Text.
- Change the label without affecting the underlying link or record reference.
Summary of Linking Options
|
Method |
Description |
Supports Traceability |
Learn More |
|
Add As |
Convert selected text into a new artifact and auto-insert link |
✅ |
|
|
Quick Explorer |
Insert existing artifacts via drag-and-drop or copy-paste |
✅ |
|
|
Insert Record Link |
Manually insert existing artifact links via selector |
✅ |
|
|
Insert TopTeam Diagram |
Insert diagram artifacts as visual references |
— |
|
|
Insert Hyperlink |
Add links to external websites or addresses |
❌ |
|
|
Update Link Text |
Modify display text of an inserted artifact link |
— |
|
|
Refresh Diagram |
Update inserted diagrams to latest state |
— |
6. Glossary, Special Characters & Equations
Add to Glossary
The Add to Glossary feature allows you to define key terms and ensure consistent understanding across your team or project. This is particularly useful for documenting domain-specific vocabulary, acronyms, or technical jargon.
To add a term to the Glossary:
1. Highlight the term in any rich text field (e.g., “Latency”, “MVP”, “OAuth”).
2. Right-click and select Add to Glossary.
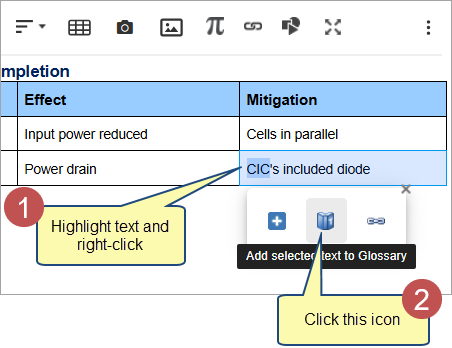
3. Provide a definition and optionally add notes or category tags.
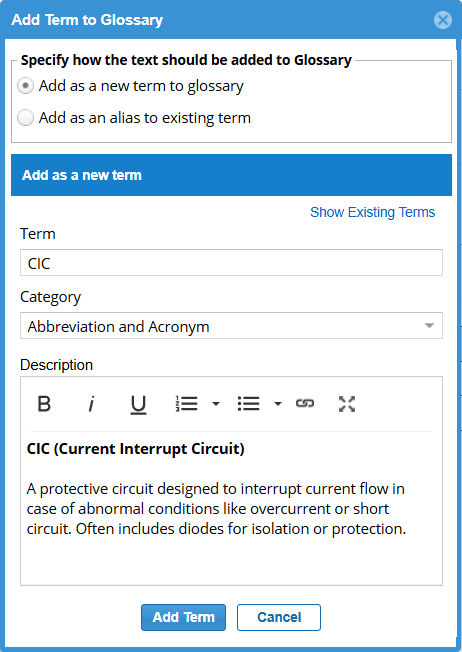
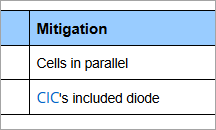
4. Once added, the term will appear in the rich text with an underline.
Hovering over a glossary term displays its definition as a tooltip (when artifact is not in edit mode), helping readers understand terms in context—without navigating away.
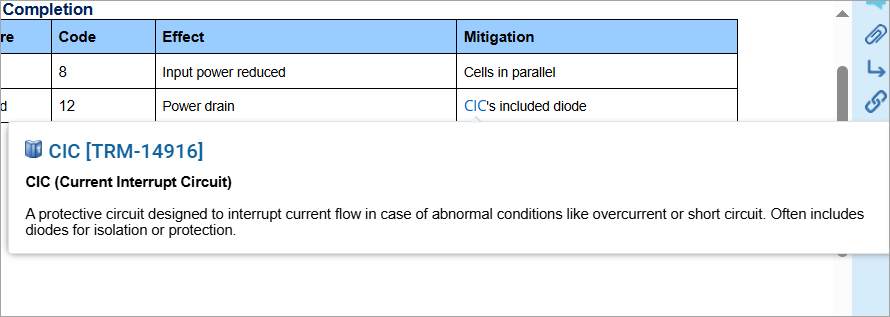
Glossary entries are reusable across the project and can be centrally managed in the Glossary module.
|
TIP
|
Use this feature to create a consistent vocabulary for business terms, technical jargon, or abbreviations. |
Insert Special Characters
TopTeam lets you insert a wide range of special characters into any rich text field for better expression of technical content, formulas, or multilingual support.
- Click Insert Special Characters from the full toolbar.
- Browse or search symbols by type:
- Currency: ₹, $, €, ¥
- Math symbols: ≠, ≤, ≥, ∑
- Punctuation & arrows: …, ‽, →, ↔
- Greek letters: α, β, θ, Ω

|
TIP
|
Use special characters to enhance requirements, business rules, or model annotations. |
Insert Mathematical Equations
The Rich Text Editor allows you to insert mathematical formulas using LaTeX syntax directly into any rich text field, useful for scientific, engineering, or calculation-based requirements.
To insert an equation:
- Place the caret where you want the equation.
- Click the Insert Equation button in the toolbar.
3. In the popup window, enter your formula using LaTeX syntax
Examples:
Quadratic formula: x = \frac{-b \pm \sqrt{b^2 – 4ac}}{2a}
Series sum: \sum_{i=1}^{n} i = \frac{n(n+1)}{2}
x = \frac{-b \pm \sqrt{b^2 – 4ac}}{2a}).
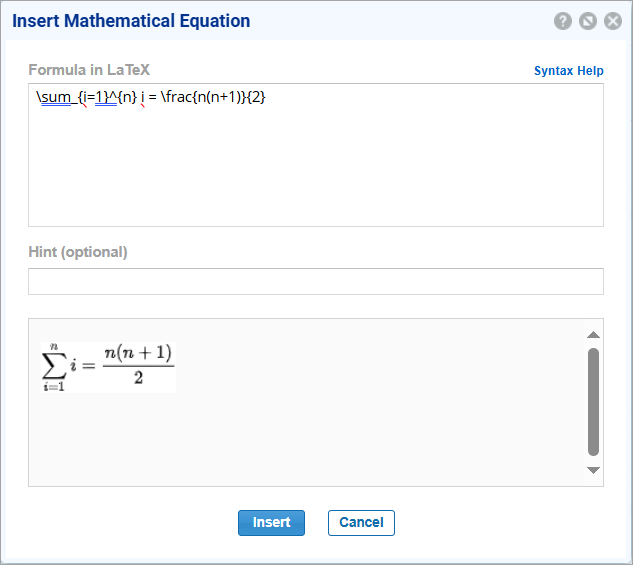
4. The equation is rendered and inserted at the caret location.
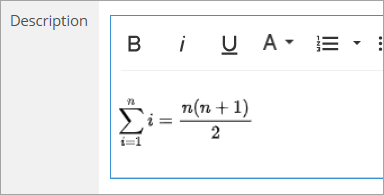
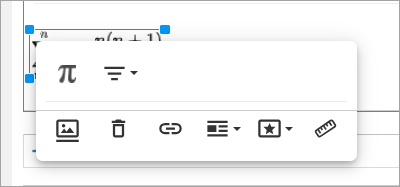
Click the inserted equation to edit it again.
|
HELP
|
Refer to the Syntax Help for LaTeX Equations document for a list of supported commands and formatting examples. |
7. Accessibility & Shortcuts
Use keyboard shortcuts to navigate and perform quick actions.
|
Common Actions |
Keyboard Shortcut |
|
Copy |
Ctrl+C |
|
Cut |
Ctrl+X |
|
Paste |
Ctrl+V |
|
Undo |
Ctrl+Z |
|
Redo |
Ctrl+Shift+Z |
|
Insert Link |
Ctrl+K |
|
Insert Image |
Ctrl+P |
|
Basic Formatting |
|
|
Select All |
Ctrl+A |
|
Bold |
Ctrl+B |
|
Italic |
Ctrl+I |
|
Underline |
Ctrl+U |
|
Increase Indent |
Ctrl+] |
|
Decrease Indent |
Ctrl+[ |
|
Quote |
|
|
Increase quote level |
Ctrl+’ |
|
Decrease quote level |
Ctrl+Shift+’ |
|
Image/Video |
|
|
Resize larger |
Ctrl++ |
|
Resize smaller |
Ctrl+- |
|
Table |
|
|
Select table cell |
Alt+Space |
|
Extend selection one cell |
Shift+Left/Right arrow |
|
Extend selection one row |
Shift+Up/Down arrow |
|
Navigation |
|
|
Shortcuts |
Ctrl+/ |
|
Focus popup/toolbar |
Alt+F10 |
|
Return focus to previous position |
Esc |
8. Best Practices
- Use Headings to structure content clearly.
- Use Format Painter for consistent styling across sections.
- Prefer tables for structured information over indents or lists.
- Add alt text for all diagrams and images.
- Use Add As and Insert Record Links for strong traceability.
- Maintain a shared Glossary to ensure consistent terminology.
9. Frequently Asked Questions (FAQs)
Q1: Can I remove or unlink a record link?
Yes. Select the link and use right-click context menu → Unlink.
Q2: What happens if traceability rules are missing?
The link will still be created, but no traceability will be established unless a rule exists.
Q3: Are inserted images stored in the project?
Yes. Images inserted into rich text fields are stored within the project and version-controlled.
Q4: Can I edit glossary terms later?
Yes. Glossary terms can be edited or deleted from the Glossary module.
Q5: Does rich text content export retain formatting?
Yes. Most formatting—such as font styles, tables, and images—is retained when exporting to PDF or Word.
- Diagrams are retained as static images.
- Artifact links (e.g., to Requirements, Issues) are retained as active links (that open in TopTeam).
Related Articles
How to add artifacts using Add As feature
Creating Traceability by Inserting Links in Rich Text Fields
Syntax Help for LaTeX Equations
Revised: September 23rd, 2025