This guide is your perfect starting point for exploring the diverse interfaces of TopTeam Requirements. Whether you are new or need a quick refresher, we’ll guide you through the essential elements. By the end of this guide, you’ll have a clear understanding of TopTeam Requirements’ interface components, empowering you to seamlessly replicate them across similar contexts.
Contents
TopTeam Assistant – Powered by AI
Moving Artifacts using Drag-and-Drop
Updating and Deleting Multiple Artifacts (Bulk Updates)
Adding Artifact Attributes to View
Dragging and Dropping Artifacts to Create Links
Rapidly Creating Artifacts (Bulk Add)
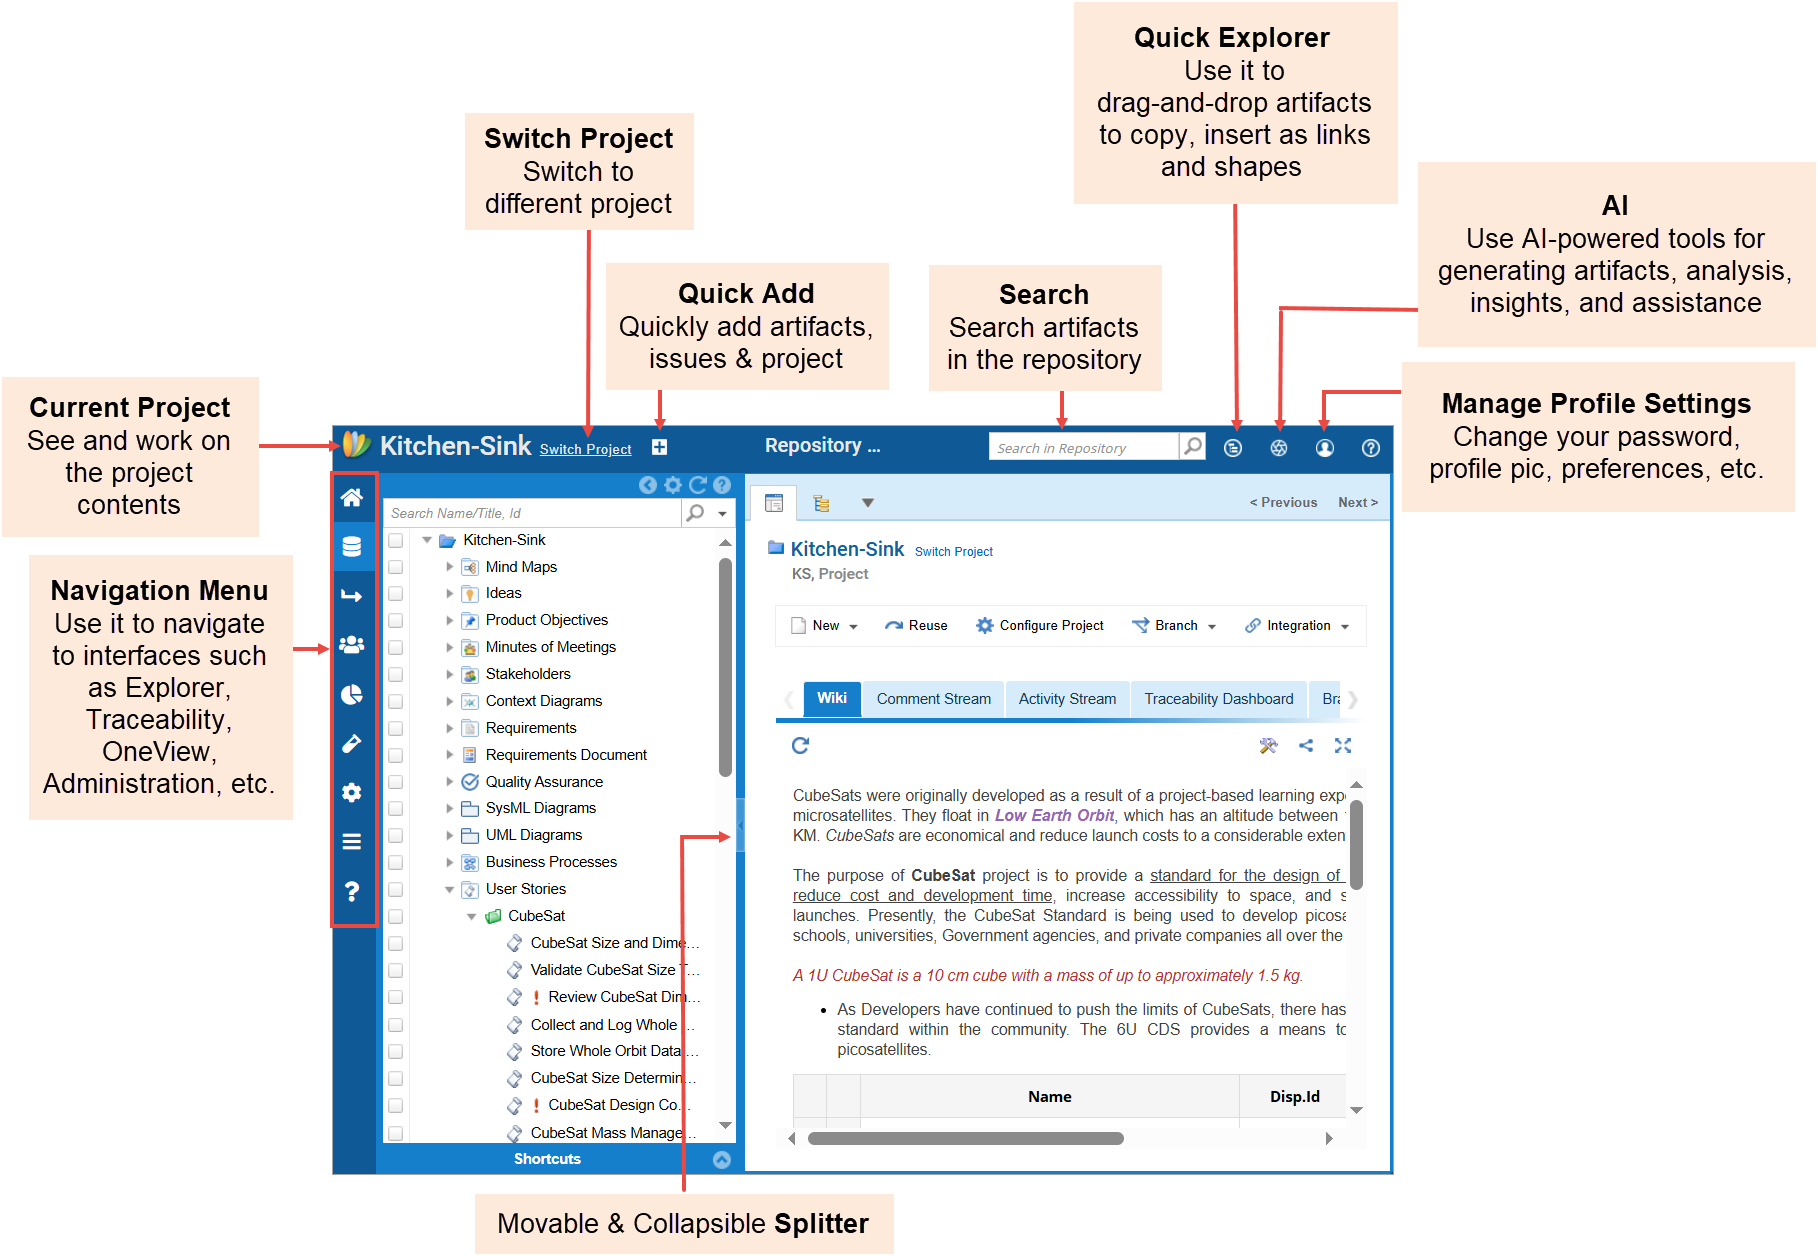
Main Interface
TopTeam’s interface is designed for intuitive navigation and efficient access to key modules and tools. The layout includes a central workspace with contextual panels, menus, and toolbars for working with artifacts, diagrams, and views.
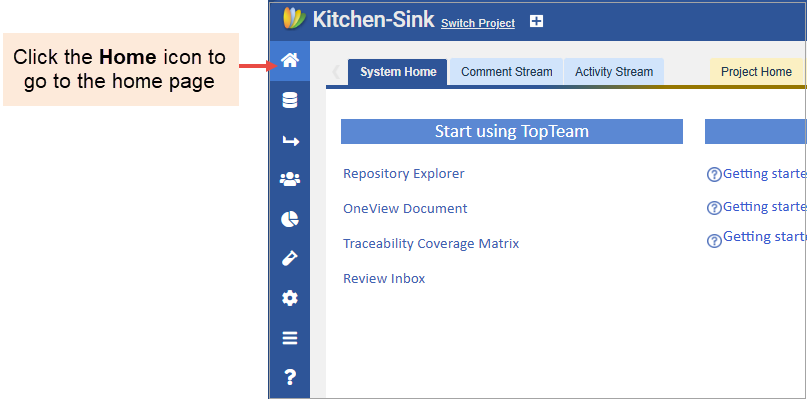
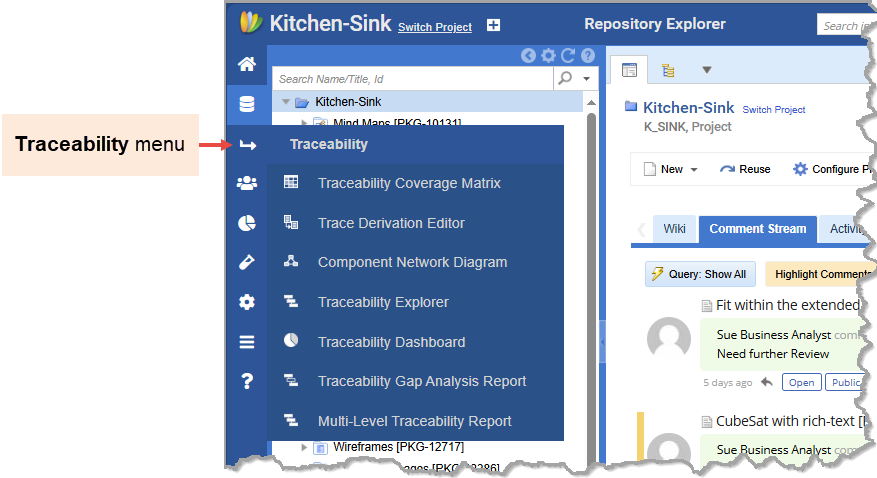
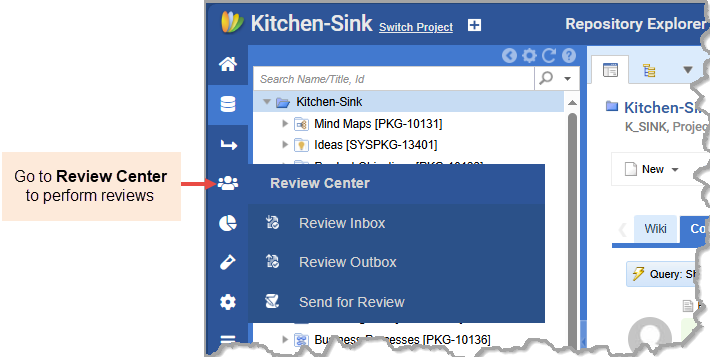
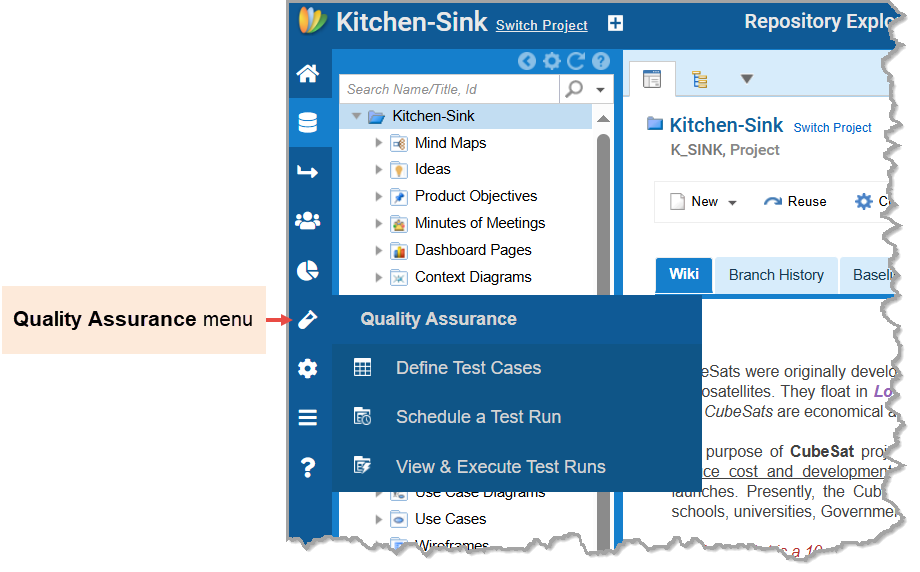
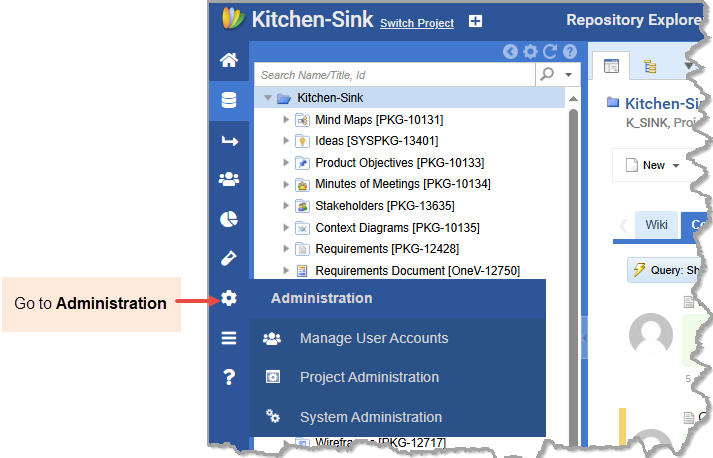
Navigating in TopTeam
Navigation Menu
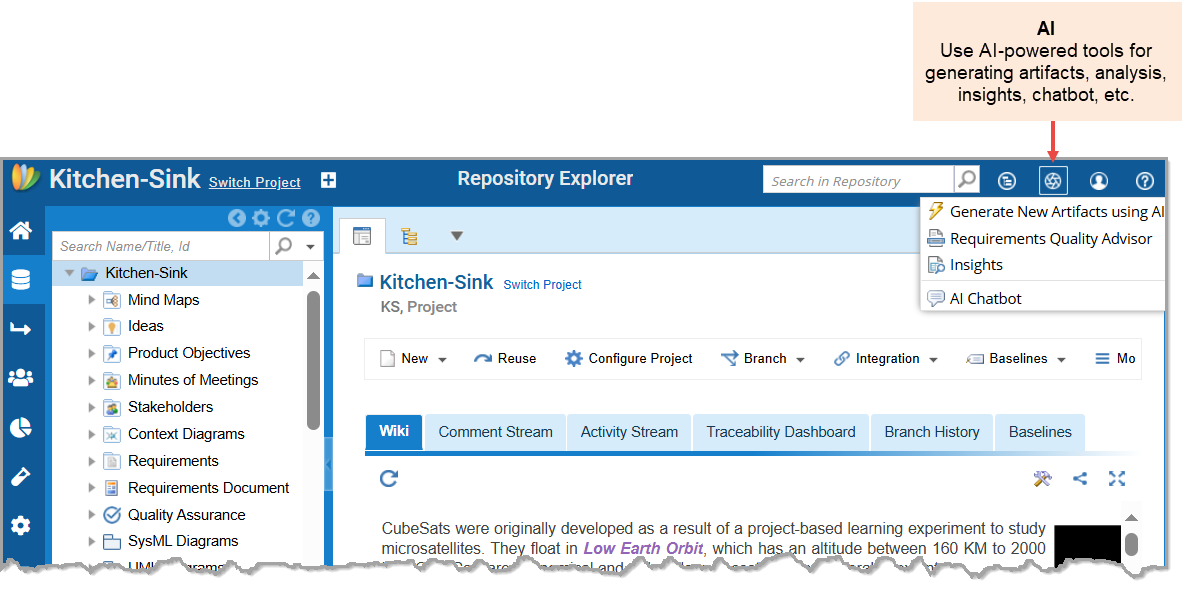
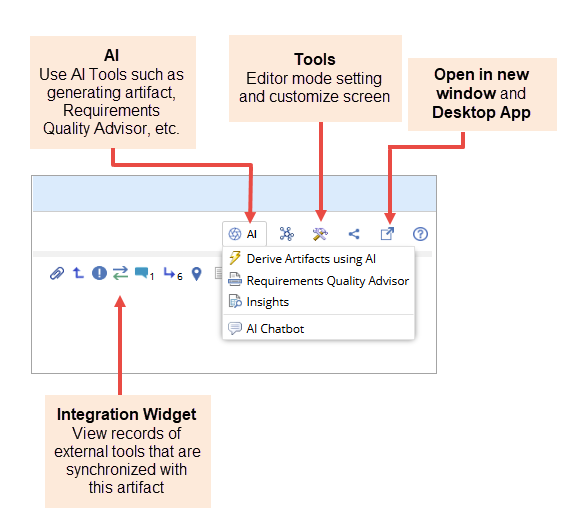
TopTeam Assistant – Powered by AI
When you want help from AI, use the TopTeam Assistant. It provides intelligent suggestions and helps you complete tasks faster using automated guidance.
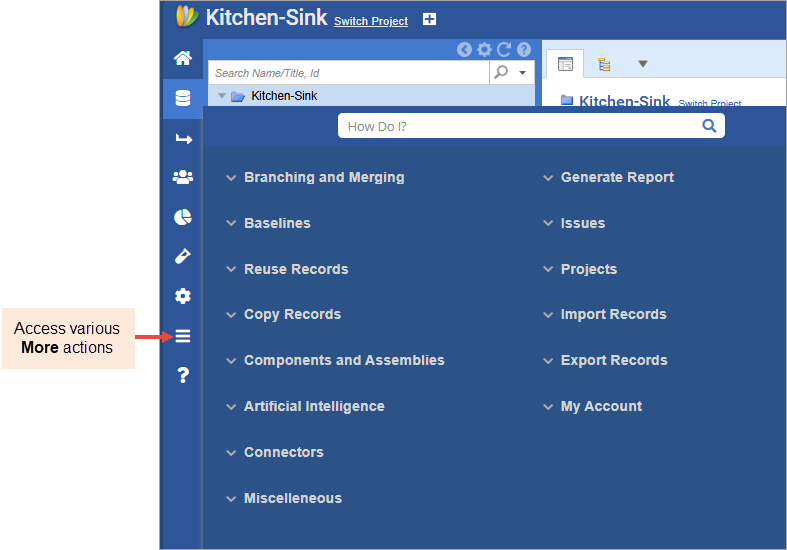
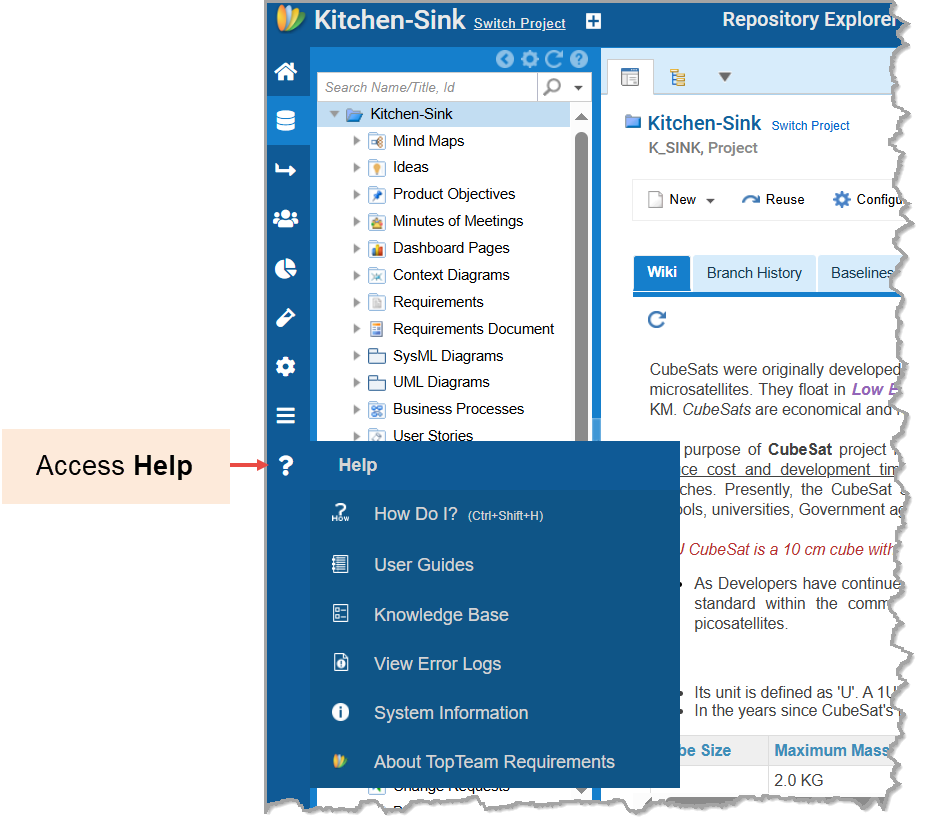
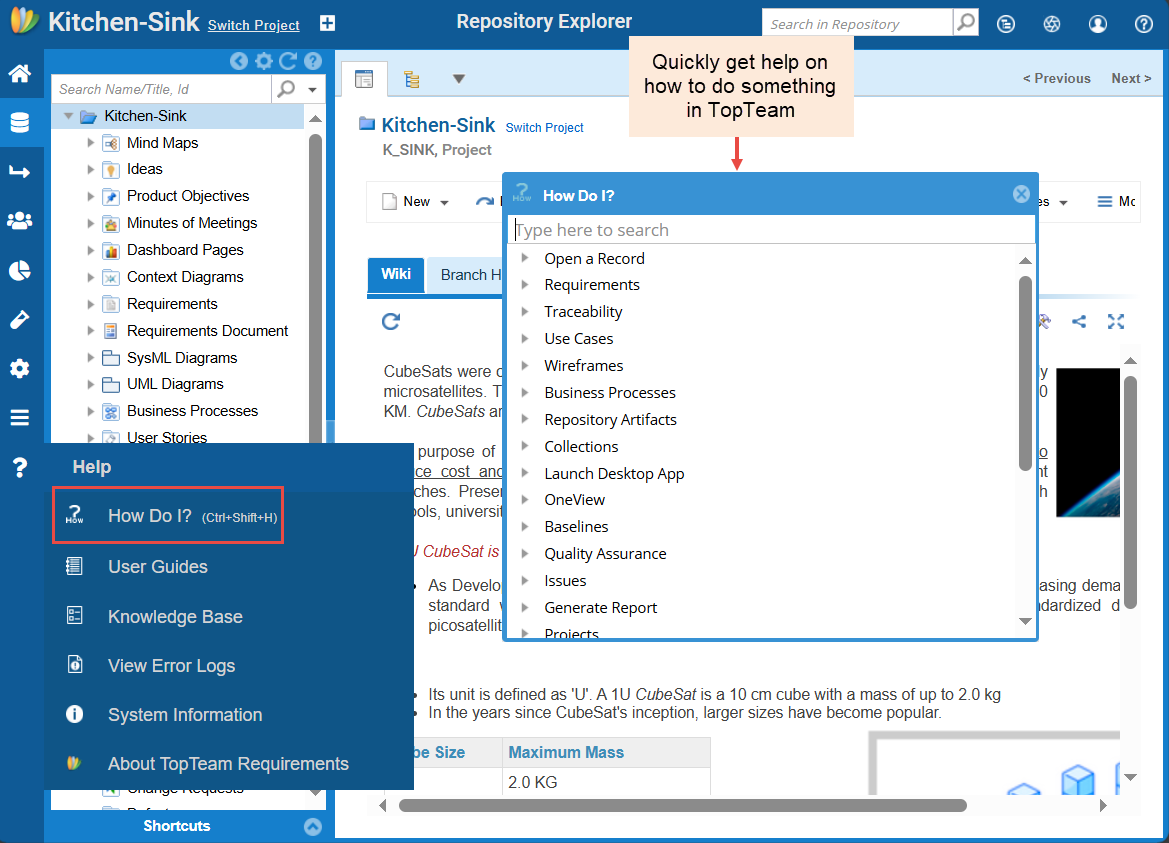
How Do I?
When you want to find and open modules or features quickly, use the How Do I? tool. Just type what you’re looking for, and it shows matching results.
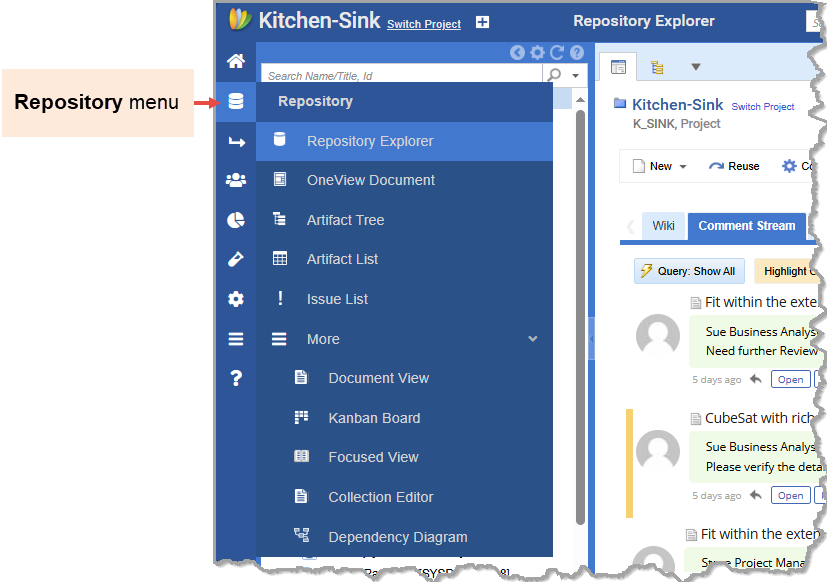
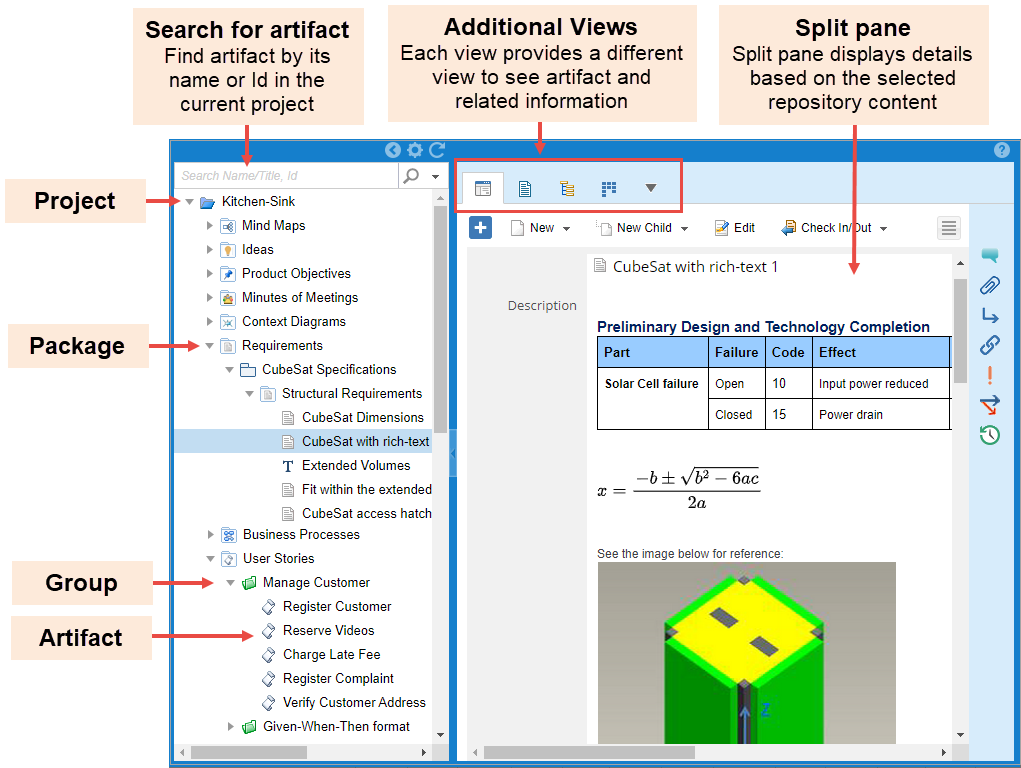
Repository Explorer
Repository Explorer is the main interface to browse a project’s structure and artifacts in a hierarchical view. This is useful when organizing or locating specific artifacts. For more information, see Repository Explorer.
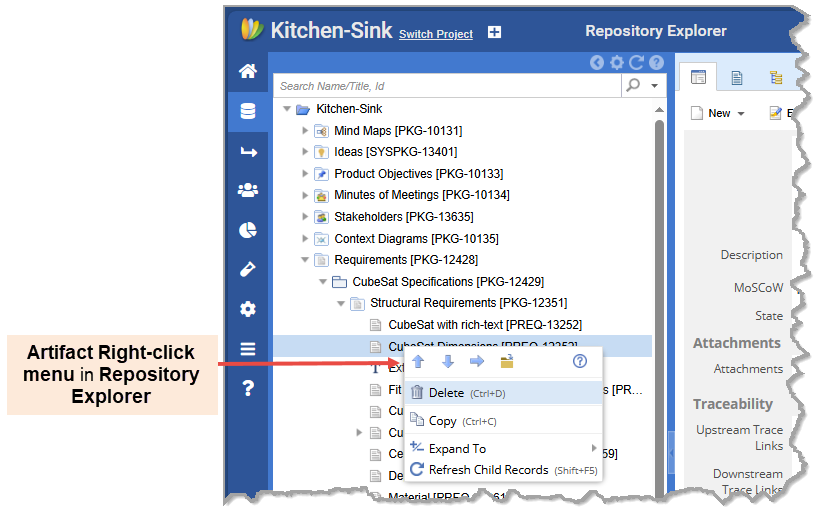
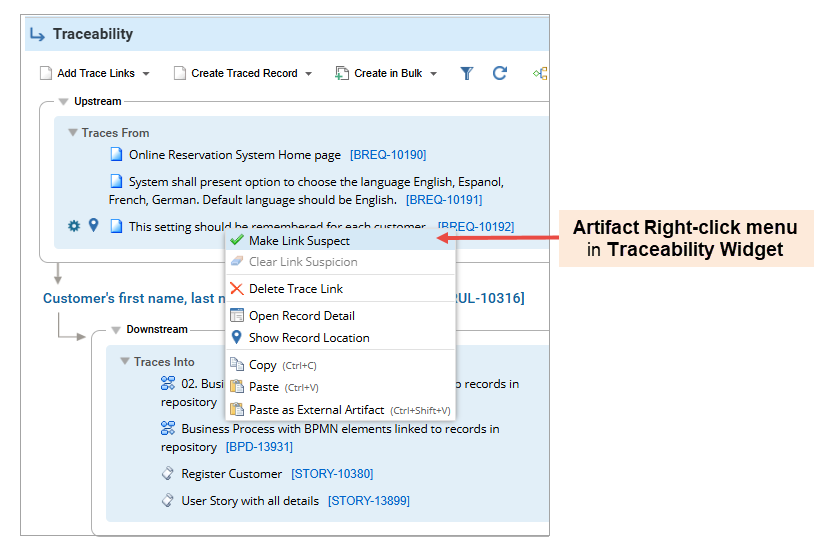
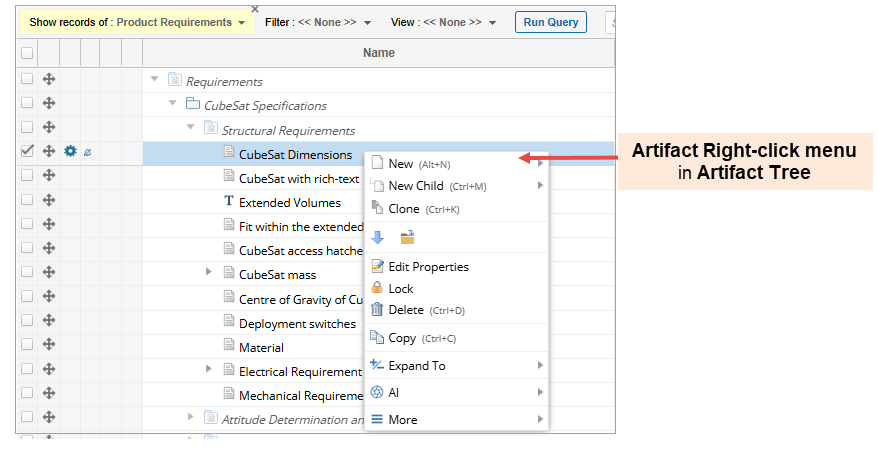
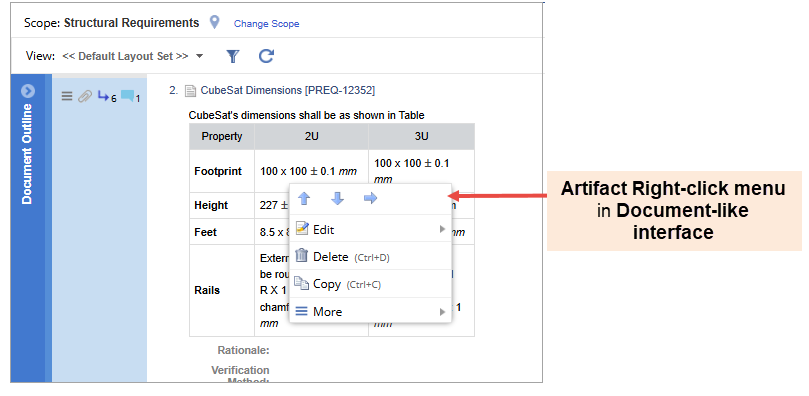
Using the Right-Click Menu
Most interfaces, such as Repository Explorer, Document Map in document-like interfaces, tree editor, traceability editors, etc., have a right-click menu. This menu provides quick access to actions you might need to perform frequently, making it much easier to complete your tasks. The menu actions may vary pertaining to the selected item and interface.
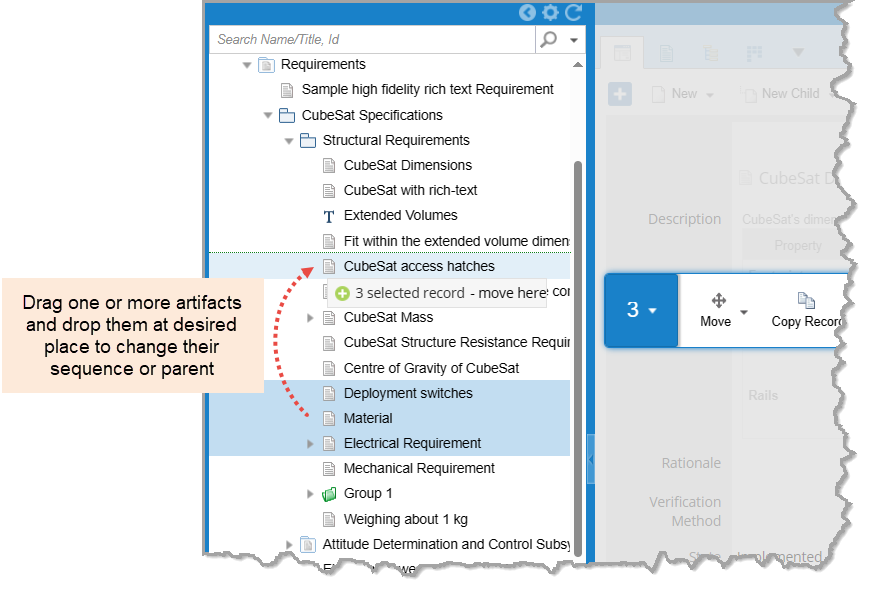
Moving Artifacts using Drag-and-Drop
When you want to change the order or change the parent of artifacts, use the drag-and-drop method in interfaces such as Repository Explorer, Document View, OneView Document, etc. For more information, see Moving Artifacts using Drag-and-drop (OneView Document).
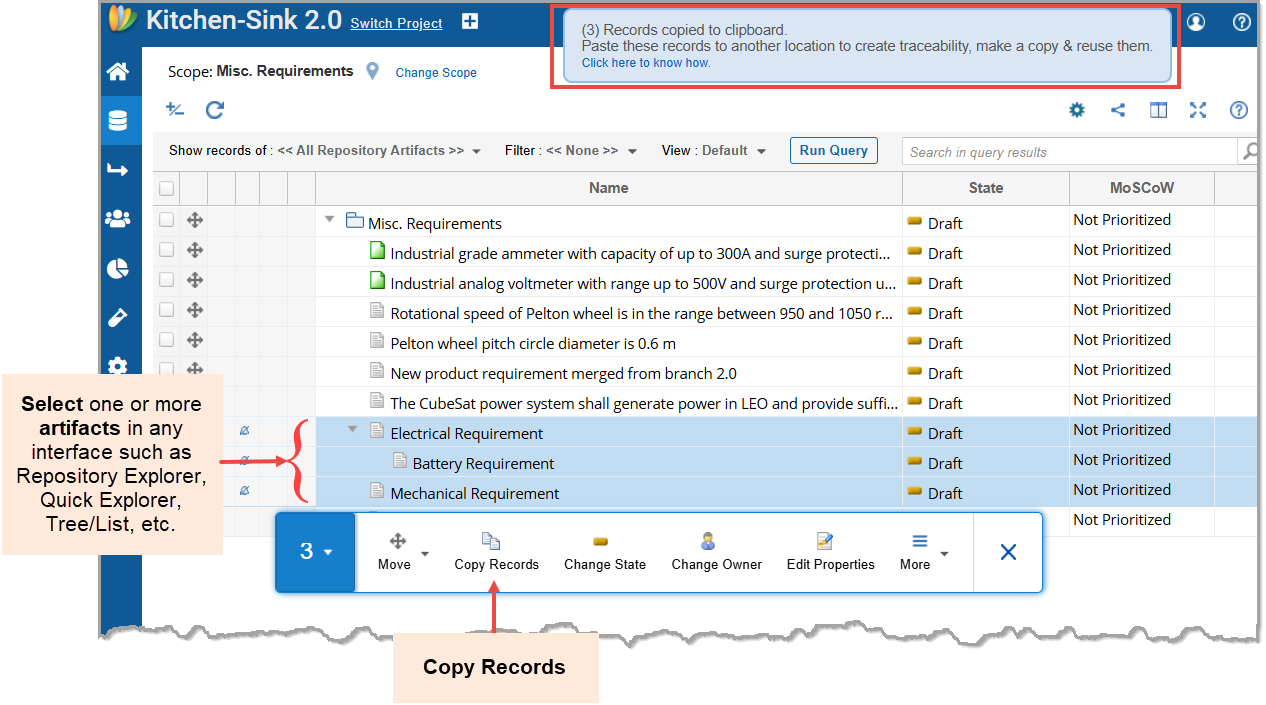
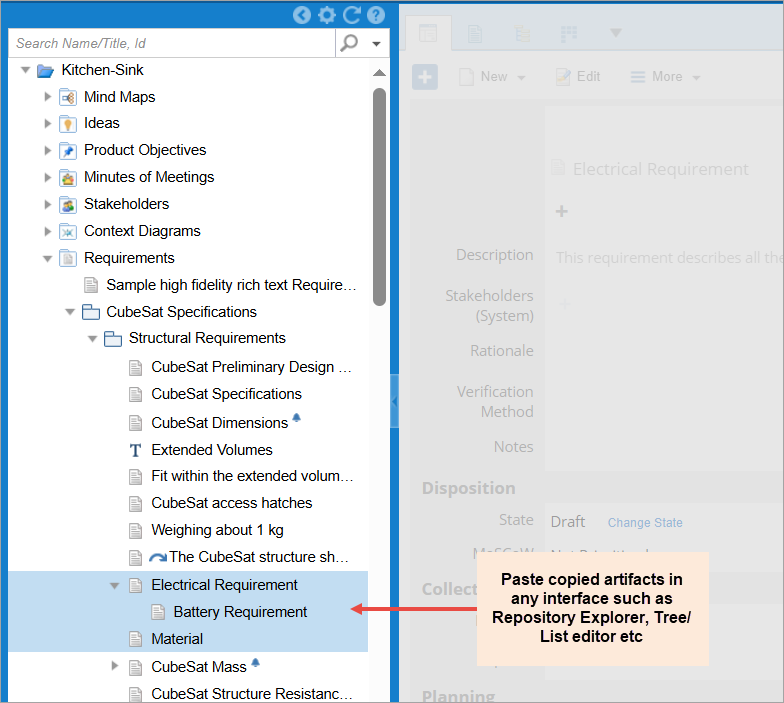
Copying & Pasting Artifacts
To duplicate artifacts, copy and paste them from one location to another. Choose whether to paste as a child or sibling. For details on copying-pasting artifacts, see Copying-pasting Artifacts.
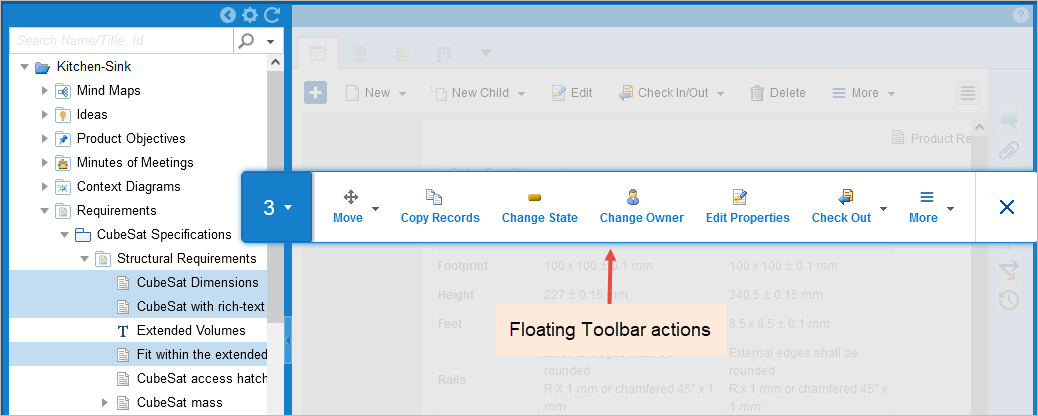
Updating and Deleting Multiple Artifacts (Bulk Updates)
When you want to make similar updates to multiple artifacts, use the Bulk Update action. Selecting multiple artifacts in any interface, such as Repository Explorer, document-like interfaces, tree, and list editors, opens a floating toolbar. The floating toolbar contains a list of actions such as change state, change owner or any common field, delete, reuse, move, etc. Note that some actions may vary pertaining to the interface where you are performing bulk editing. For more information, see Editing multiple artifacts.
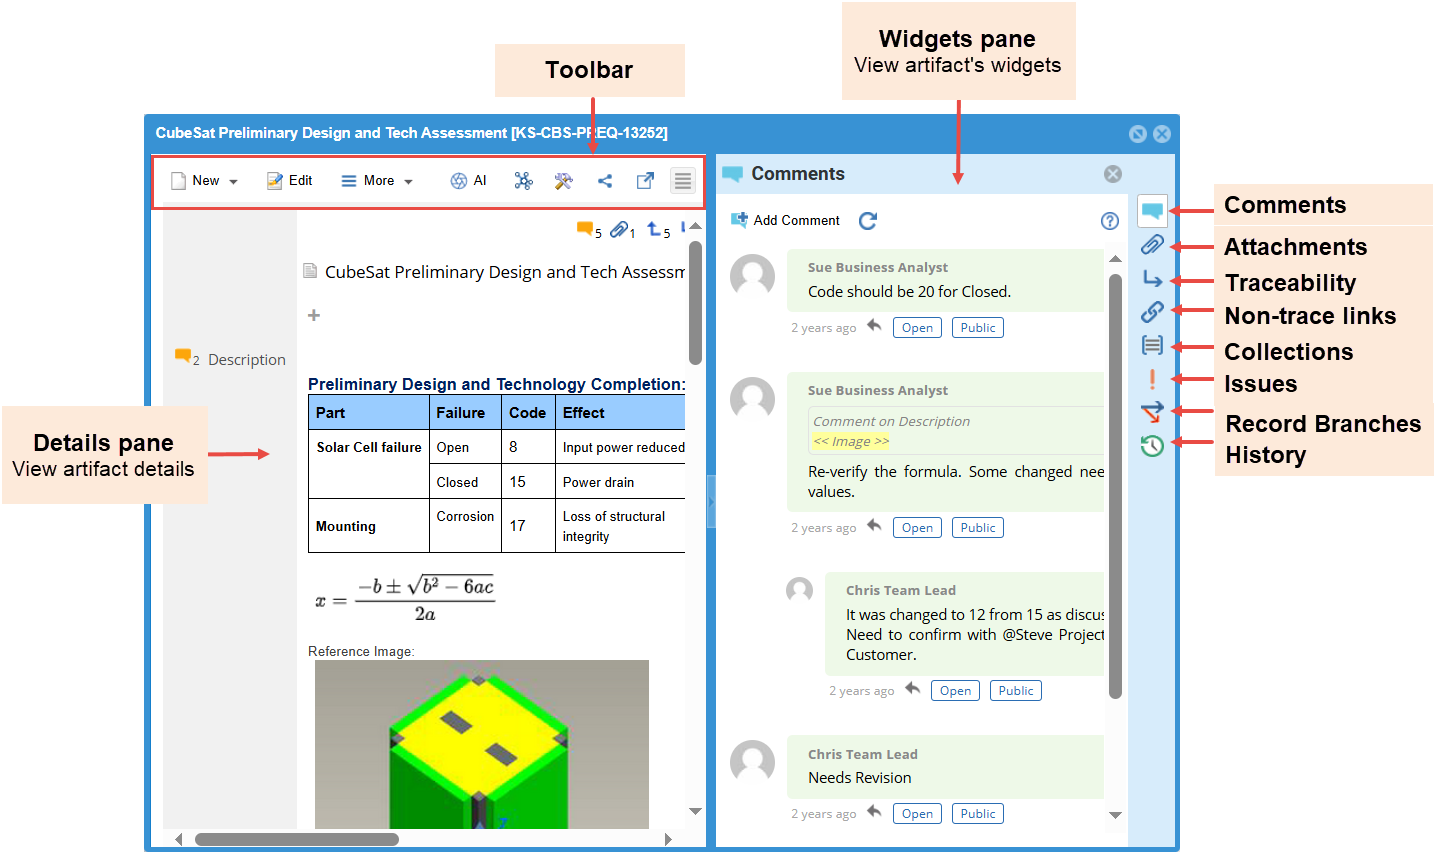
Detail Editor
To view details of an artifact from any interface, double-click or click the artifact’s ID link to open Detail Editor. Detail Editor allows you to edit your artifact details, view artifacts comments, attachments, traceability, etc., and perform actions such as check-in and out, delete, etc. For more information, see Using Detail Editor.
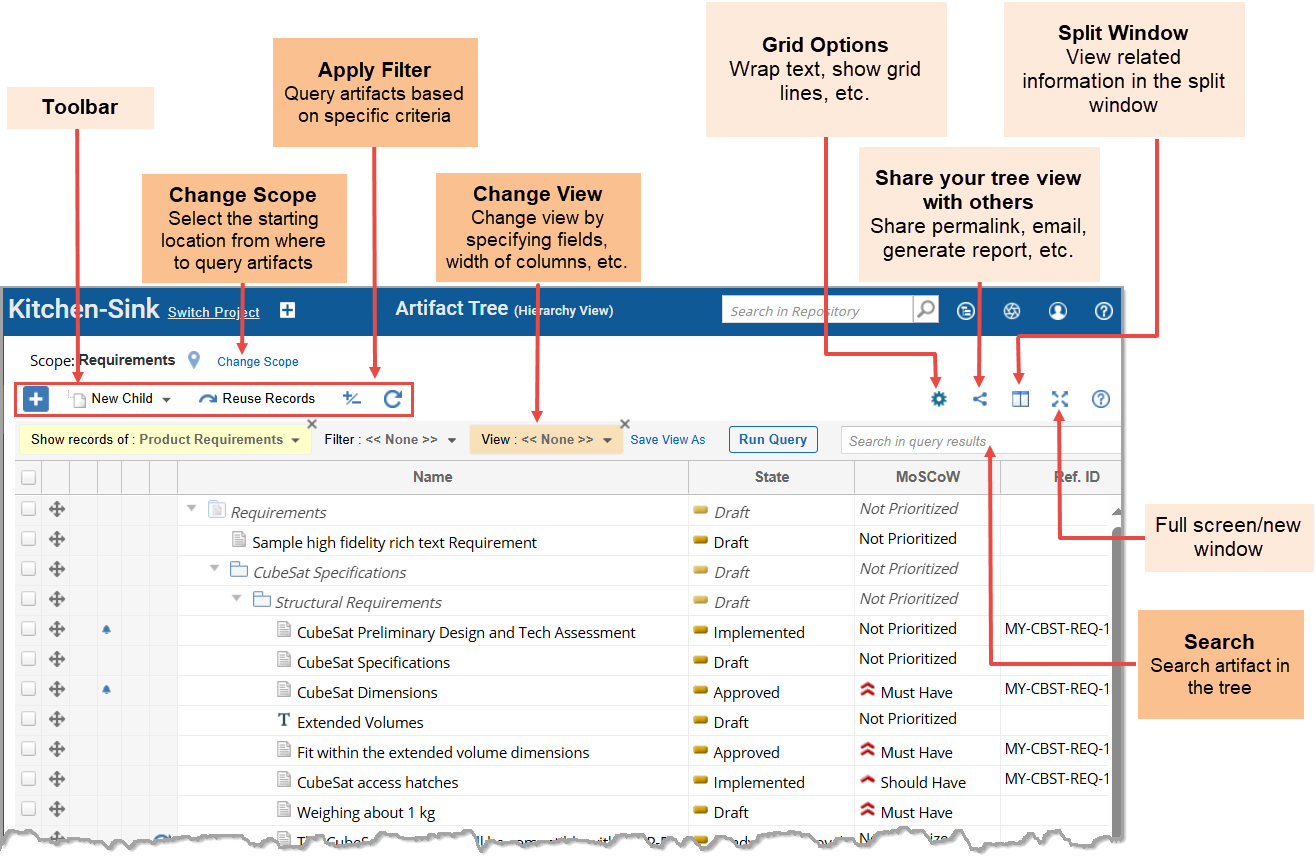
Tree View
To view a list of repository artifacts along with the chosen fields/attributes in a spreadsheet-like view, use Artifact Tree. Tree Editor displays artifacts in a hierarchical structure. You can author artifacts in this view. You can apply filters and change views by specifying fields. For more information, see Artifact Tree.
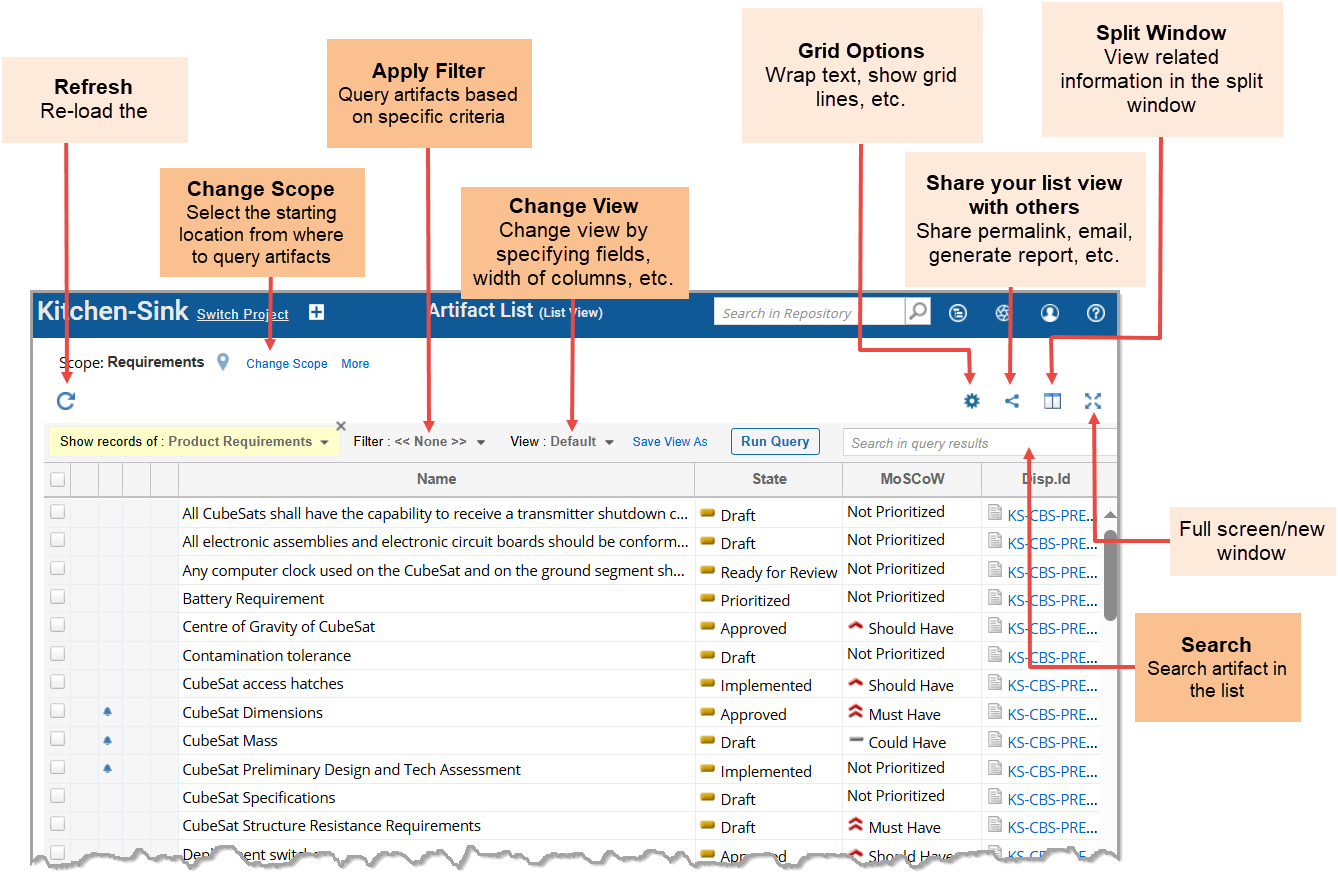
List View
To view a list of repository artifacts along with the chosen fields/attributes in a spreadsheet-like view, use List View. List View displays artifacts in a flat structure. You can sort artifacts by fields. You can apply filters and change views by specifying fields. You can also author artifacts except adding new artifacts in this view. For more information, see Artifact List.
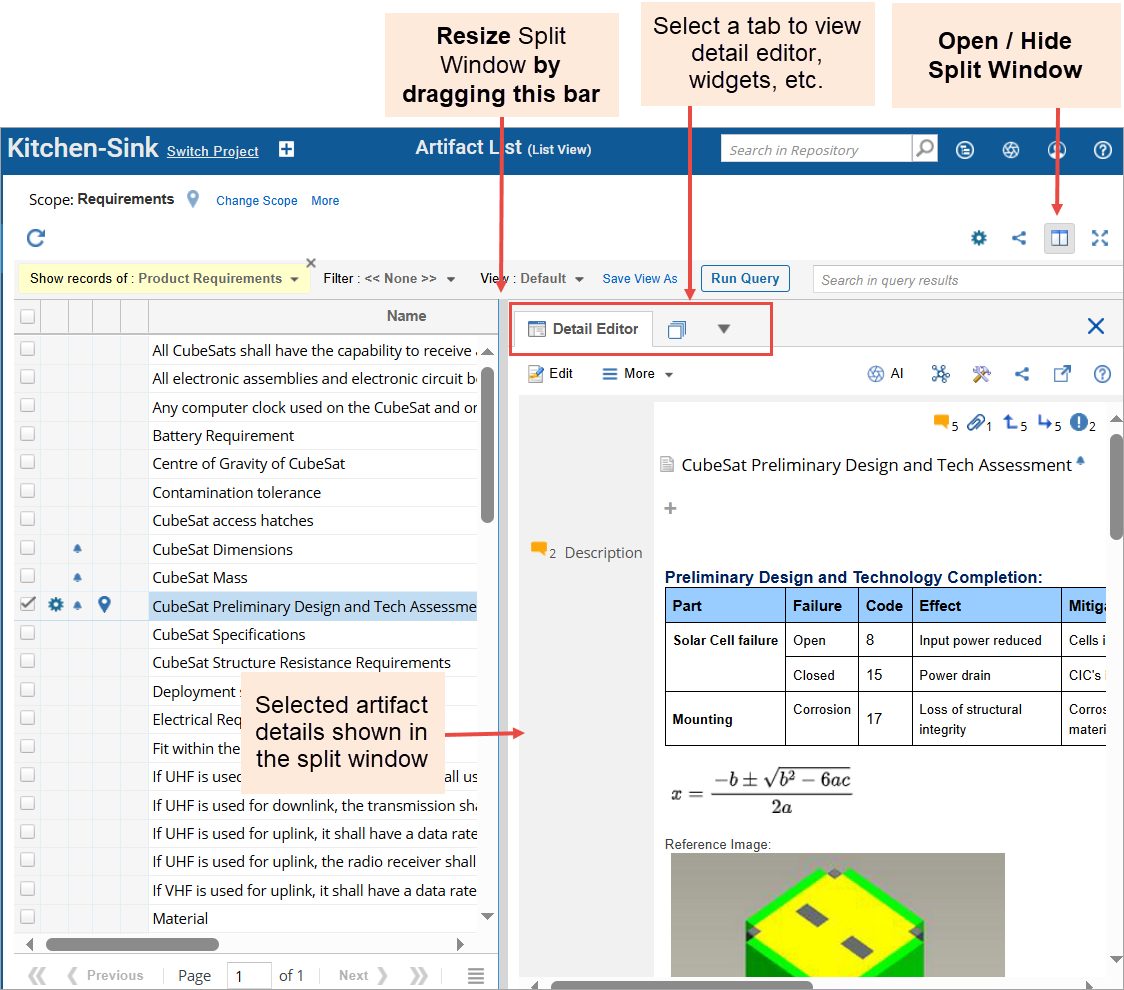
Using Splitter Windows
Splitter Windows or Split Windows split a window into two panes to display details of the selected item (artifact, package, etc.). Many interfaces, such as Repository Explorer, document-like interfaces, tree editor, etc. have Split Window to display artifact details. Here are some characteristics of a Split Window:
- You can author artifacts by viewing details side-by-side.
- You can select an editor type to view details such as Detail Editor, Record Widgets, Traceability Diagram, etc.
- You can adjust the size of this split window by dragging the splitter bar.
- You can choose the orientation to display the split window: Horizontal or Vertical Orientation.
Filtering Artifacts
You can apply filters to help narrow down your results in tree and list interfaces. You can save a filter condition and use it later. For more information, see How to Create and Apply Data Filters in Tree and List Editors.

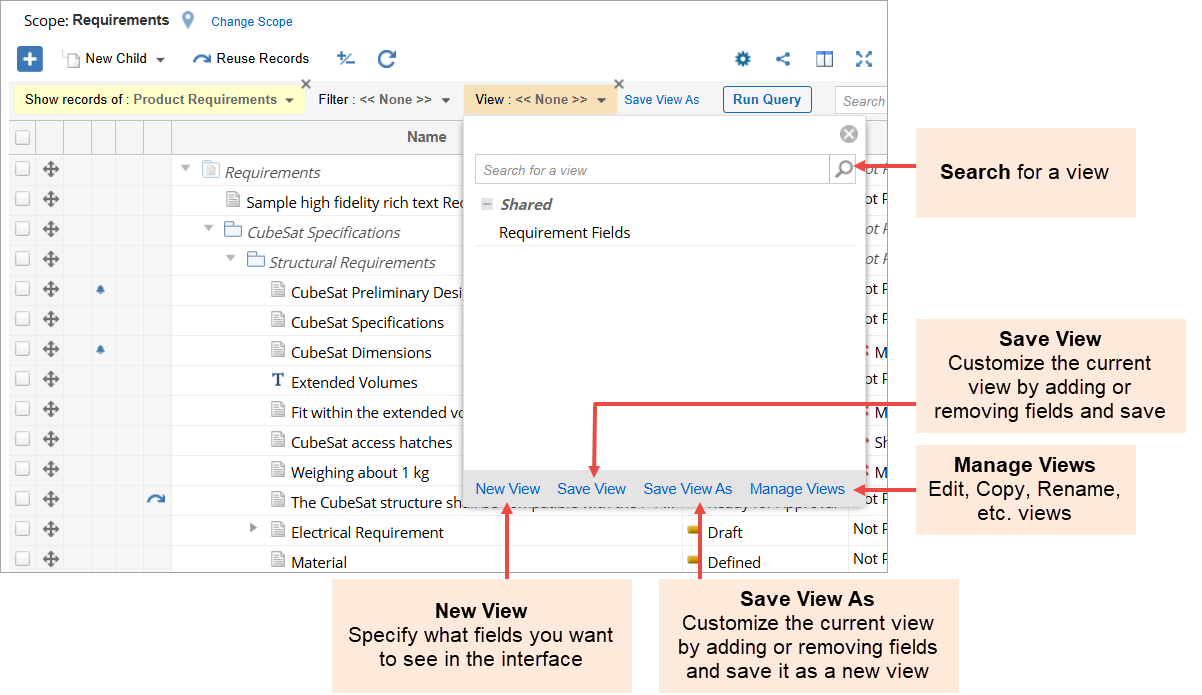
Adding Artifact Attributes to View
You can select the fields of artifact to view in list interfaces and then save your custom view as a Saved View for reuse.
Note: You can also change the fields visible in the detail editor using the configuration. However, an administrator can only do this, and the change to display/form is applicable to all users. For more information, see Working with Views.
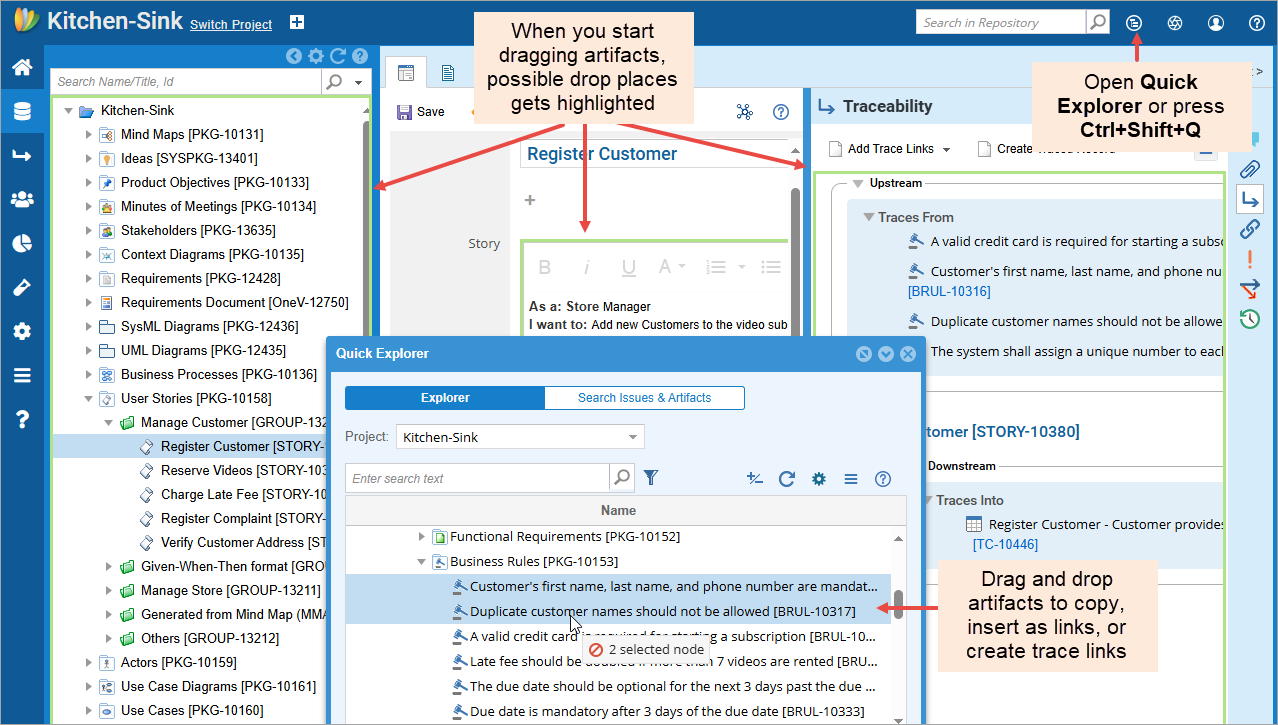
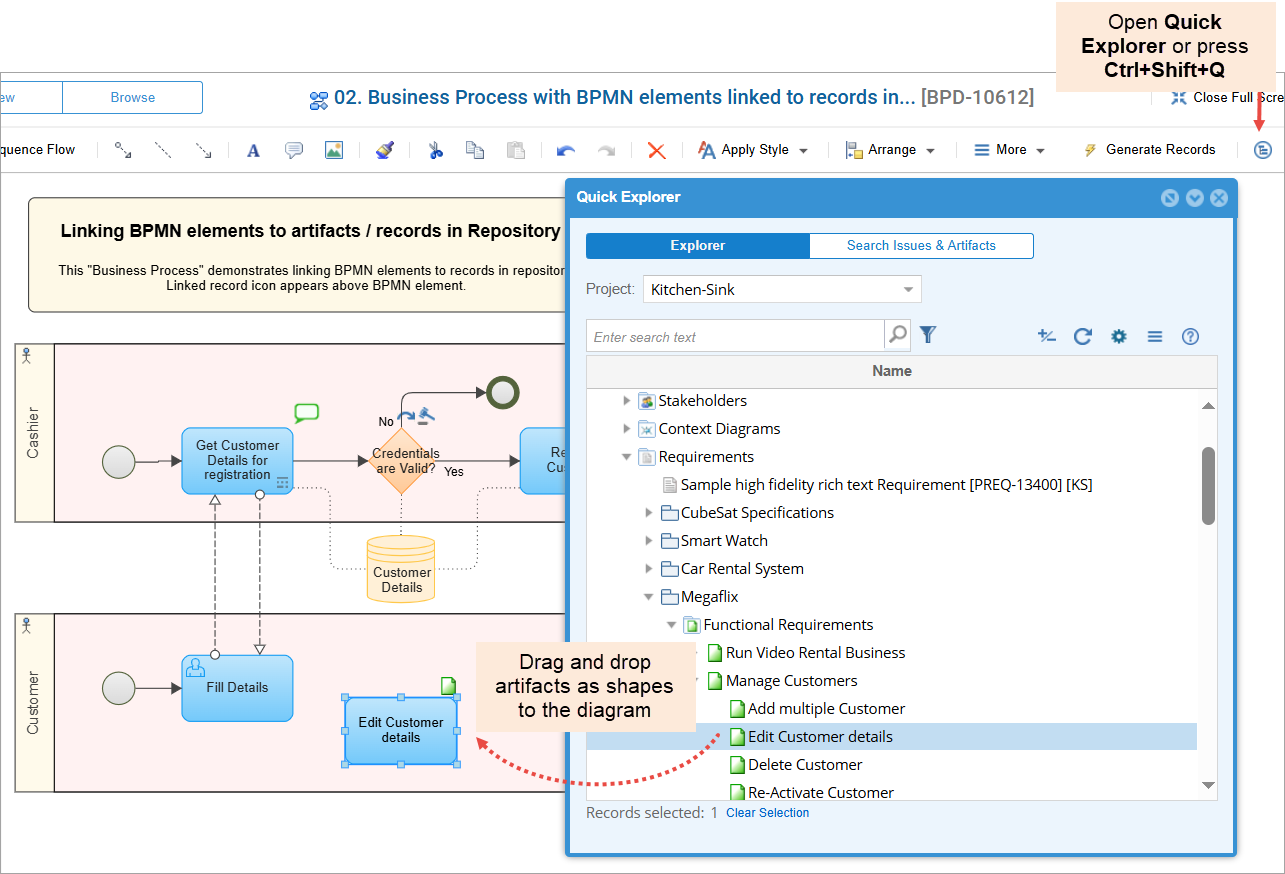
Dragging and Dropping Artifacts to Create Links
You can drag and drop repository artifacts into various interfaces in TopTeam to quickly create trace links, create diagrams and models, link diagram shapes to artifacts, etc. using Quick Explorer. For more information, see Quick Explorer.
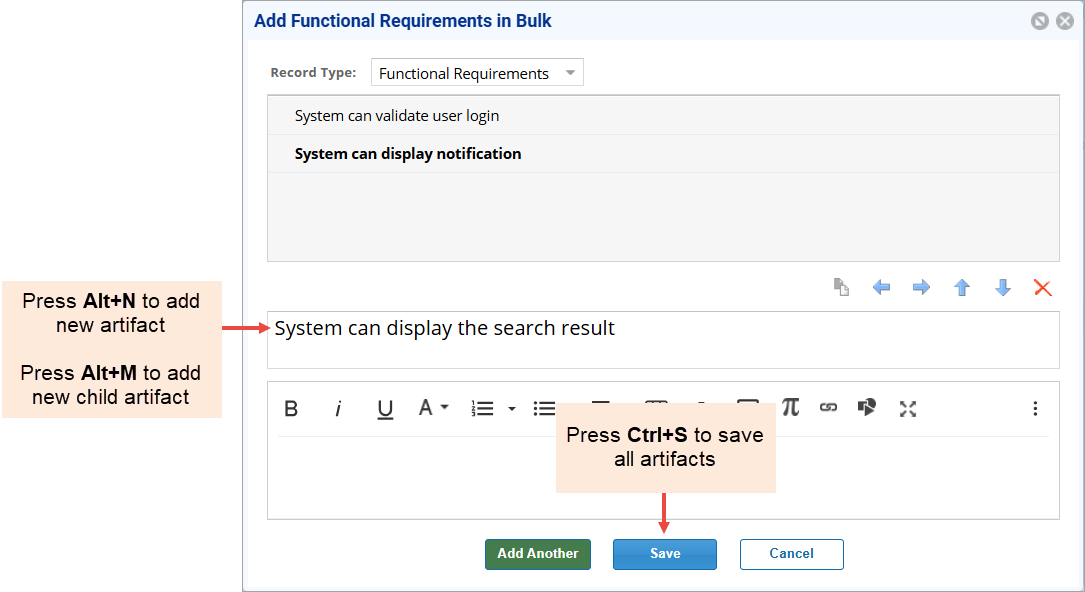
Rapidly Creating Artifacts (Bulk Add)
You can add multiple artifacts in one go with the help of the Add in Bulk feature. Simply name your artifacts, add a description and move on to add the next artifact, and so on. Lastly, save to add all at once. The process becomes faster with the use of keyboard shortcuts.
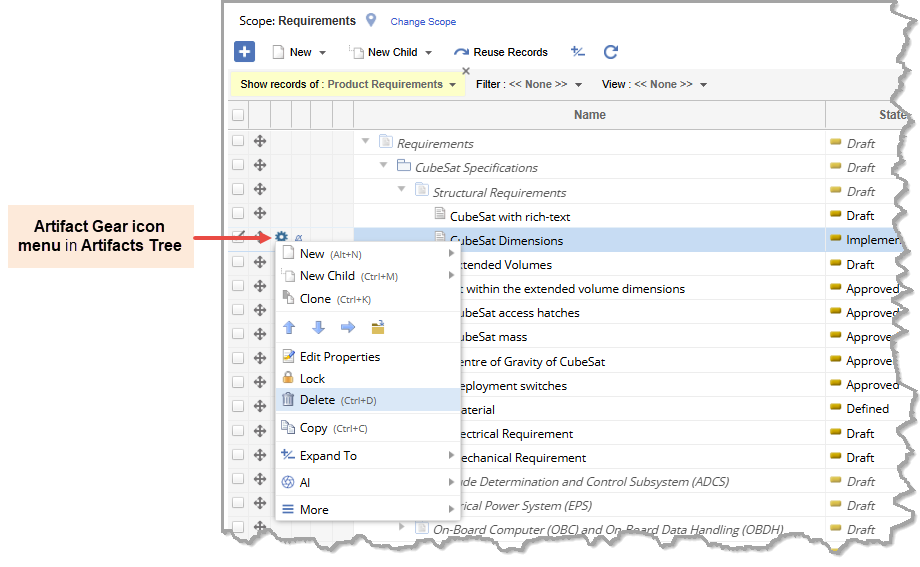
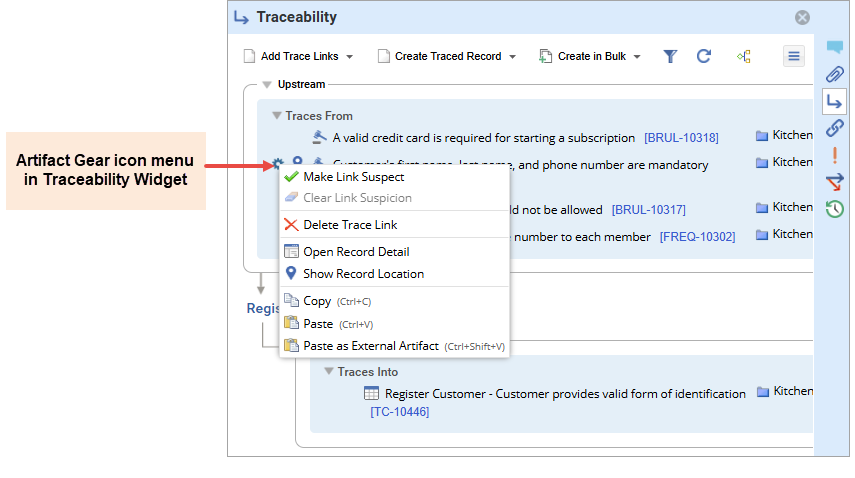
The Gear icon menu
You can hover the mouse over artifacts in many interfaces, such as Tree editors, Traceability interfaces, etc., to display the gear icon. The gear icon menu provides a similar list of actions as right-click menu (as discussed in the previous topic). Hence, it is an alternative to invoking the actions you may want to perform for a particular artifact. The menu actions may vary pertaining to the selected item and interface.
Contextual Comments
You can add contextual comments by selecting text in various interfaces such as Repository Explorer, Detail Editor, document-like interfaces such as OneView, Document View, Reading View, Diagram Shapes and Regions, etc. It helps you to view the text on which comment was made. You can also view a shape or region of a diagram on which a comment was made.
- To view the text on which contextual comment was made, click the A icon.
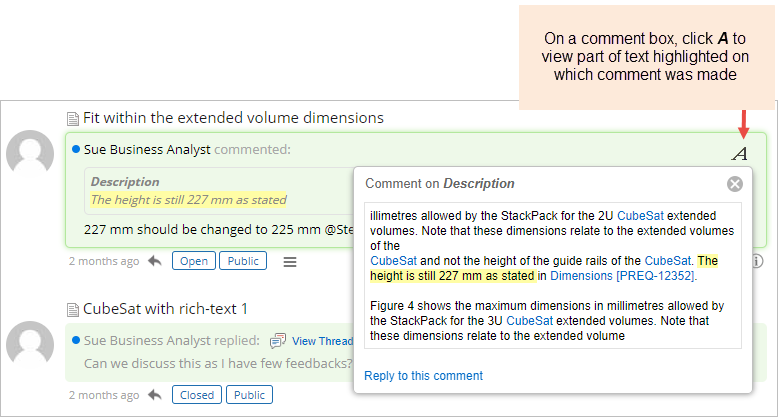
- To view graphic shape or region on which contextual comment was made, click the image icon.

Permalink
Whether you are viewing a single artifact or multiple artifacts, whether you are viewing artifacts in any interface such as tree/list editors, comparing baselines viewer, comparing branches viewer, traceability coverage matrix, etc., a permalink is created that you can share with your stakeholders. Permalink is most useful when viewing artifacts in tree or list editors. As you can filter artifacts, change views, change scope, etc., in such interfaces. You can share the query generated after applying any of these criteria using the permalink. Permalink is generated with the following:
-
- With Scope
- Without Scope
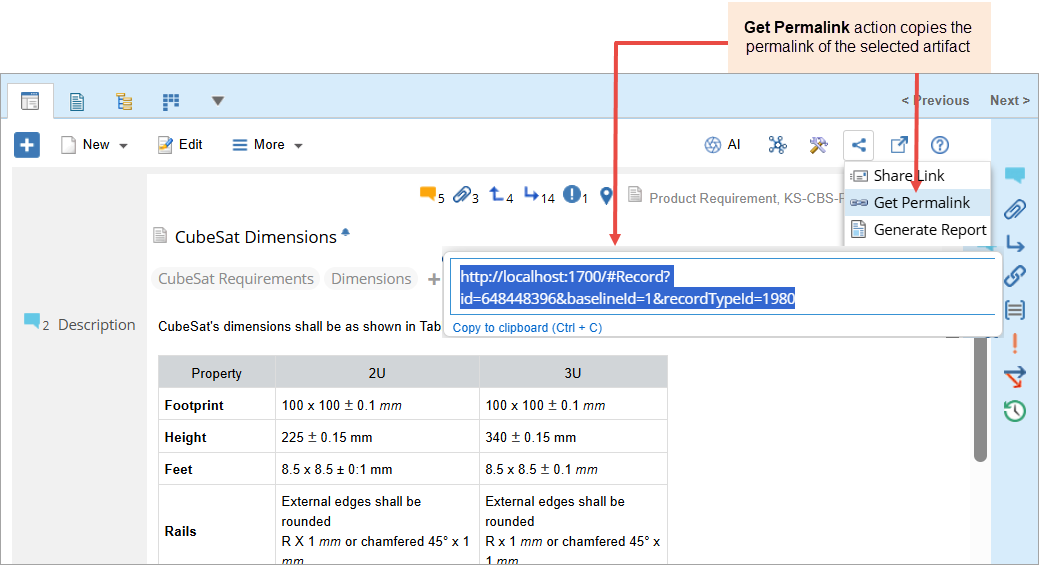
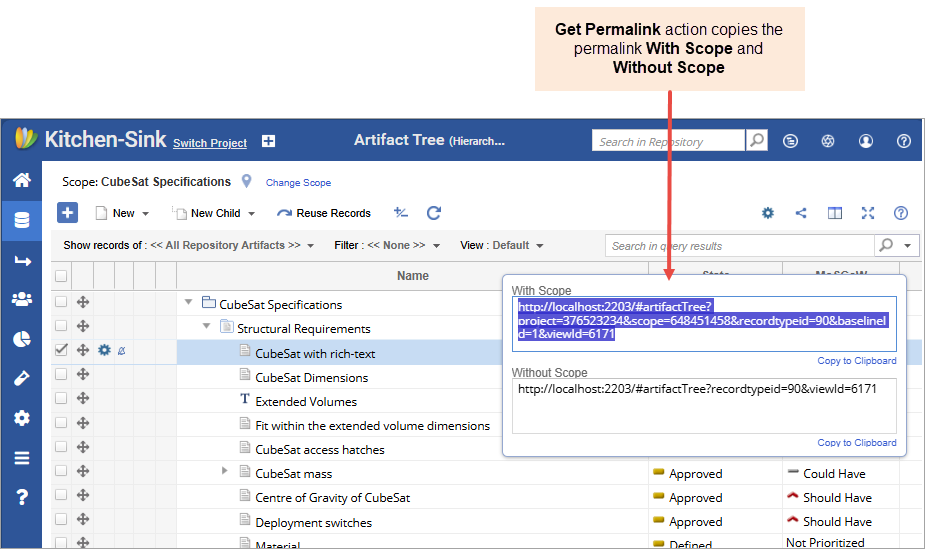
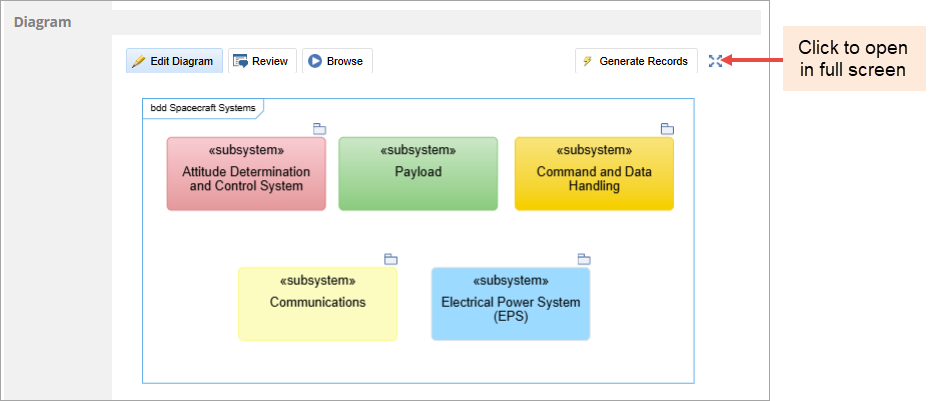
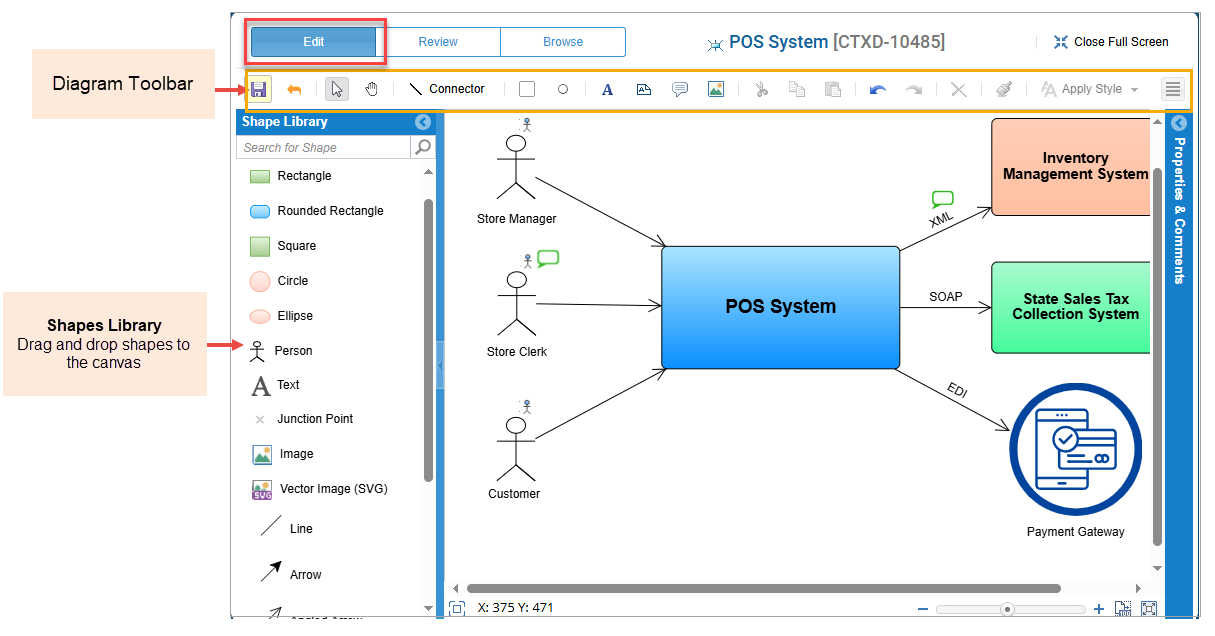
Diagram Modes
Editor Mode: In this mode, you can create your diagram with the help of different shapes and connectors using the drag-and-drop technique. For more information, see Building a Diagram.
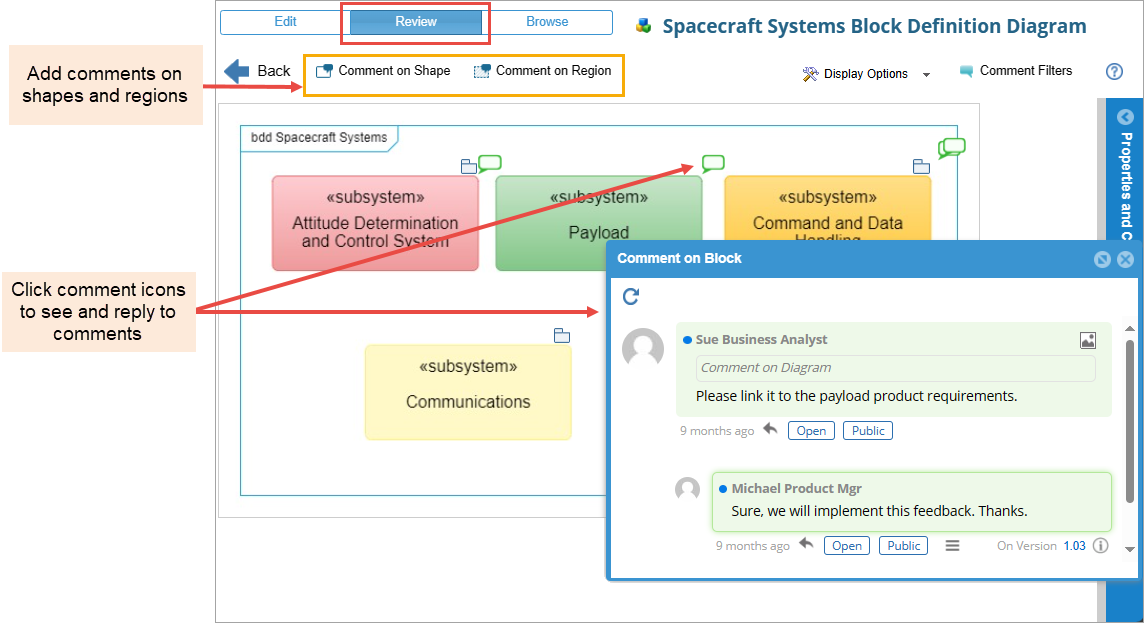
Review Mode: In this mode, reviewers can review the diagram by commenting on a shape, region, shape properties, replying to comments, etc. For more information, see Reviewing a Diagram.
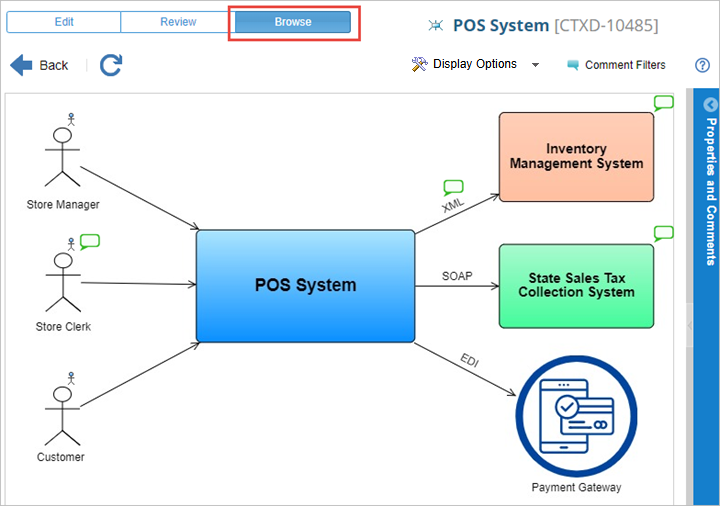
Browse Mode: In this mode, you can browse through a diagram to drill down into a linked artifact to view artifact details. For more information, see Browsing through a Diagram.
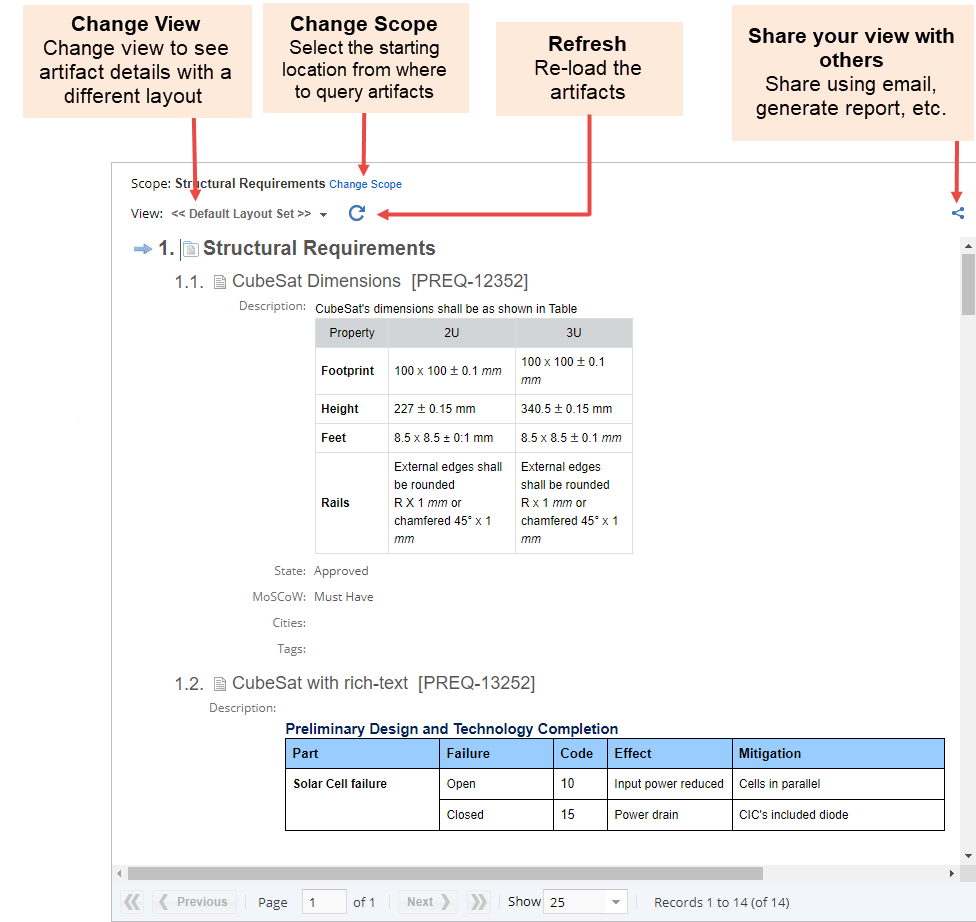
Focused View
When you want to read the contents of a package or a project without distractions in an uncluttered, simple interface, use the Focused View. Note that this view is only for read-only purposes.
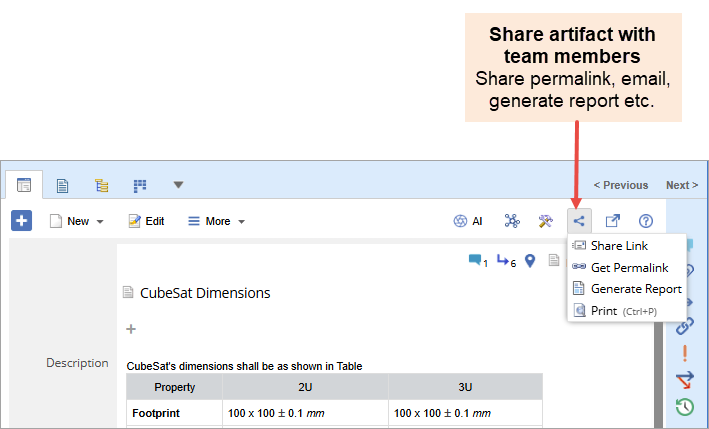
Collaboration
While working on your project, it’s very important to keep your team up to date. You may want to share the progress of the artifacts with your team members or stakeholders. This is where collaboration comes in.
Full Screen
When working on diagrams, rich text fields, tree editors, document-like editors, etc., you can open them in full screen mode for an expanded view.