Overview
Locating an artifact in the repository having a large number of data becomes an easy task with the Search feature.
This article provides a comprehensive guide to utilizing TopTeam’s search capabilities, covering both basic and advanced search functionalities.
Basic Artifact Search
Artifacts can be searched in the selected project:
- If you know the Name of artifact.
- If you know the ID, or Ref ID of artifact.
Advanced Search feature
If you are looking to expand your search parameters across all fields and projects, the Advanced Full Text Search feature offers an enhanced search capability.
Basic Artifact Search
To locate artifacts, utilize two primary methods:
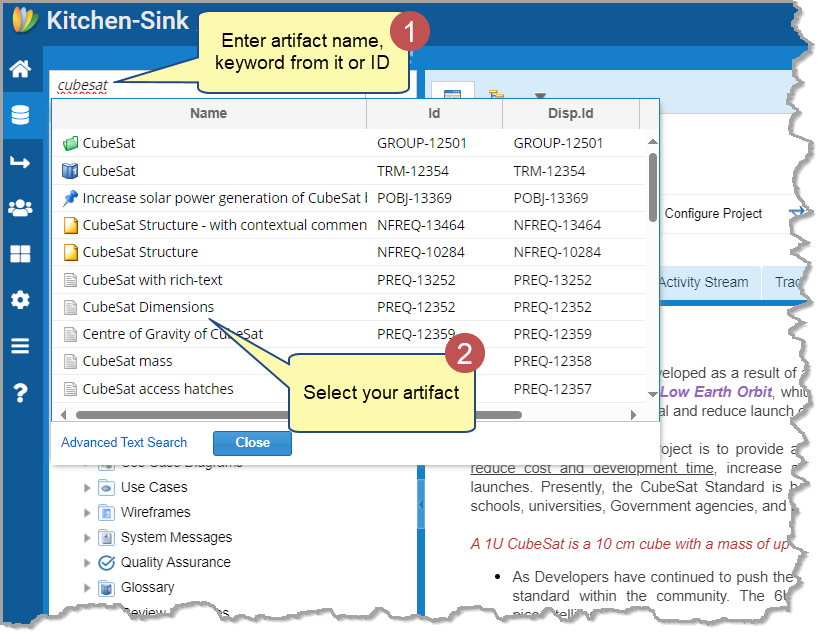
- Search by Name: If the artifact’s name is known, simply type it into the search box located at the top of the repository explorer or the search box in the application header.
- Search by Identifier: Alternatively, you can search by the artifact’s ID, or Ref ID.
Search in Explorer
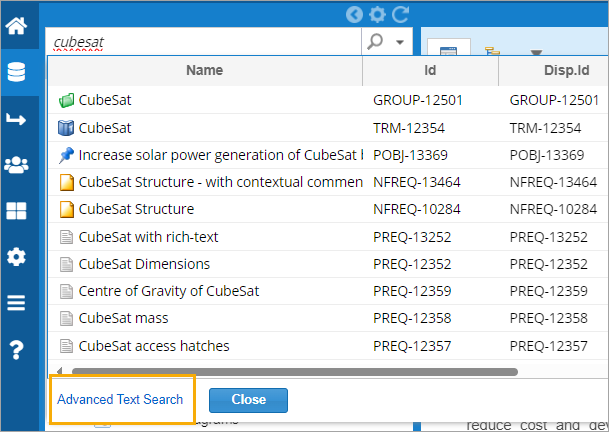
Upon entering the search query, a list of artifacts matching the search text or ID will be displayed. Select the desired artifact.
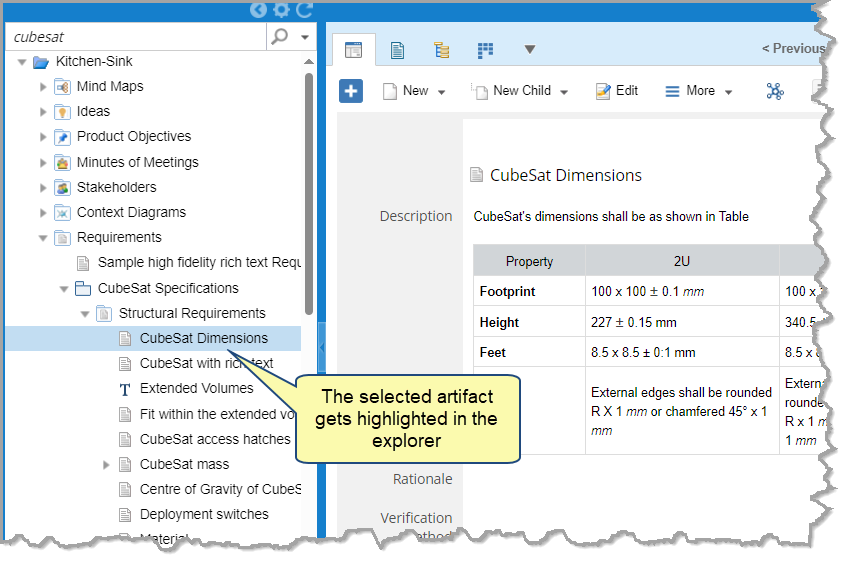
The selected artifact gets highlighted in the explorer, and its details will be displayed in the split pane.
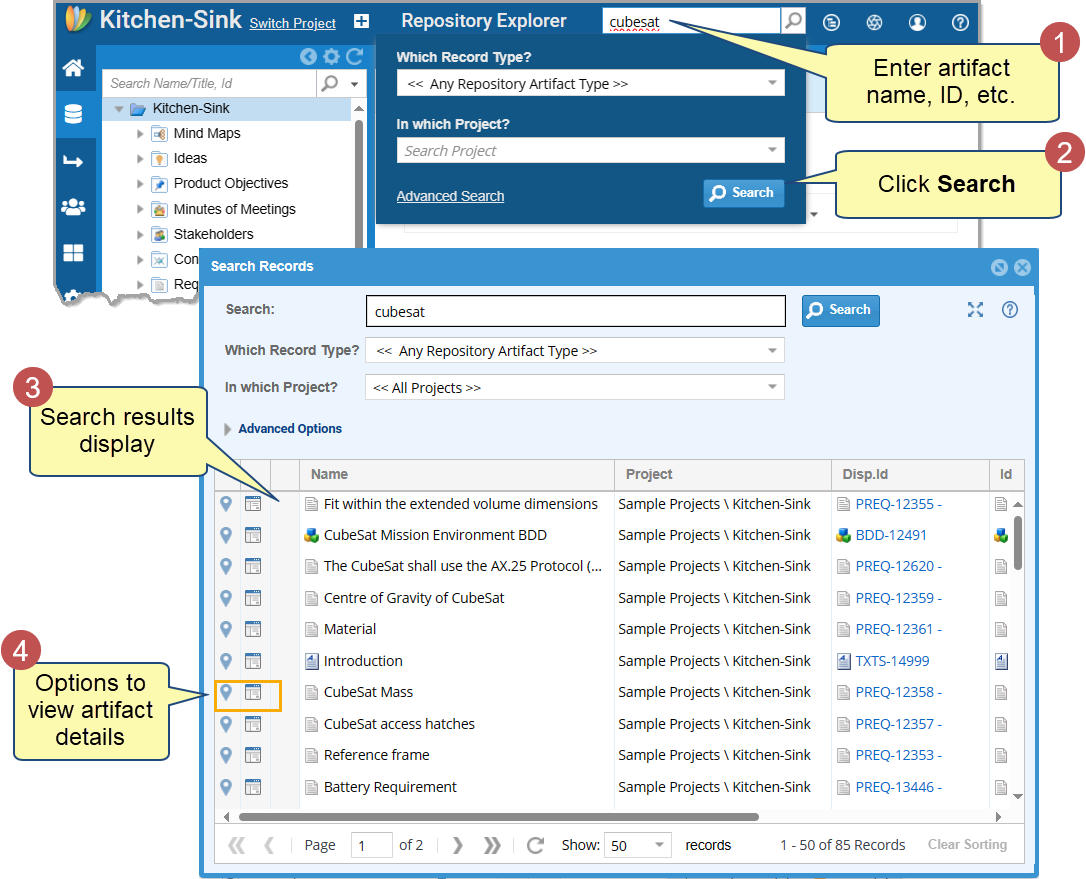
Search Box in Application Header
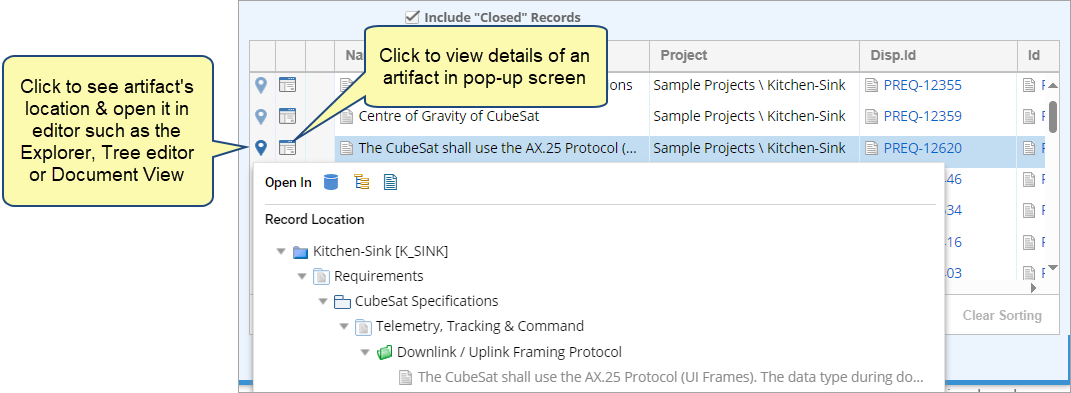
Upon entering a search query, results will display in a new pop-up screen. Select the desired artifact and you can open its detail editor or locate it in the desired interface (explorer, tree view, etc.).
Advanced Full-Text Search
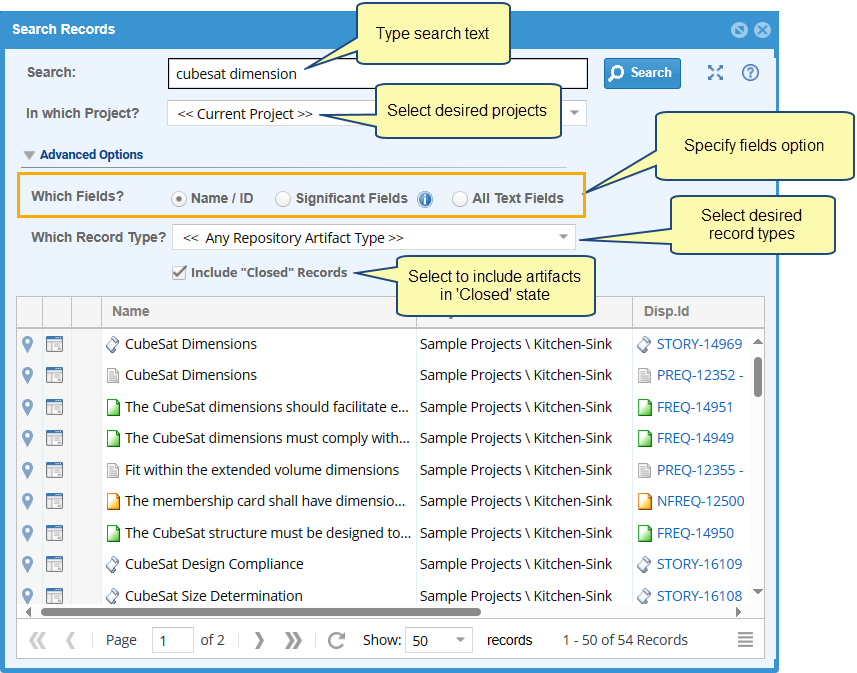
For an advanced search, you can utilize advanced options provided by the Advanced Full Text Search feature. These options help you refine your search and retrieve the most relevant results.
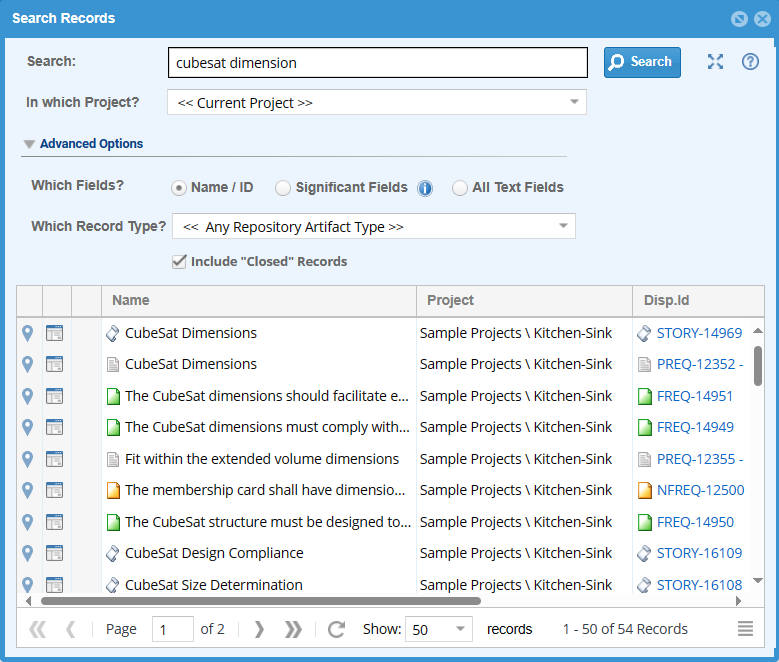
Advanced Search Options
- Specify in which fields you want to search.
- Name/ID – returns artifacts containing the search text in their name or ID.
- Significant Fields – returns artifacts containing the search text in predefined fields specific to each record type, such as ‘Description’ for all record types, ‘Story’ and ‘Acceptance Criteria’ for User Story record type, and ‘Scenarios’ for Use Case record type.
- All Text Fields – returns artifacts containing the search text in all text fields.
- Specify in which record types you want to search.
Access to the Advanced Full Text Search feature will be discussed in detail later in this article, see here.
Understanding Search Operators
The Advanced Full Text Search feature utilizes various operators to construct search conditions:
| Search Text Example | Search Results |
| Link | Returns artifacts containing the word “link” and its forms like “Links”, “Linked”, “Linking”, etc. |
| Allow customer to use | Returns artifacts containing any of the words “Allow”, “customer”, or “use” or any form of these words. By default, artifacts will be shown in the order of relevance. Artifacts containing all words will be shown first, followed by other artifacts that match the maximum number of words. |
| “Link” | Returns artifacts containing the word “Link”. It will ignore variations like “Links” or “Linking”. This is a case-insensitive search. |
| “CubeSat Dimension” | Returns artifacts containing the exact text “CubeSat Dimension”, in the same order. |
| “CubeSat” AND “Dimension” | Returns artifacts containing both the words “CubeSat” and “Dimension” anywhere in the text and in any order. |
| “CubeSat OR Dimension” | Returns artifacts containing either the word “CubeSat” or “Dimension” anywhere in the text and in any order. |
| “Allow” AND NOT “User” | Returns artifacts containing the word “Allow” but NOT “User”. |
| “Reserv*” | Returns artifacts containing a word starting with “Reserv”. Such as “Reserve”, “Reserved”, “Reservation”, etc. |
Updating Text Indexes
After enabling Advanced Full Text Search (go to the second tab), you need to update the text indexes to reflect any changes. Text indexes can be updated via the ‘Update Text Indexes’ option, accessible through various paths within TopTeam:
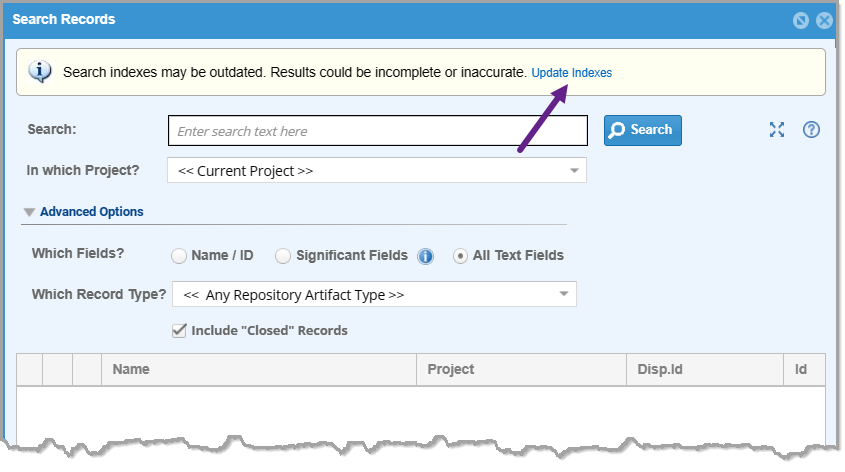
1. Use the option provided on the Search Records screen.
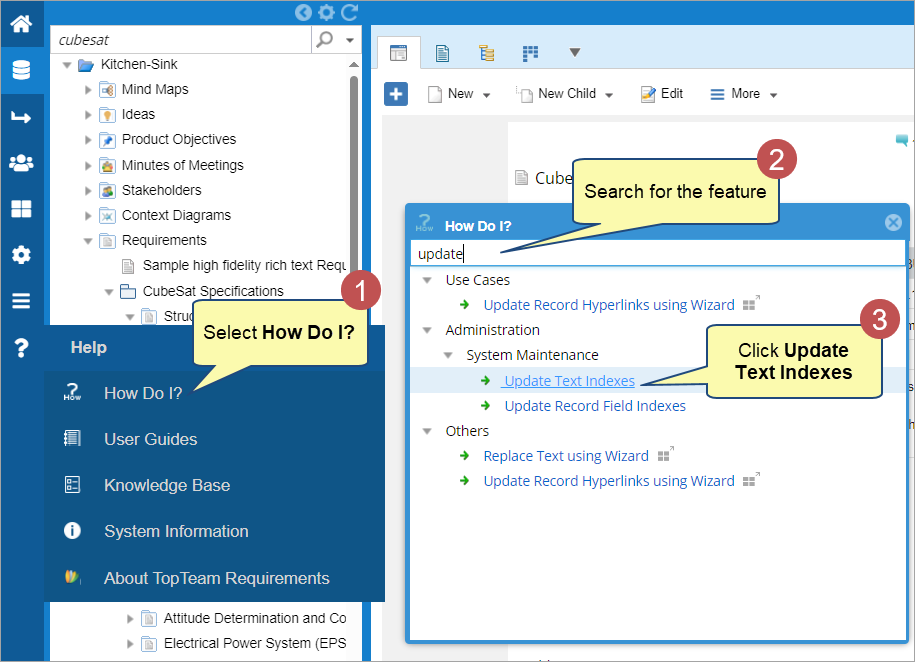
2. You can also find the ‘Update Text Indexes’ option by searching in How Do I?
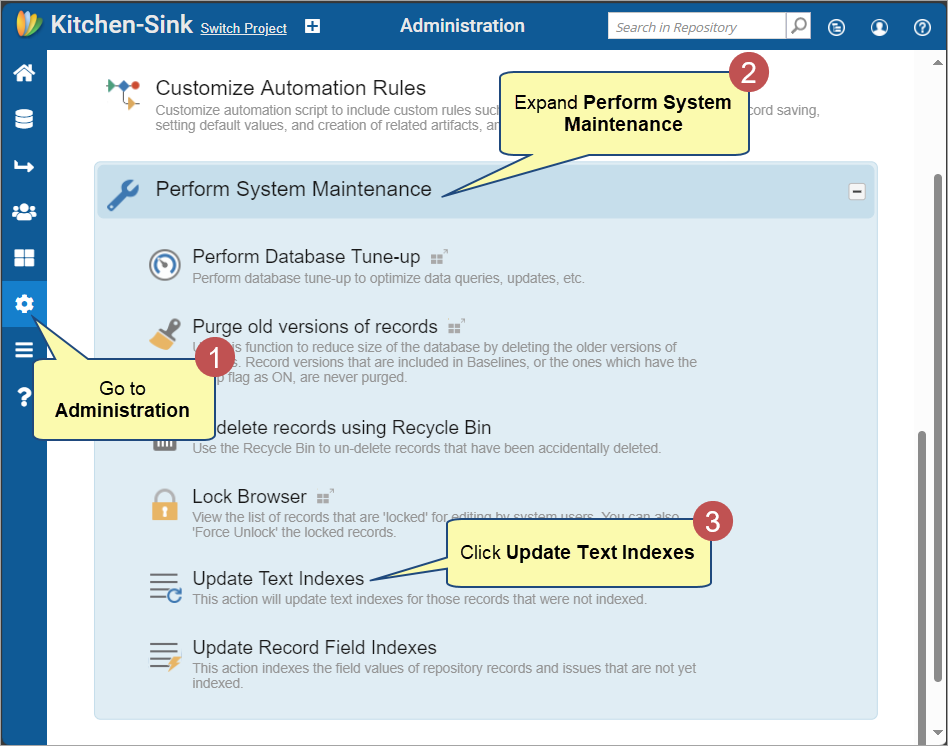
3. Go to Administration 🡪 System Administration 🡪 Perform System Maintenance 🡪 Update Text Indexes.
Accessing Advanced Full Text Search Feature
There are two methods to access the Advanced Full Text Search feature :
Method 1. From Application Header
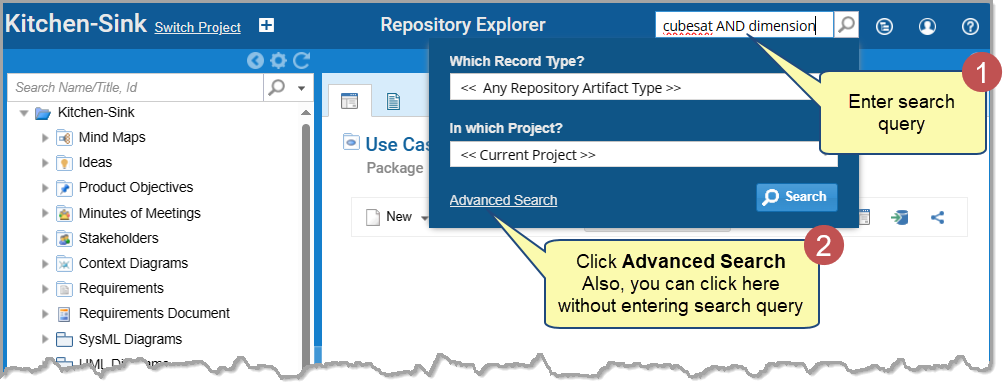
Enter your search query in the search box located in the application header.
Method 2. From the Explorer
Click the icon adjacent to the search icon and select Advanced Text Search.
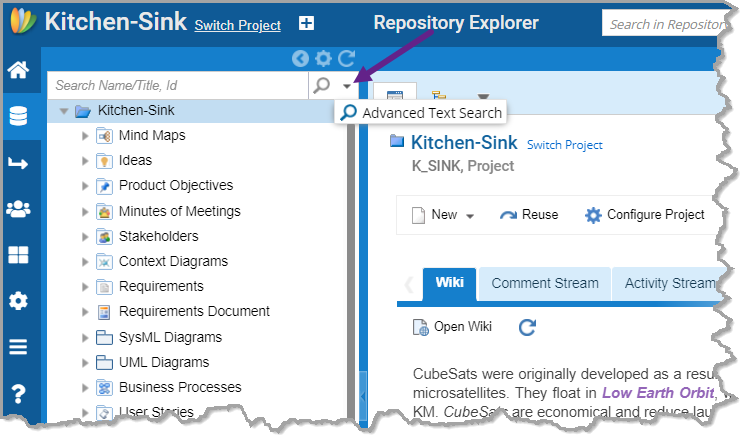
Alternatively, click the link Advanced Text Search in search results screen.
The Search Records window opens.
Stoplist and Search Exclusions
Certain words are excluded from searches and added to the Stoplist. These words include common terms like articles and conjunctions. It’s essential to avoid adding search operators like AND, OR, and NOT to the Stoplist.
During the installation of TopTeam Database Schema, you can add or remove words from the list.
| A, ABOUT, AFTER, ALSO, AM, AN, ANOTHER, ARE, AS, AT, BE, BECAUSE, BEEN, BEFORE, BEING, BETWEEN, BOTH, BUT, BY, CAME, CAN, COME, COULD, DID, DO, DOES, EACH, GET, GOT, HAD, HAS, HAVE, HE, HER, HERE, HIM, HIMSELF, HIS, HOW, I, IF, IS, IT, ITS, JUST, MAKE, MANY, ME, MIGHT, MORE, MOST, MUCH, MUST, MY, NEVER, NO, NOW, OF, ON, ONLY, OTHER, OUR, OUT, OVER, RE, SAID, SEE, SHOULD, SINCE, SO, SOME, STILL, SUCH, TAKE, THAN, THAT, THE, THEIR, THEM, THERE, THESE, THEY, THIS, THOSE, THROUGH, TO, TOO, UNDER, UP, USE, VERY, WANT, WAS, WAY, WE, WELL, WERE, WHAT, WHERE, WHICH, WHILE, WHO, WILL, WITH, WOULD, YOU, YOUR. |
NOTE  | There is no user interface to add or remove words from the stoplist. If you need to modify the stoplist, contact TechnoSolutions Support. By default, TopTeam Database Schema is configured to support the English language in advanced search. If you need support for any other language, contact TechnoSolutions Support. |
Overview
This article describes how to integrate Full-Text Search into TopTeam, enabling you to perform advanced searches that go beyond simple keyword matching. By leveraging this feature, you can efficiently query complex text data, making it easier to find relevant information within your TopTeam artifacts.
Prerequisites
Learn about the Advanced Full Text Search feature in the first tab.
Enabling Advanced Full Text Search
Before utilizing the Advanced Full Text Search feature, users must enable full-text search in the SQL Server instance.
This can be done by toggling the ‘Enable Advanced Full Text Search’ setting in the system-wide settings:
Go to Administration 🡪 Configure System Wide Settings 🡪 Configure Global Settings 🡪 Enable Advanced Full Text Search.
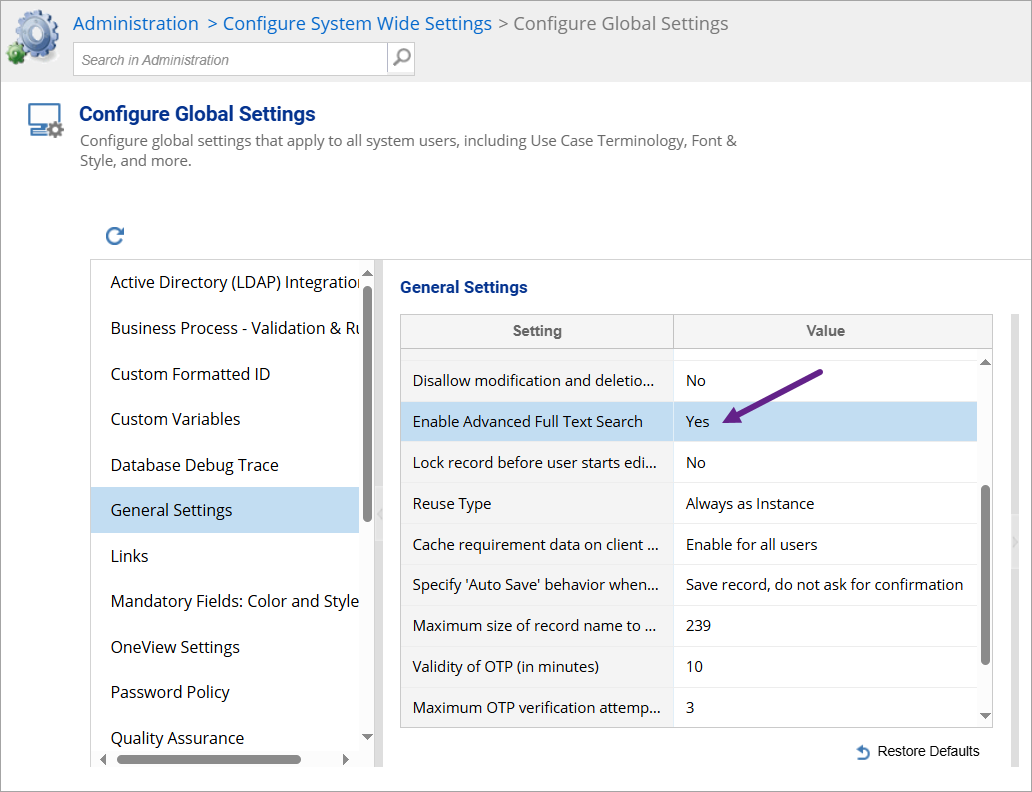
NOTE  | After enabling Advanced Full Text Search, remember to update the text indexes for the search to reflect the new changes. If Advanced Full Text Search is NOT enabled, the system will default to the previous version’s search technique. |
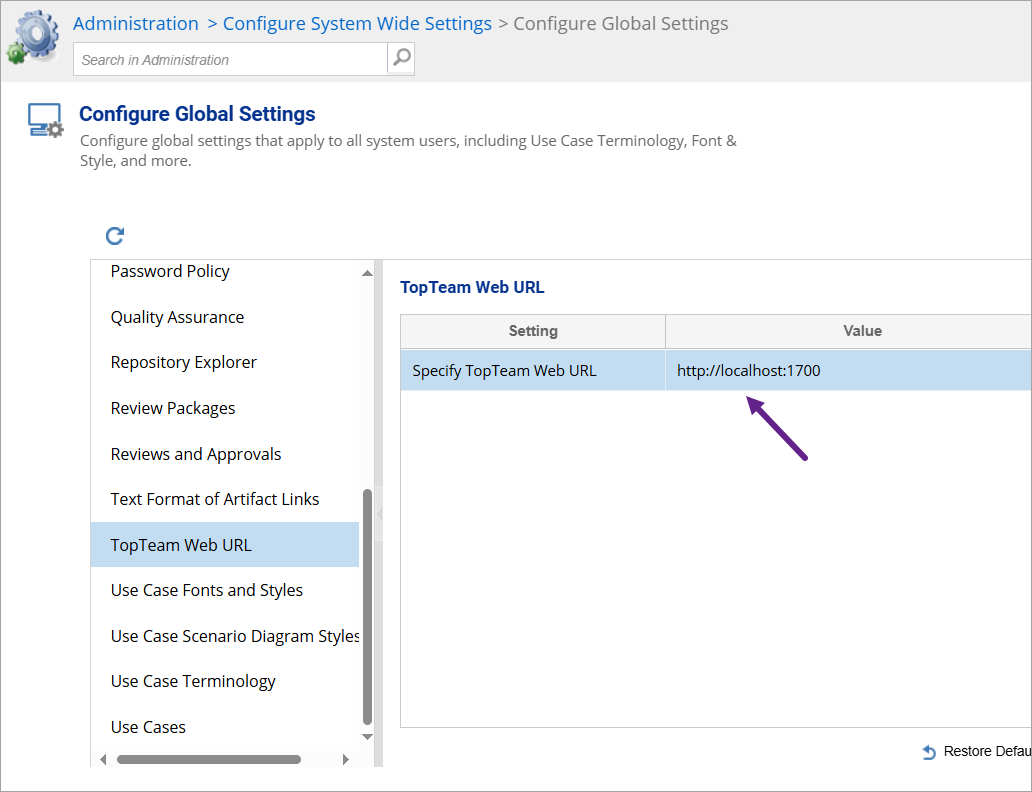
Additionally, you must add the TopTeam Web URL in the global settings for the Advanced Full Text feature to function correctly.
Go to Administration 🡪 Configure System Wide Settings 🡪 Configure Global Settings 🡪 Enter TopTeam Web URL.
Overview
Full-Text Search in SQL Server allows users to perform advanced text searches on large text-based data columns. It enables the creation of full-text indexes and supports powerful search queries. This feature is essential for efficient and sophisticated text search capabilities in TopTeam.
Prerequisites
Learn about the Advanced Full Text Search feature in the first tab.
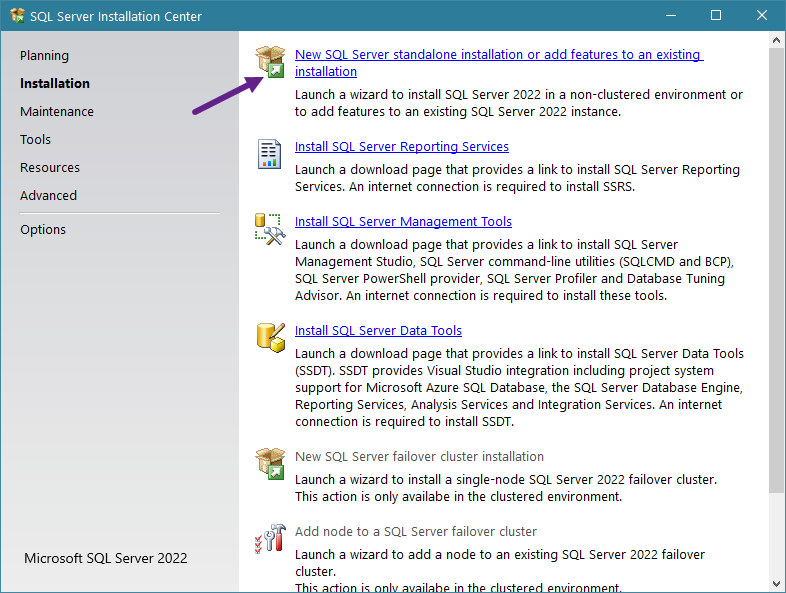
Step 1. Launch the Installation Wizard
Run the SQL Server installation executable to start the wizard for installing new features or adding to an existing setup.
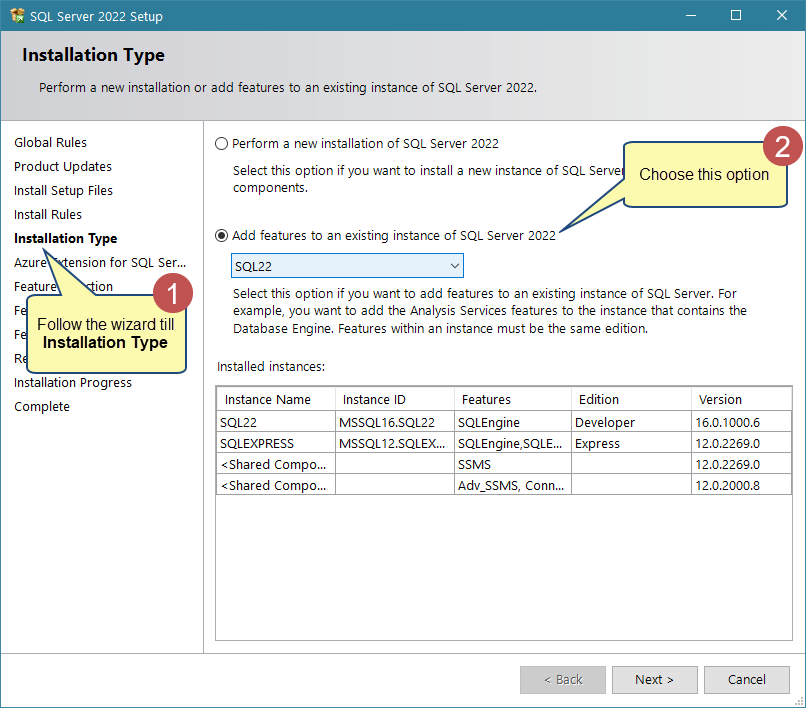
Step 2. Select Installation Type
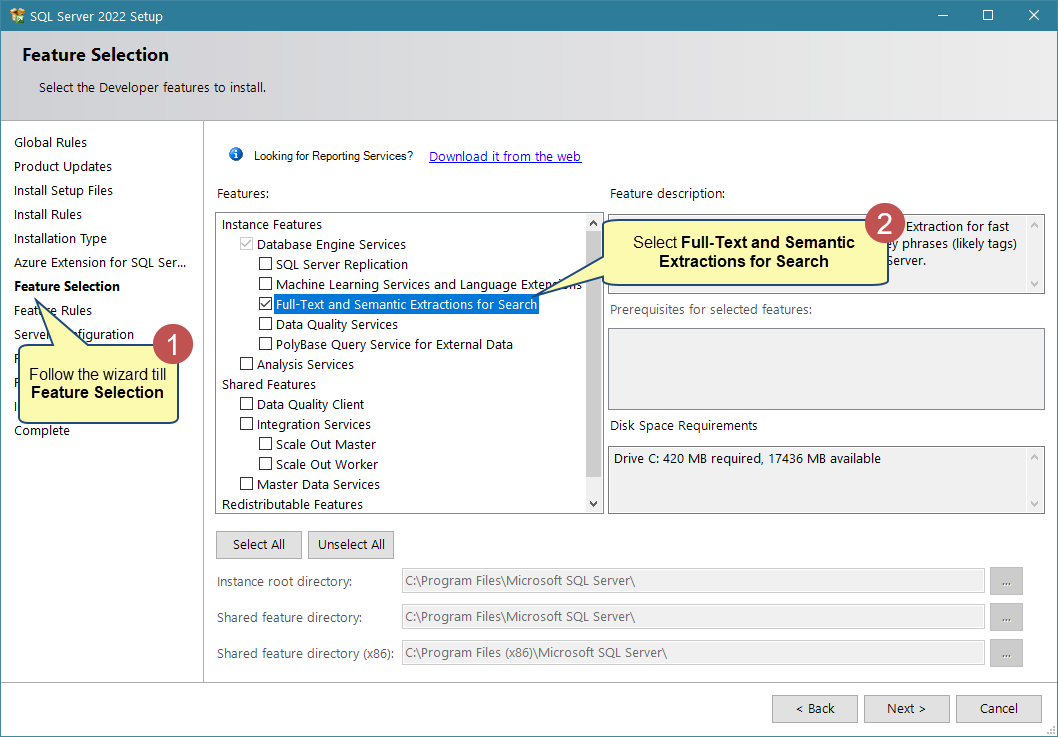
Step 3. Enable Full-Text Search feature
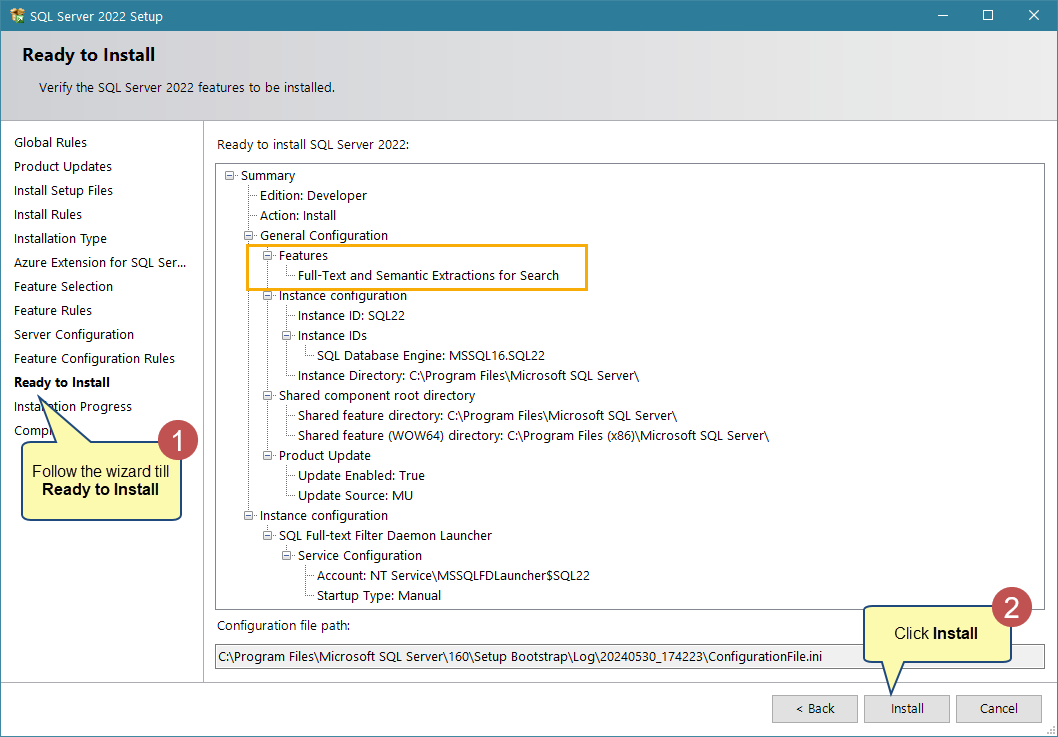
Step 4. Complete the installation
Follow the remaining prompts to install the SQL Server with the Full-Text Search feature.
Related Articles
Revised: June 10th, 2024