Overview
Traditionally, Requirements, User Stories, Use Cases, etc., are documented in Microsoft Word files. These documents often contain different types of artifacts formatted using heading styles, bullets, paragraphs, and tables.
Import Records from Word Document Wizard in TopTeam helps you extract and import these artifacts from Microsoft Word compatible documents (*.docx, *.doc, *.rtf) into TopTeam repository —whether it’s a Project, Package, OneView Document, Folder, or System Package—preserving the structure and hierarchy as defined in the Word document.
You can import artifacts based on:
- Styles
- Heading Styles
- Bulleted Lists
- Paragraph Formatting
- Tables
This wizard enables you to:
- Import records from a Word document into TopTeam Repository.
- Preserve the hierarchy from the original document.
- Import field values such as Ref. ID, Priority, Complexity, etc., along with artifact’s Title/Name and Description.
NOTE: Microsoft Word does not need to be installed to use this wizard.
TopTeam also supports importing artifacts from a variety of formats:
- Excel spreadsheet (*.xls, *.xlsx)
- Copy-paste from Word document (*.doc, *.docx) or any text file
- Business Process from Visio files (*.vsd, *.vsdx)
- ReqIF (Requirement Interchange Format)
- Word document using import parser file (XML) – Expert User
This article describes the procedure to import artifacts from a Word document into a Package using the Import Records from Word Document Wizard.
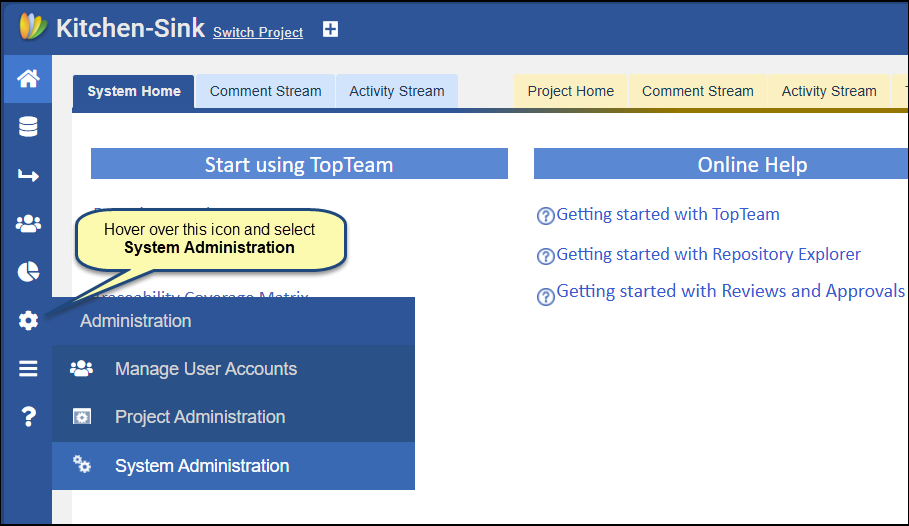
Step 1. Hover over the Administration icon and select System Administration
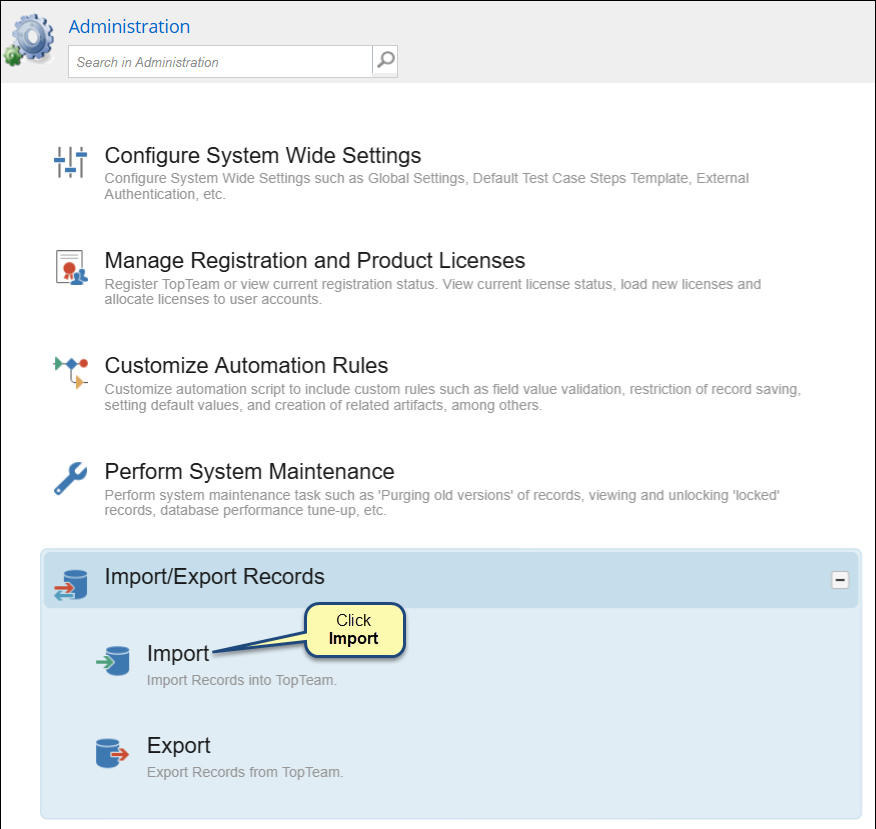
Step 2: Click Import/Export Records
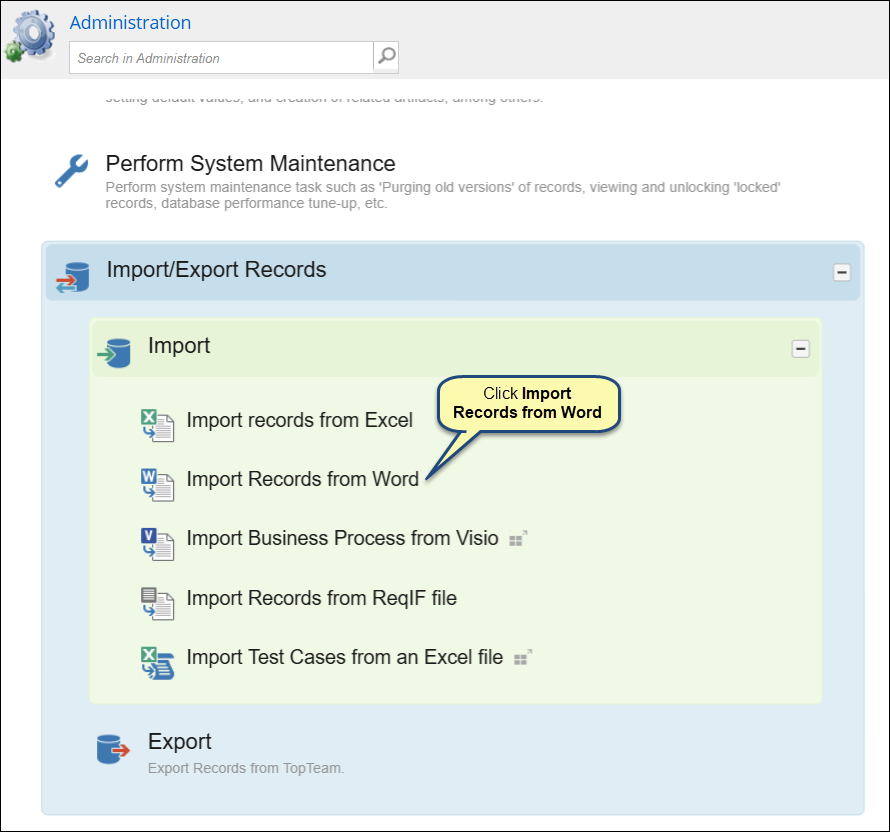
Step 3: Click Import Records from Word
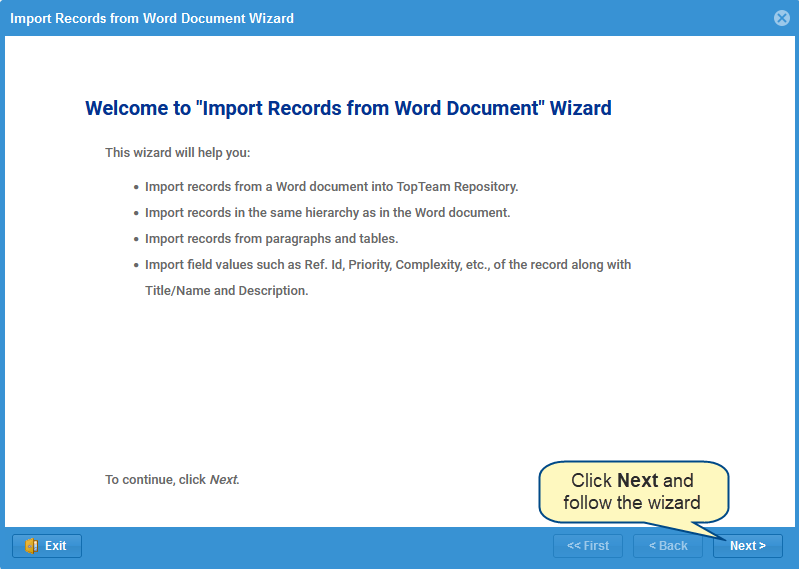
Step 4. The Import Records from Word Document Wizard starts
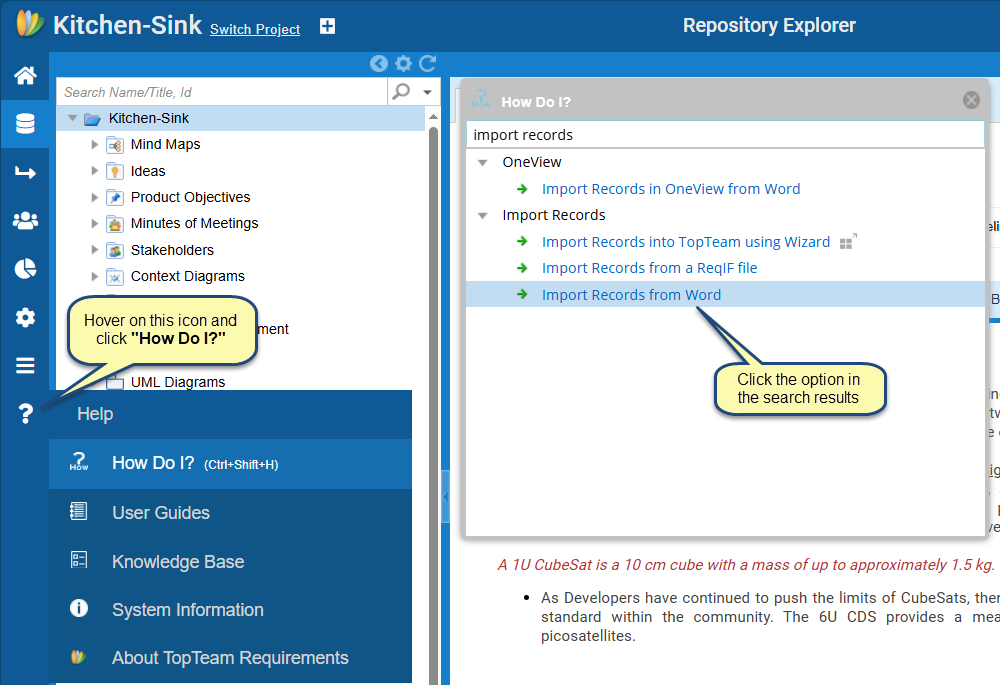
Alternatively, you can open this wizard from How Do I?.
- How do I? – Access
 from the left hand panel of the application and start typing the wizard name. Click the option in the search results.
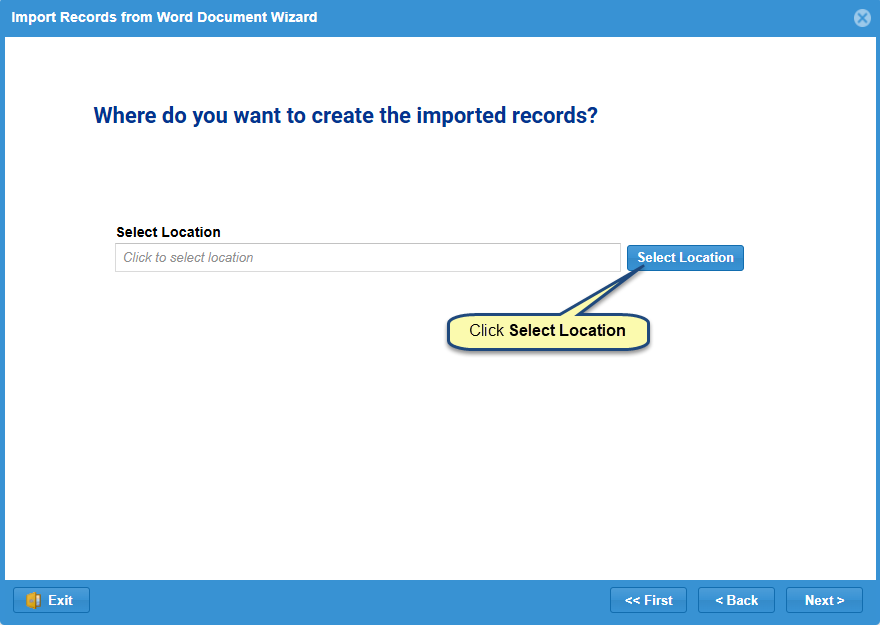
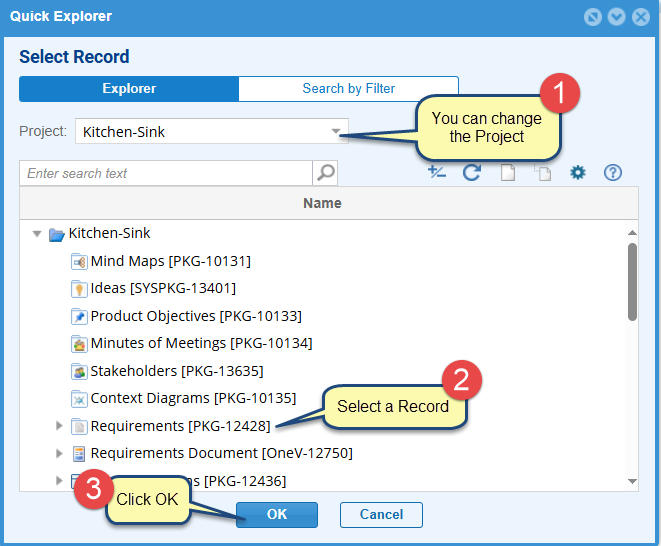
Step 5: Select a location where you want to create the imported artifacts
Select a location where you want to import artifacts i.e., Project, Package, OneView Document, Folder, etc.
Step 6. Select a document from which you want to import artifacts
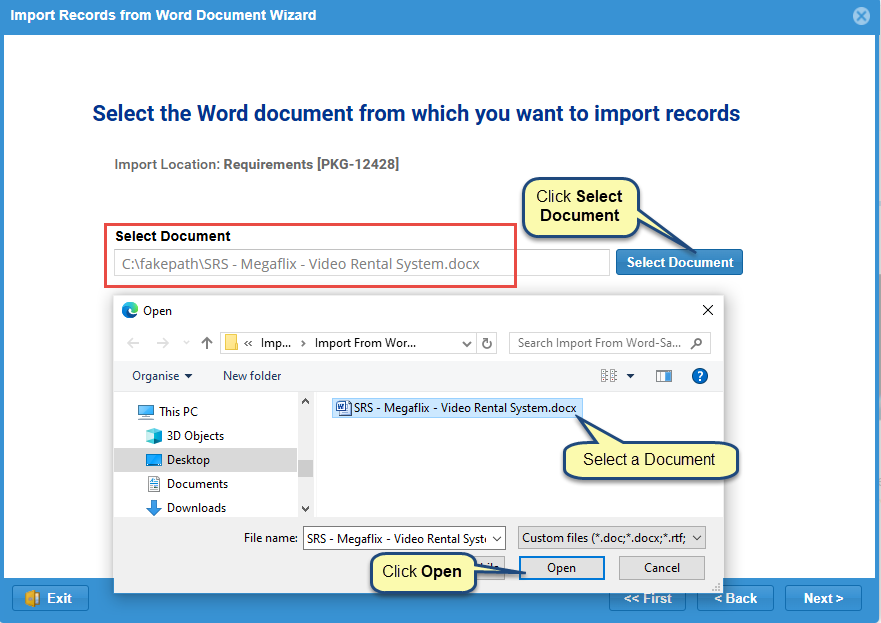
You can import artifacts from the following Word document types:
- Microsoft Word Documents (*.docx).
- Microsoft Word 97-2003 Documents (*.doc).
- Rich Text Documents (*.rtf).
Step 7. Choose an Import Method Based on your Document
Choose whether your Word document contains:
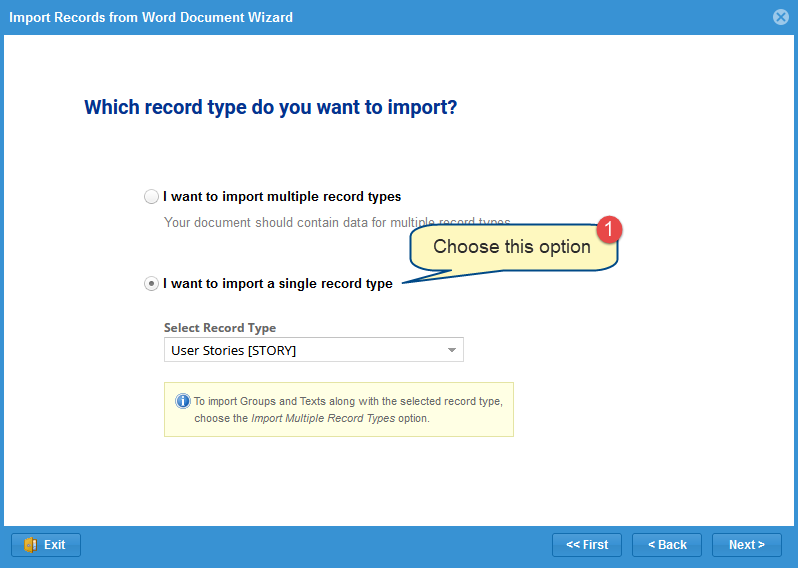
- Multiple record types (e.g., User Stories, Use Cases, Features, etc.)
- A single record type (e.g., only User Stories)
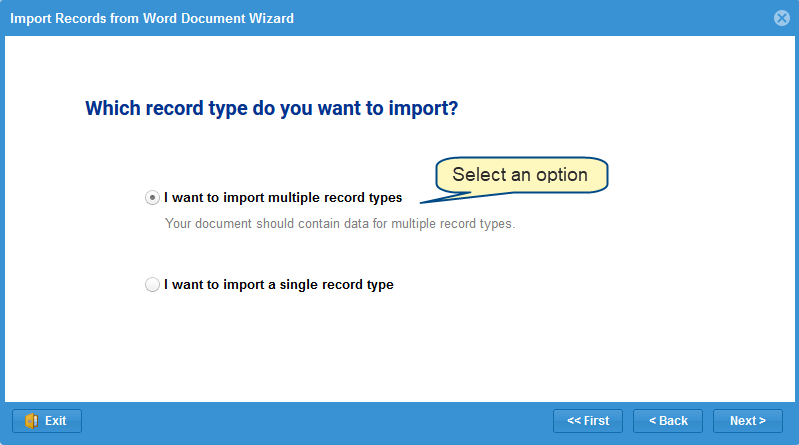
NOTE  | The record types that you want to import should be included in your project. This page will not show in the case of System Packages (when selected as location). |
Proceed with one of the following paths depending on your scenario:
Step 7.1. Importing multiple Record Types
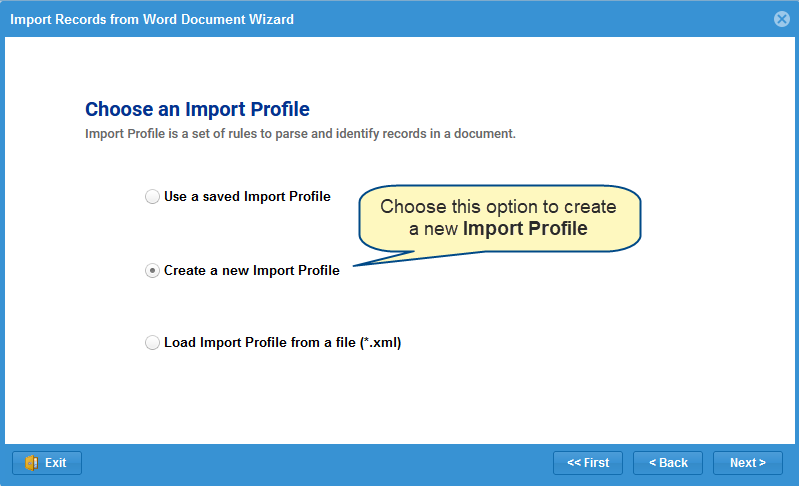
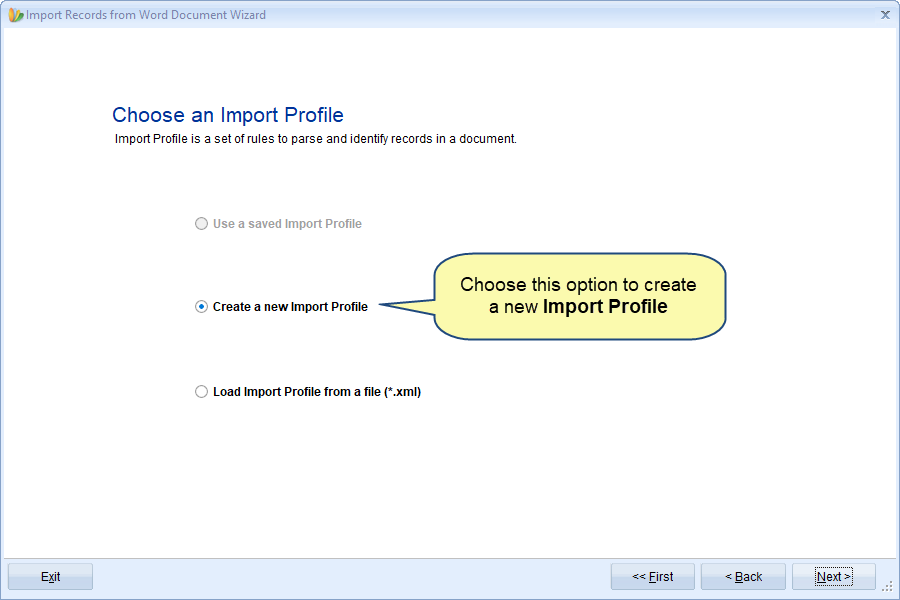
Step 7.1.1. Choose an Import Profile

On this page, there are three options:
- Use a saved Import Profile:
Choose this option if you have a document with a similar layout as the document from which you had imported artifacts earlier. You can use the same Import Profile of the previous document for the current document by saving the Import Profile.
This option is visible only if you have saved any Import Profiles created by you earlier. How to save an import profile is explained in step 7.1.6. while you are creating a new import profile.
- Create a new Import Profile:
Choose this option if you want to import artifacts defined in your word document by using the step-by-step wizard that allows you to define rules for the import parser. This will create UI based Import Profiles.
In this article, we are showing this method.
- Load import Profile from a file (*.xml)
Choose this option if you want to import from a document with traceability defined, fields in paragraphs, or tables in mixed layouts. This option is recommended for the users who have the technical know-how of working with XML, TopTeam, and import parser XML structure.
To know more about XML file import, click here (Need article on XML for Web).
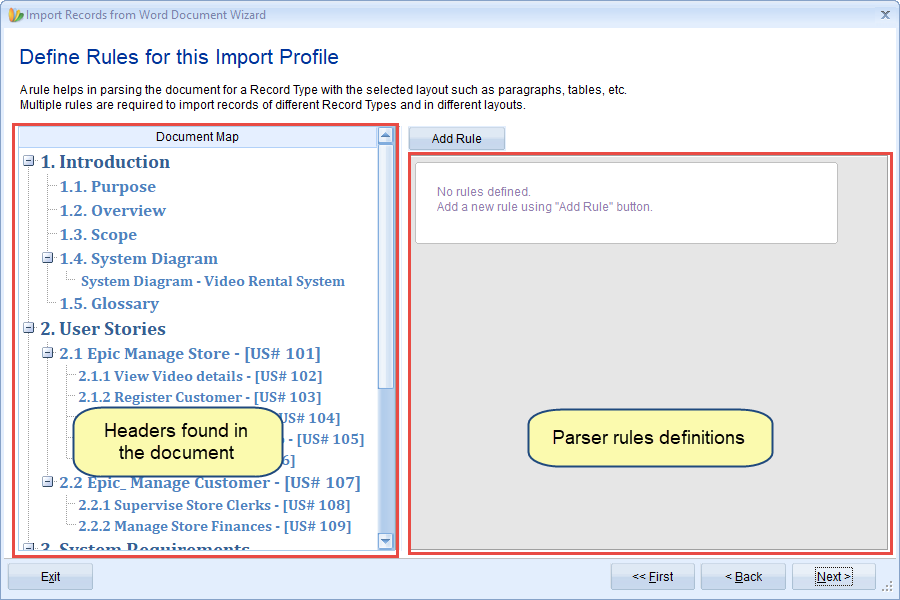
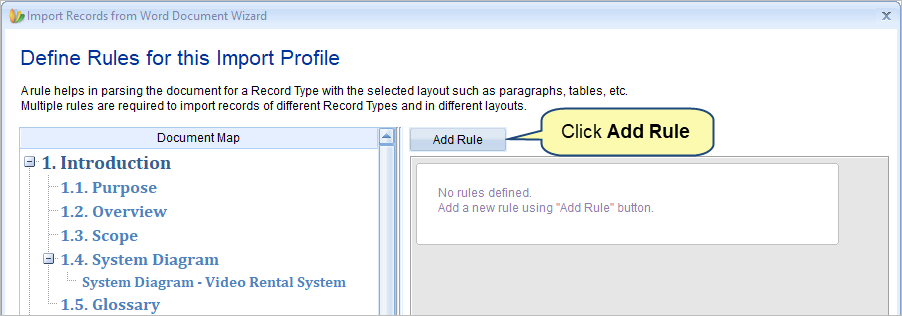
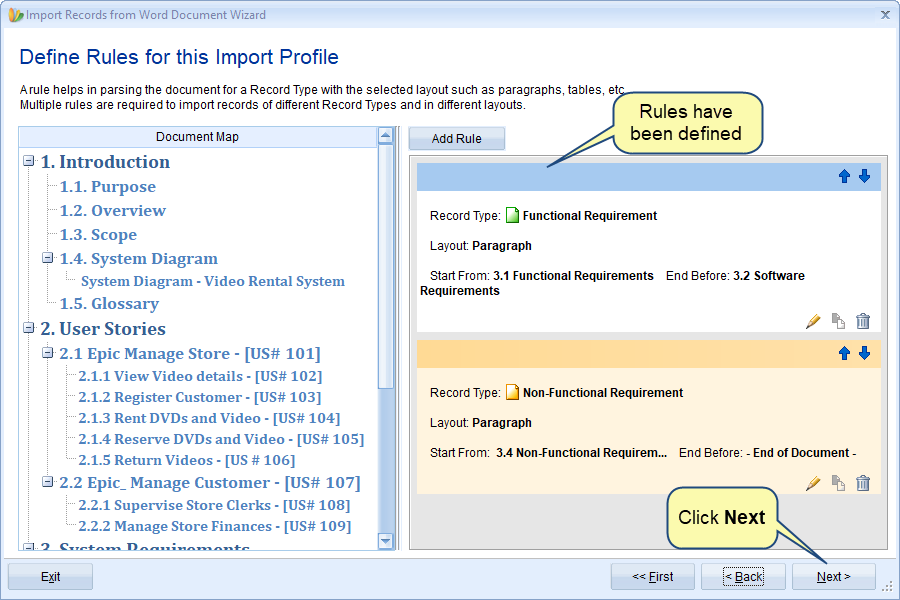
Step 7.1.2. Define Rules for this Import Profile
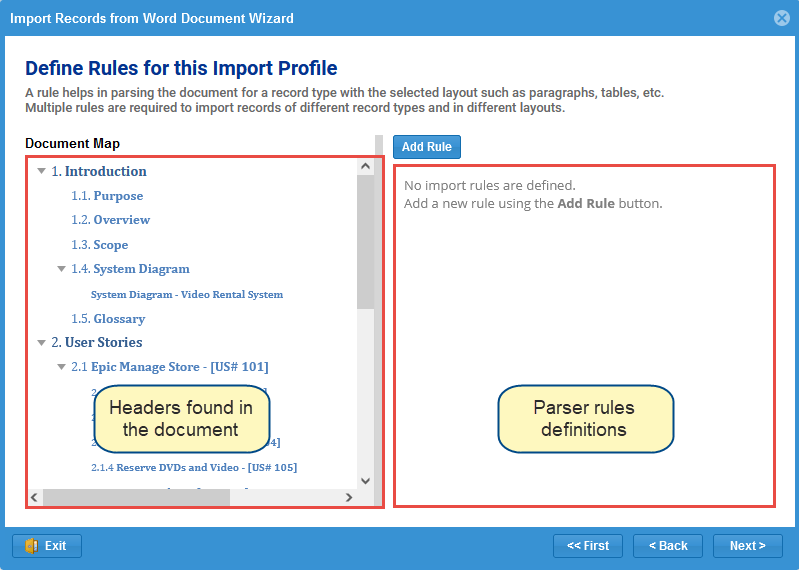
Each parser rule helps import artifacts of different record types from the document.
Step 7.1.3. Add Rules for Import Profile
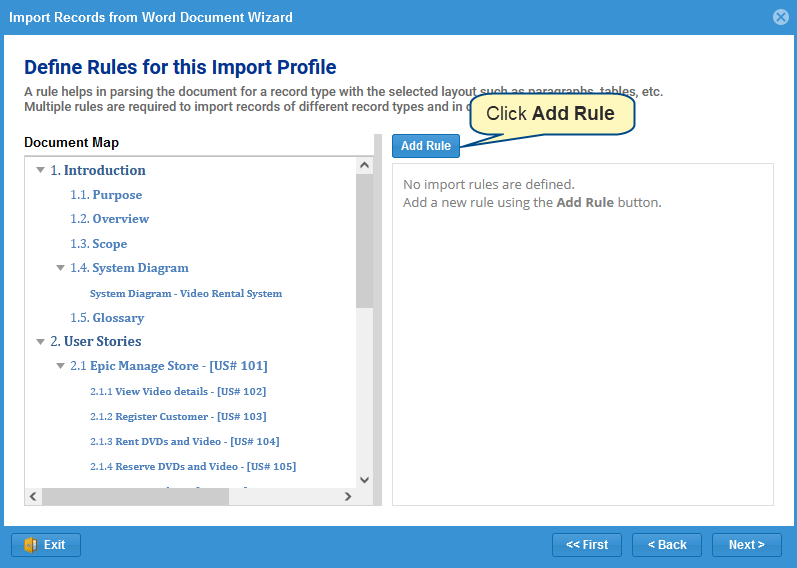
Add multiple rules for each part or record types of your document.
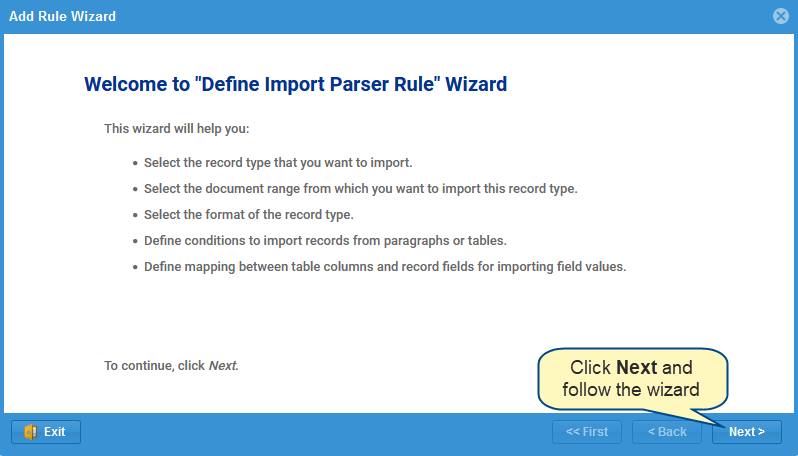
To learn how to add rules, refer to the article How to add rules for importing records from Word document using Add Rule Wizard.
Step 7.1.4. Multiple parser rules have been added
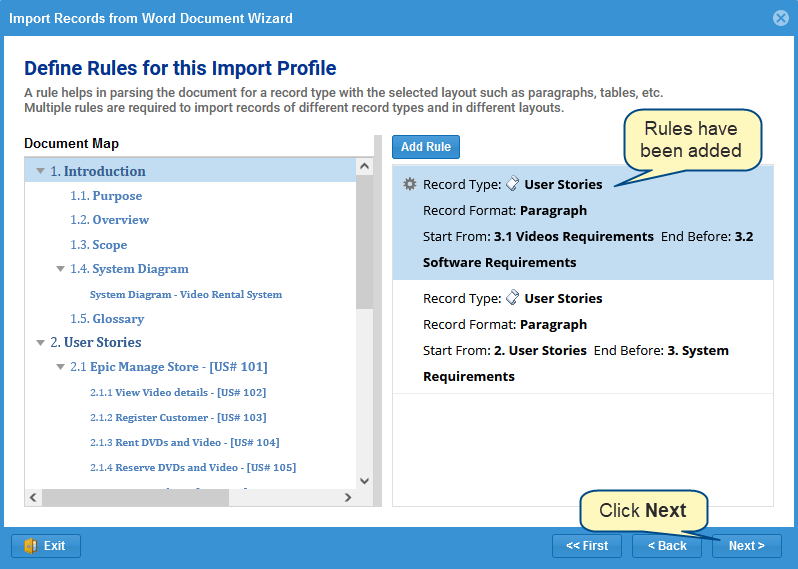
On clicking Next, the wizard will perform the artifacts parsing based on the rules and load information from the Word document.
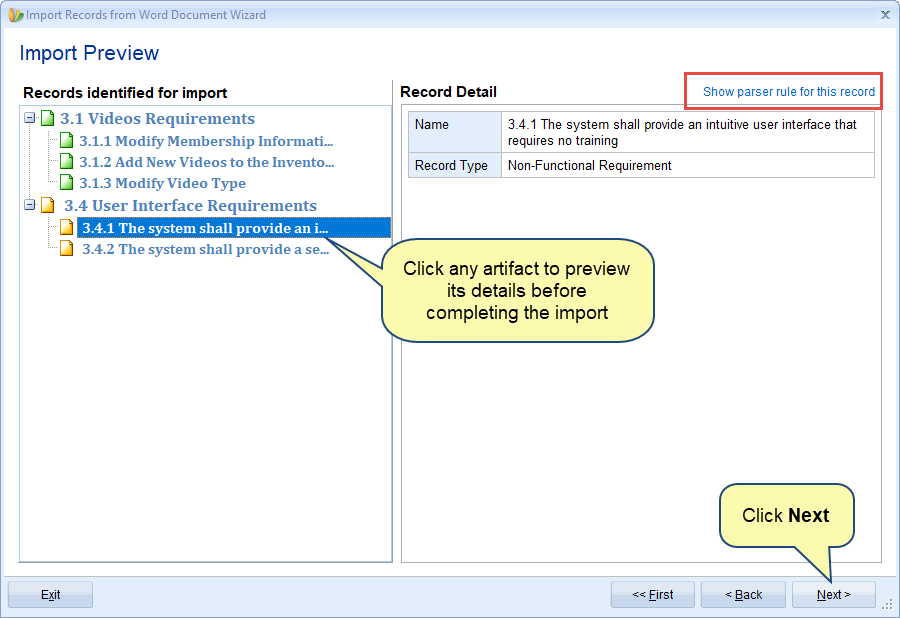
Step 7.1.5. Preview of the parsed artifacts
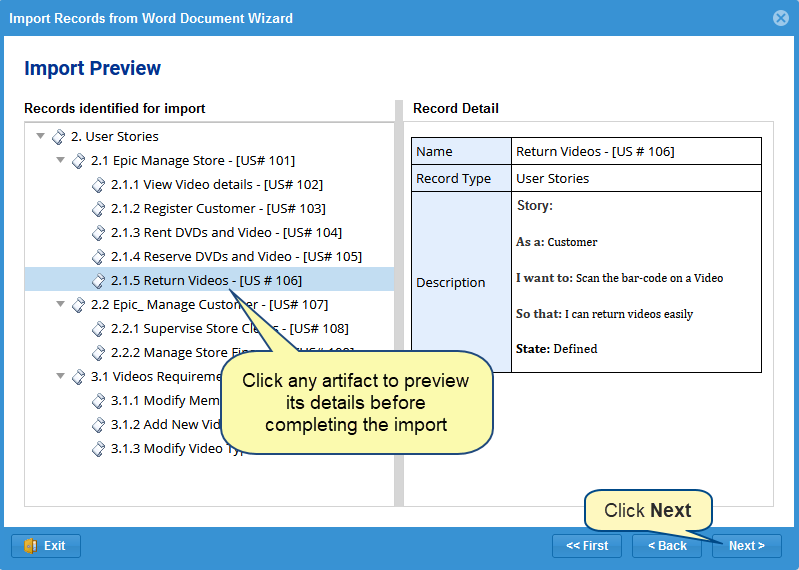
Before you click Next, you can verify whether the parser has correctly read your data using the Show parser rule for this record action.
Show parser rule for this record: If the parser is NOT importing an artifact correctly, such as some fields are missing, record types are mismatched, all fields are not imported, etc., to identify which rule is causing this error, click this action. It will take you back to the Add Rule page with the rule causing this issue as highlighted. You can fix that rule and recheck the preview.
Step 7.1.6. Save the newly created Import Profile (optional)
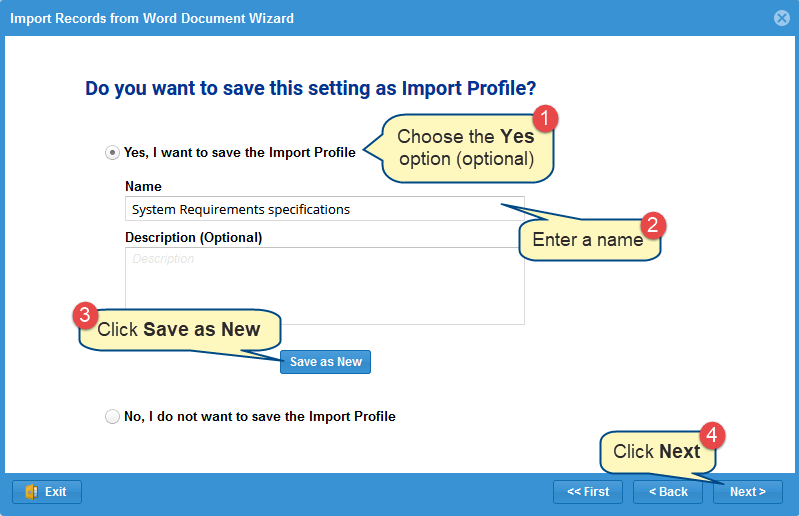
You may need to save an import file if you have a document that has a similar layout as the document from which you are importing artifacts.
INFORMATION  | 1. If the import profile you save here is created for multiple record types, this import profile will be shown for selection only when you choose the multiple record types option in step 7.1.1. 2. Similarly, if the import profile that you save here is created for a single record type, this import profile will be shown for selection only when you choose the same record type option in step 7.1.1. for which you have created the import profile. |
Step 7.1.7. View Import Record Summary
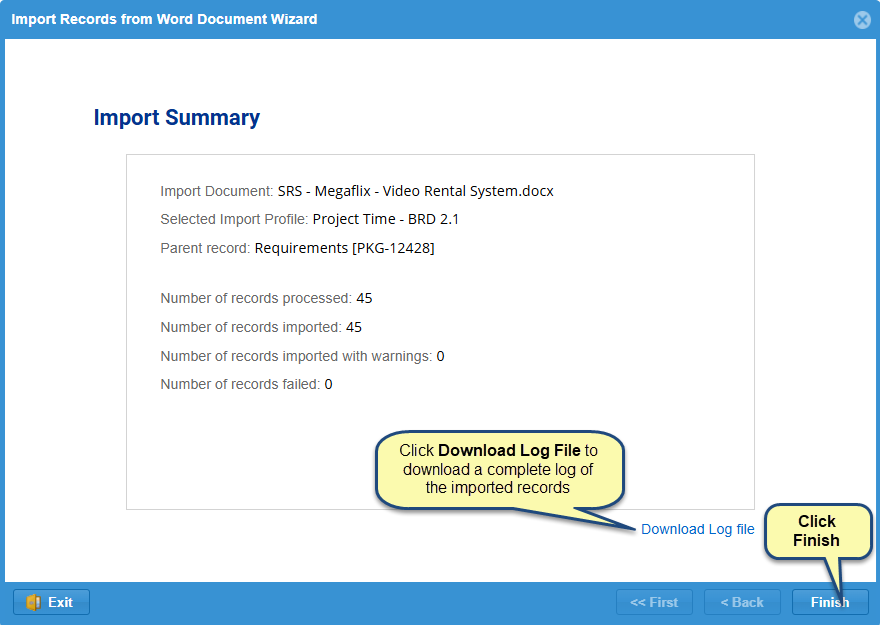
NOTE  | Depending on the number and content of artifacts (images, tables, etc.), the import process may take some time. |
Step 7.2. Importing Single Record Type
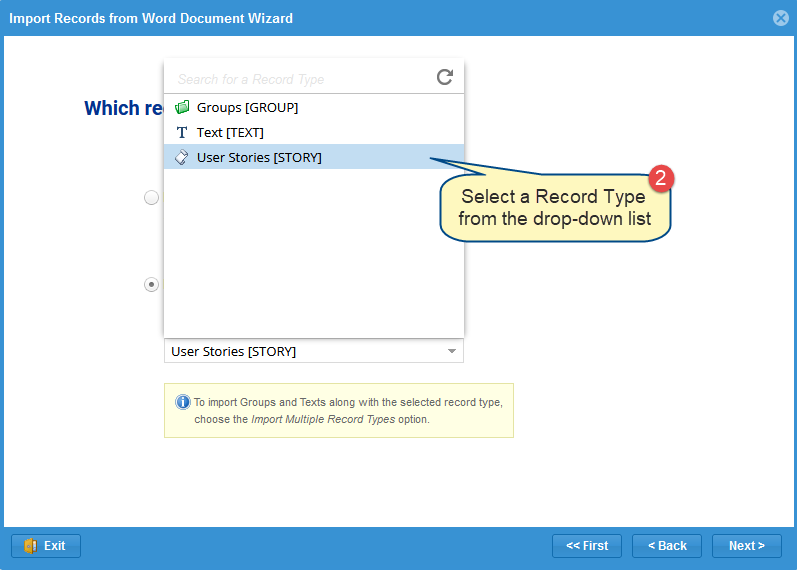
Step 7.2.1. Select Record Type of which artifacts you want to import from the document
Step 7.2.2. Choose an Import Profile
Refer to step 7.1.1 for the information on this wizard page.
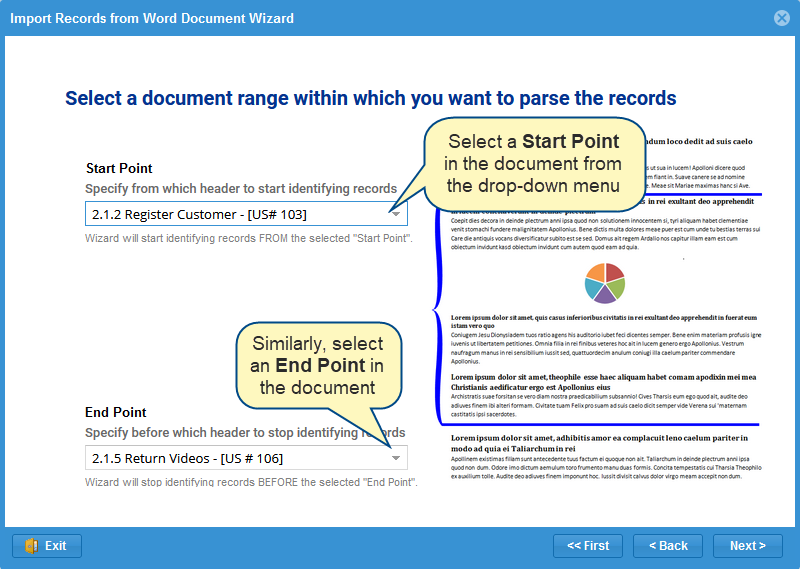
Step 7.2.3. Select the start and the end (range) of the document
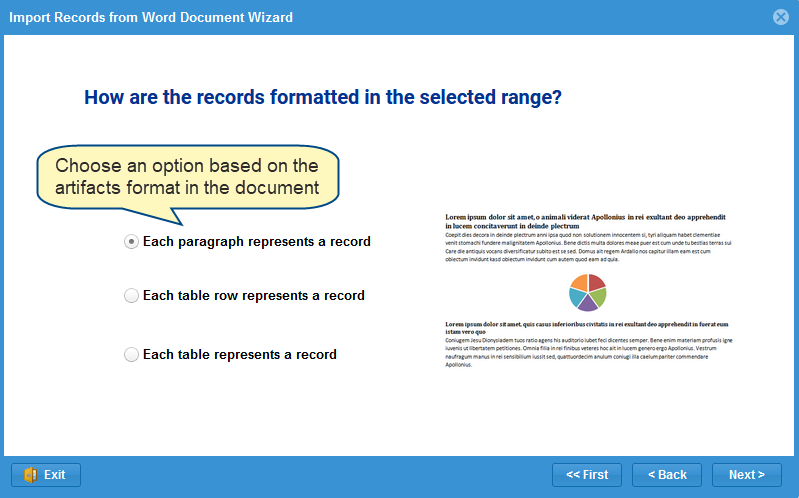
Step 7.2.4. Select format
Step 7.2.5. Select options to identify artifacts titles and other fields
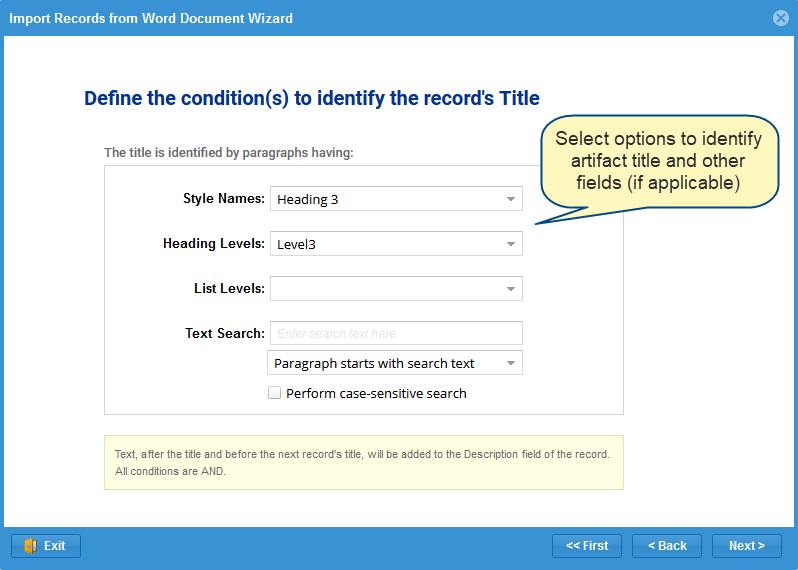
This page changes based on the selection on the previous page.
Step 7.2.6. Preview of the artifacts being imported
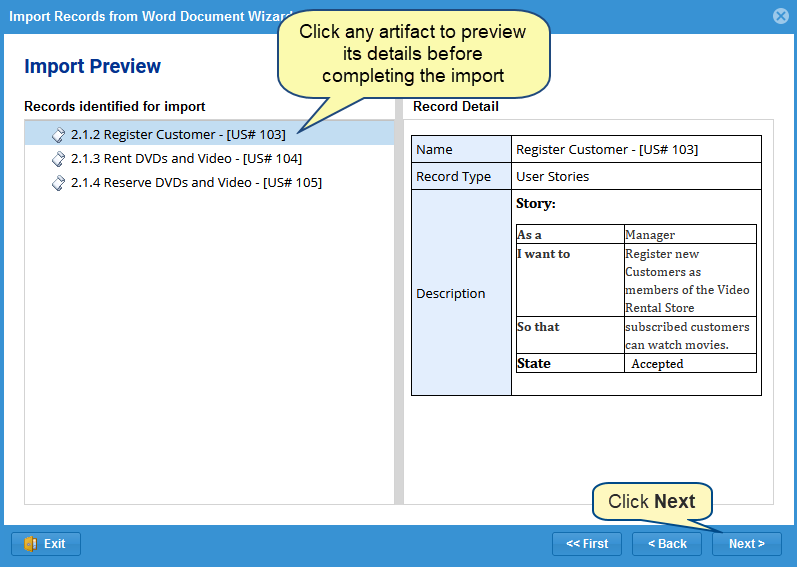
If an artifact is NOT importing correctly, such as hierarchy is incorrect, field properties are not correct or fields are missing, etc., go back to the Add Rule page, fix the rules, and check the preview.
Now complete the process by following the same steps for saving the profile and viewing the import summary, as described in Step 7.1.6 (Save Import Profile) and Step 7.1.7 (View Import Summary).
Step 7.2.7. Artifacts are imported to the selected location
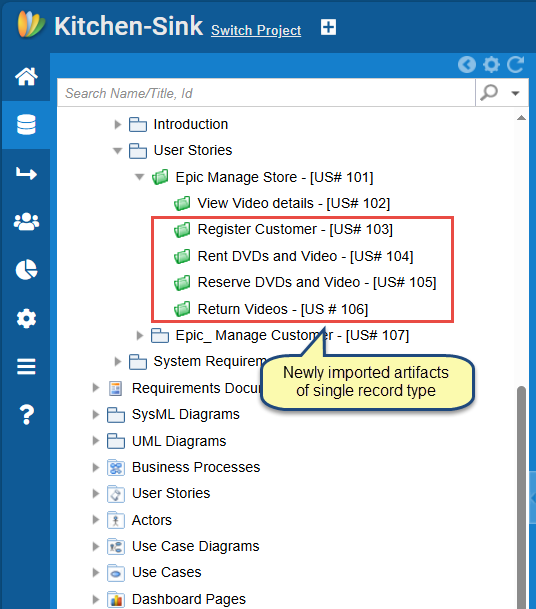
If you have chosen a single record type for importing artifacts into User Stories Package (e.g.), artifacts will be imported as shown in the image below:
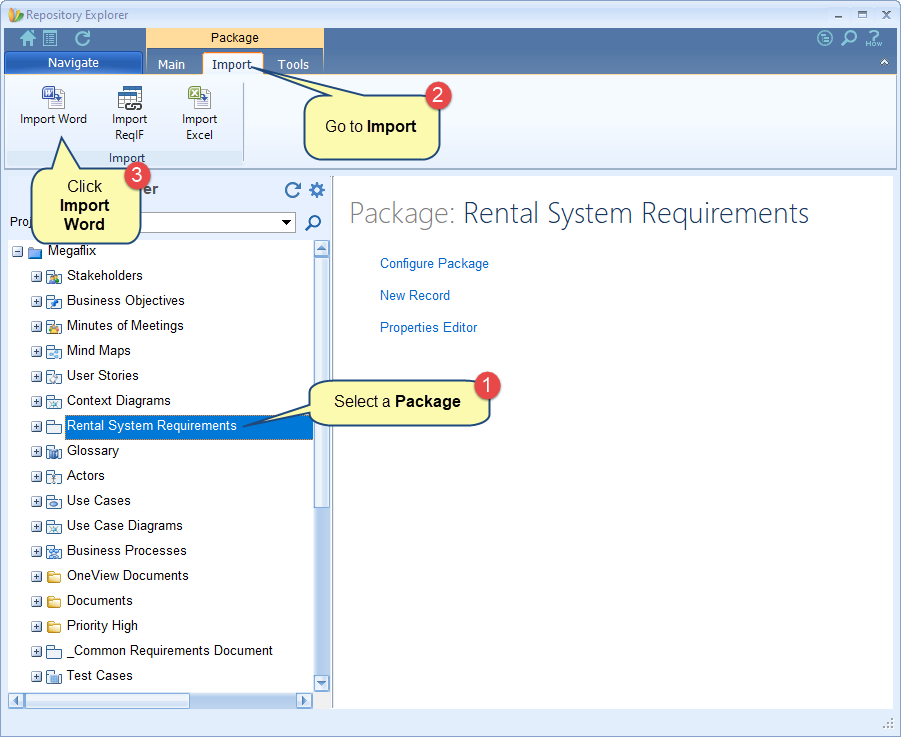
Step 1. Start Import Record from Word Document Wizard
Select a Project, Package, OneView Document, Folder, or System Package in Repository Explorer, go to the Import tab on the ribbon toolbar, and click Import Word.
Alternatively, you can open this wizard from the following:
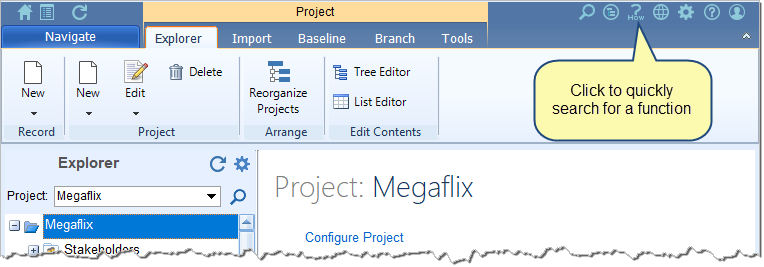
- How do I? – Access
 from the top-right corner of the application or editors and start typing the wizard name. Click the wizard in the search results.
- Navigation menu – Click Navigation menu > Import / Export > Import Records into TopTeam Wizard.
- Import tab on the ribbon toolbar of a Project, Folder, OneView Document, and System Package.
- Import tab on the ribbon toolbar of OneView Document Editor, Document View Editor, and Tree Editor.
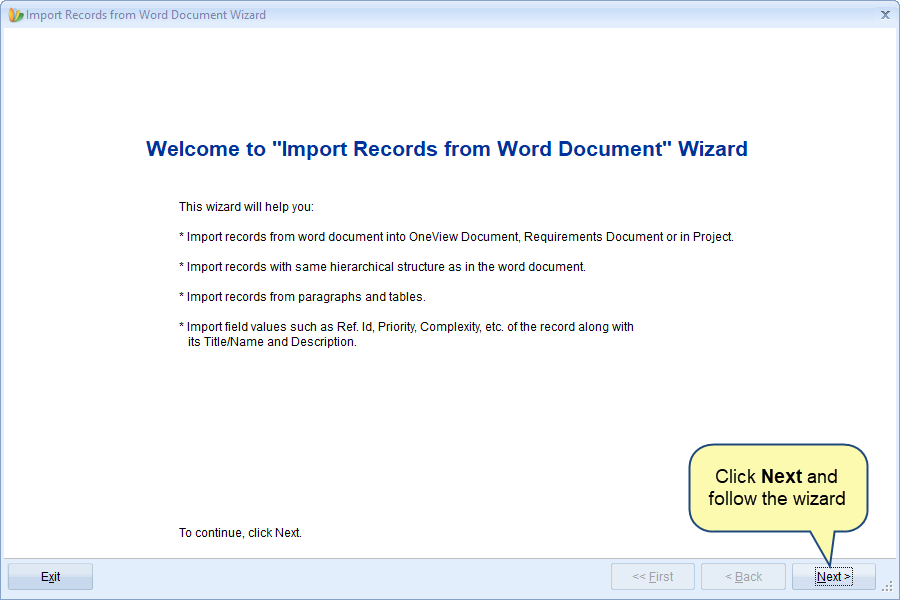
Step 2. The Import Records from Word Document wizard starts
NOTE  | If you start this wizard from How do I? or Navigation menu, it will ask you to select a location where you want to import artifacts i.e. Project, Package, OneView Document, Folder, and System Packages. |
Step 3. Select a document from which you want to import artifacts
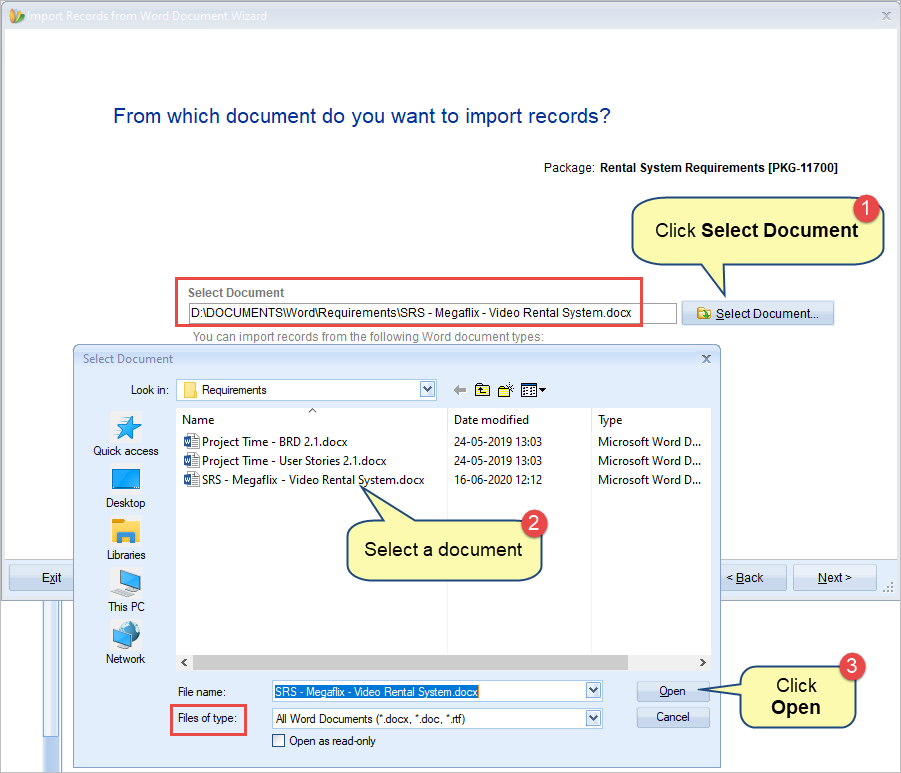
The Files of type drop-down menu lists all available document formats from which artifacts can be imported into TopTeam.
NOTE  | Enable Debugging: Check this option to enable detailed logging of the import process. This is required in case TechnoSolutions Support needs to analyze the import process. Enable this option only at the request of TechnoSolutions Support. 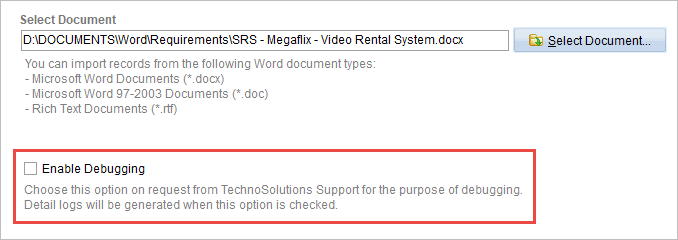 |
Step 4. Select if you want to import artifact of multiple record types or a single record type
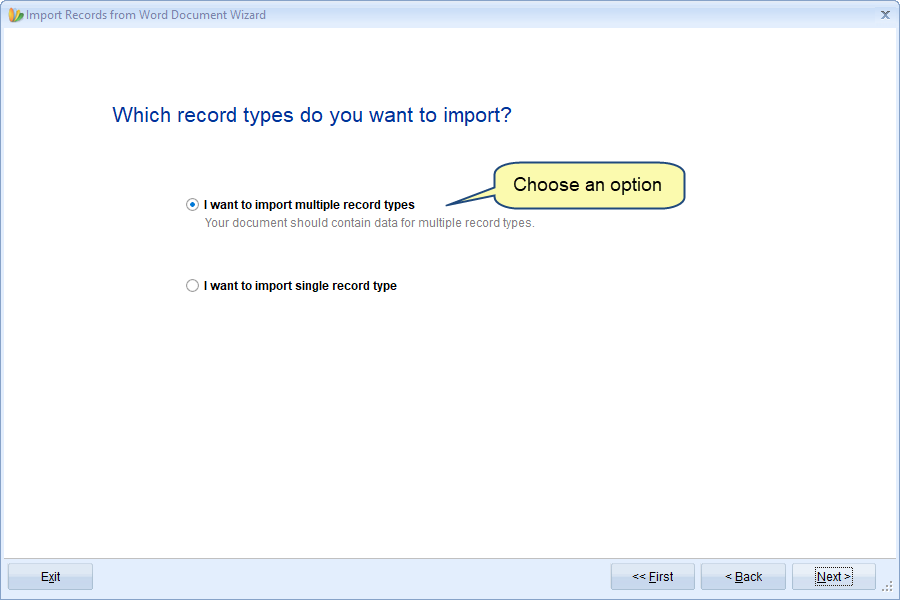
- If your document contains data of different record types and you want to import all of them, choose the first option.
- If your document contains data of single record type or different record types and you want to import only a single record type, choose the second option.
NOTE  | The record types that you want to import should be included in your project. This page will not show in the case of System Packages (when selected as location). |
Let’s see how to import using both options.
Step 4.1. Importing from Multiple Record Types
Step 4.1.1. Choose an Import Profile
On this page, there are three options:
- Use a saved Import Profile:
Choose this option if you have a document that has a similar layout as the document from which you had imported artifacts earlier, you can use the same Import Profile of the previous document for the current document by saving the Import Profile.
This option is visible only if you have saved any Import Profiles created by you earlier. How to save an import profile is explained in step 4.1.7 while you are creating a new import profile.
- Create a new Import Profile:
Choose this option if you want to import artifacts that are defined in your word document by using the step-by-step wizard that allows you to define rules for the import parser. This will create UI based Import Profiles.
In this article, we are showing this method.
- Load import Profile from a file (*.xml)
Choose this option if you want to import from a document that has traceability defined, fields in paragraphs, or tables in mixed layouts. This option is recommended for the users who have the technical know-how of working with XML, TopTeam, and import parser XML structure.
To know more about XML file import, click here.
Step 4.1.2. Define Rules for this Import Profile
Each parser rule helps in importing artifacts of different record types from the document.
Step 4.1.3. Add Rules for Import Profile
Add multiple rules for each part or record types of your document.
To learn how to add rules, refer to the article How to add rules for importing records from Word document using Add Rule Wizard.
Step 4.1.4. Multiple parser rules have been added
On clicking Next, the wizard will perform the artifacts parsing based on the rules and load information from the Word document.
Step 4.1.5. Preview of the parsed artifacts
Before you click Next, you can verify whether the parser has correctly read your data using the Show parser rule for this record action.
Show parser rule for this record: If the parser is NOT importing an artifact correctly such as some fields are missing, record types are mismatched, all fields are not imported, etc. to identify which rule is causing this error, click this action. It will take you back to the Add Rule page with the rule causing this issue as highlighted. You can fix that rule and check the preview again.
IMPORTANT  | This page also shows warning messages such as: 1. When you do not have rights to create a record type. 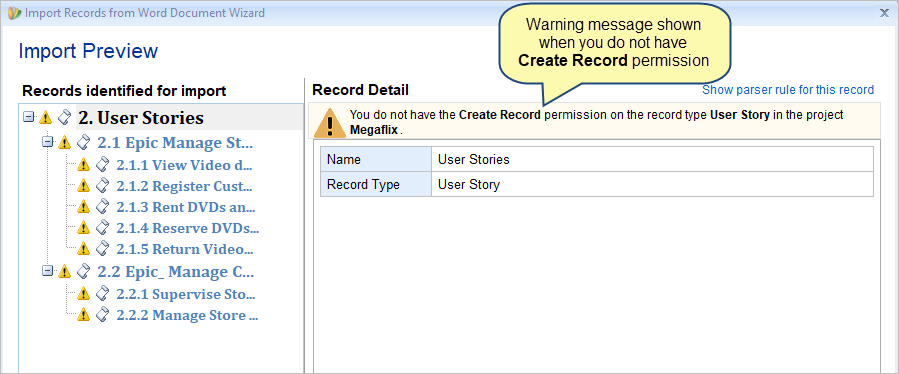 2. When Package Structure applied is different. 2. When Package Structure applied is different. 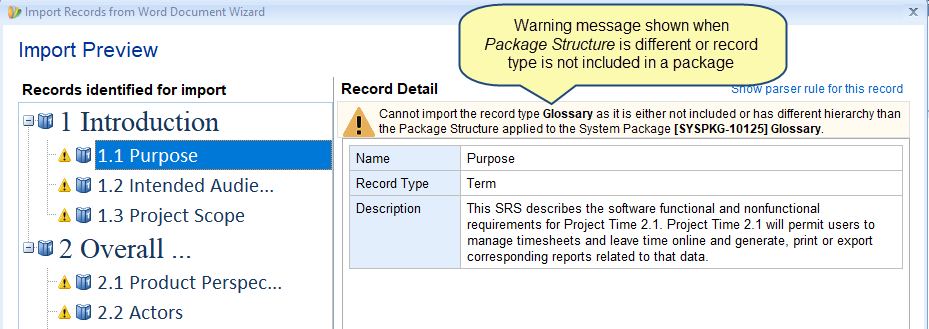 |
Step 4.1.6. Specify Package Structures for the new Packages
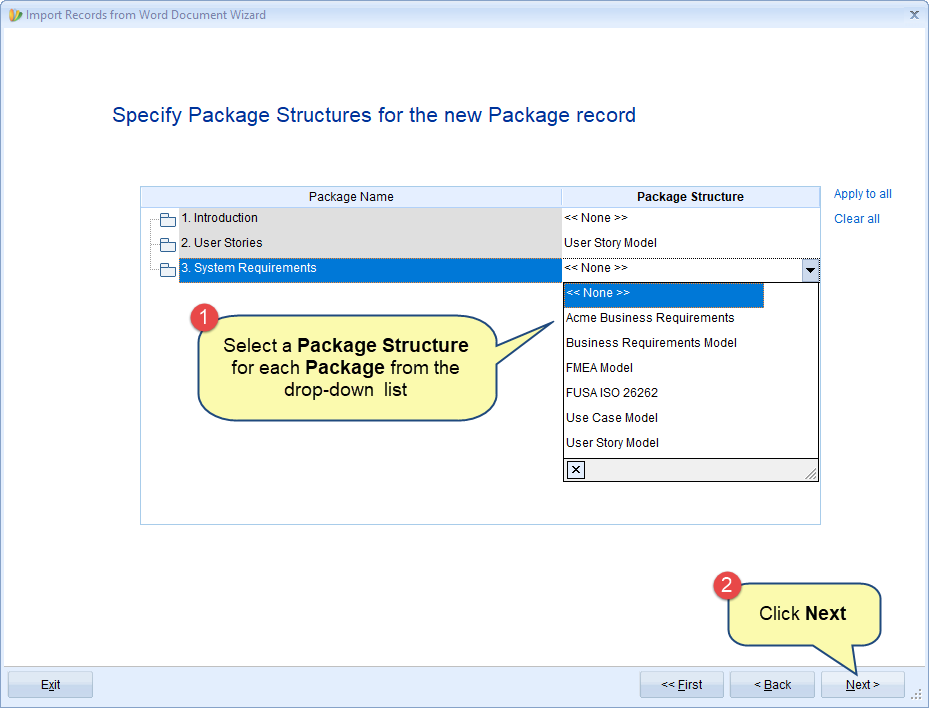
Assumption: Package Structures are defined. To know more about Package Structure, click here.
INFORMATION  | Why you should select Package Structure? If the record types you are importing have parent-child relationships and are similar to the parent-child relationships of a Package Structure, you can select the Package Structure so that traceability links are created between them. Otherwise, traceability links will not be created. |
NOTE  | This step is optional and it is NOT necessary to assign a Package Structure to the Packages. Click Yes to continue 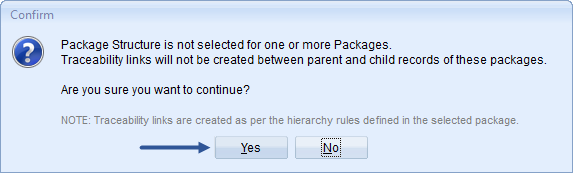 |
Step 4.1.7. Save the newly created Import Profile (optional)

You may need to save an import file if you have a document that has a similar layout as the document from which you are importing artifacts.
INFORMATION  | 1. If the import profile that you save here is created for multiple record types, this import profile will be shown for selection only when you choose the multiple record types option in step 4.1. 2. Similarly, if the import profile that you save here is created for a single record type, this import profile will be shown for selection only when you choose the same record type option in step 4.2. for which you have created the import profile. |
Step 4.1.8. Specify if you want to process Advanced Workflow and Automation Rules during import (optional)
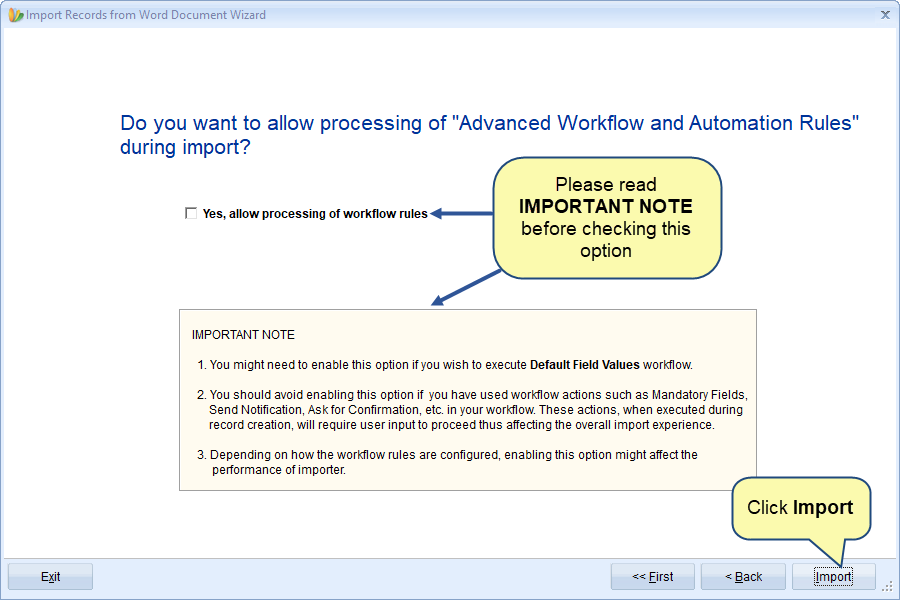
By default, workflow rules are turned OFF. If you have defined workflow actions for mandatory fields, etc. such workflow rules will not be processed during import.
Step 4.1.9. View Import Record Summary

NOTE  | Depending on the number and content of artifacts (images, tables, etc.) it may take some time for the import process to complete. |
Step 4.1.10. Artifacts are imported to the selected location
If you have chosen multiple record types for importing artifacts into Requirements Package (e.g.), artifacts will be imported as shown in the image below:
Step 4.2. Importing from Single Record Type
Step 4.2.1. Select Record Type of which artifacts you want to import from the document

Step 4.2.2. Choose an Import Profile

Please refer to step 4.1.1. for the information on this wizard page.
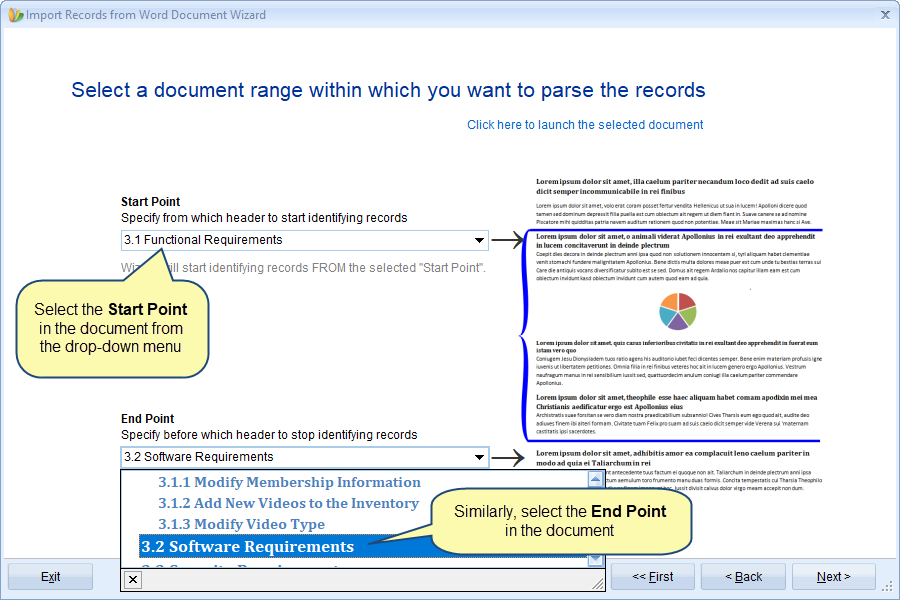
Step 4.2.3. Select the start and the end (range) of the document
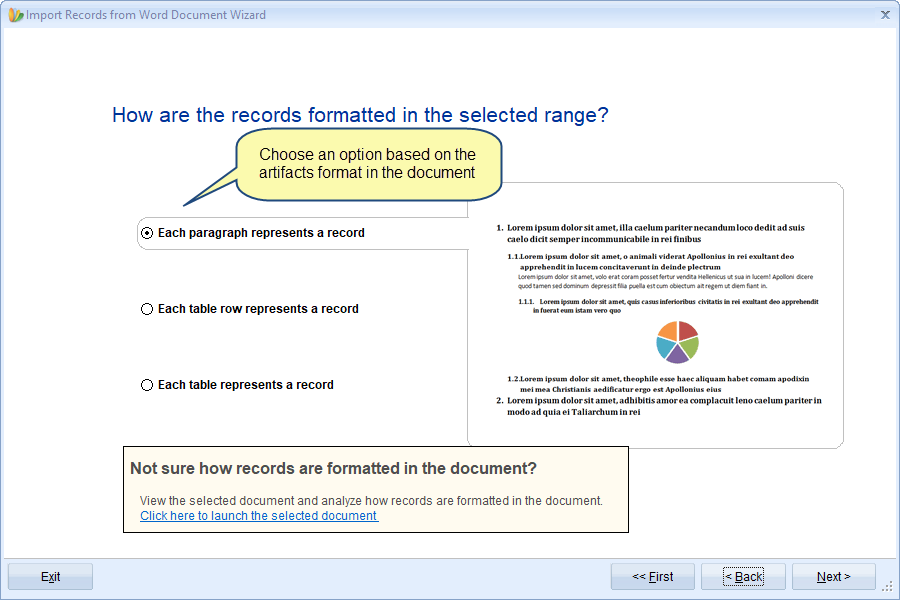
Step 4.2.4. Select format
Step 4.2.5. Select options to identify artifacts title and other fields
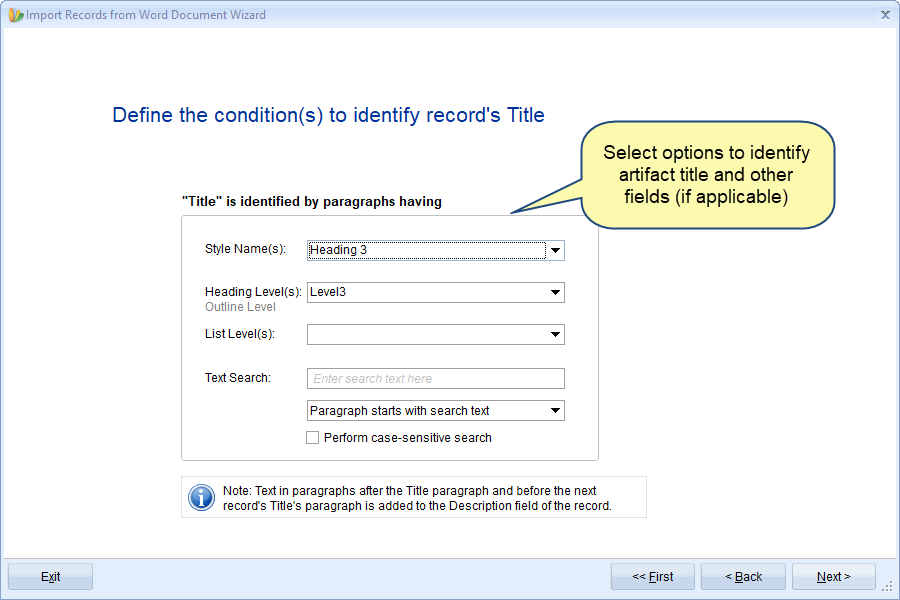
This page changes based on the selection on the previous page.
Step 4.2.6. Preview of the artifacts being imported
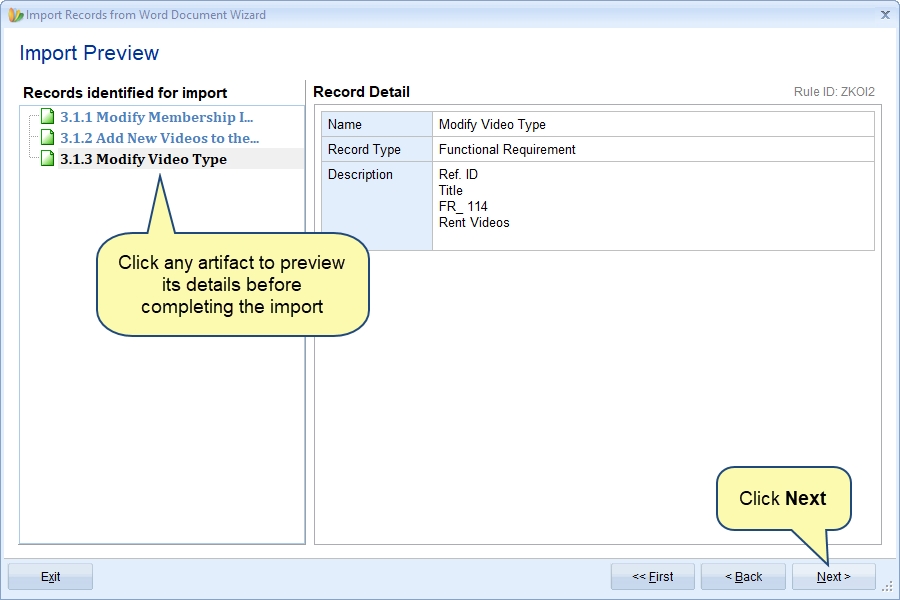
If an artifact is NOT importing correctly such as hierarchy is incorrect, field properties are correct fields are missing, etc. go back to the Add Rule page and fix the rules, and check the preview.
For the next wizard pages, please refer to the steps from 4.1.7. to 4.1.9.
Step 4.2.7. Artifacts are imported to the selected location
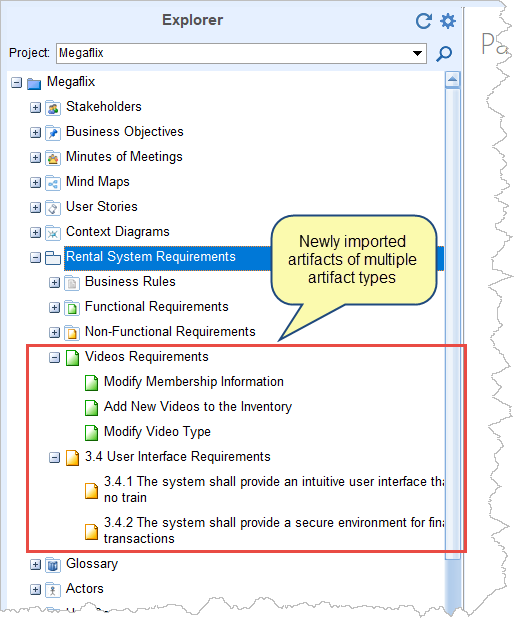
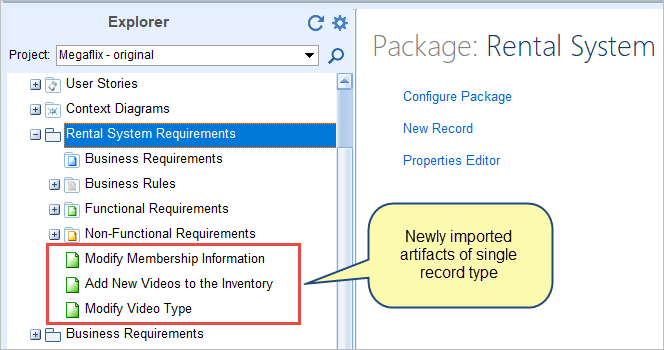
If you have chosen a single record type for importing artifacts into Rental System Requirements Package (e.g.), artifacts will be imported as shown in the image below:
Related Articles
How to import artifacts from Microsoft Excel
How to import artifacts using Copy-Paste
How to import Business Processes from Microsoft Visio
How to import artifacts from ReqIF file
How to import artifacts from Word document using Import Parser File (XML)
See Also
Revised: April 22nd, 2025