Overview
A Review Gate defines a set of rules that control how artifacts are evaluated during a review process. These rules determine which artifacts will be included in the review and how reviewers interact with them.
Each review gate can specify:
- Approval method – Whether reviewers approve each artifact individually or approve the entire document/package at once.
- Artifact conditions – Whether artifacts must meet specific criteria (e.g., locked or in a specific state) before being sent for review.
- Reviewer eligibility – Who is allowed to review the artifacts.
- Digital signature requirement – Whether reviewers must provide a digital signature during the approval process.
Review Gates are used as part of a review cycle, which may involve multiple stages. You can define one or more gates to control the progression and quality of reviews.
TopTeam provides two default Review Gates:
- Formal Review
- Informal Review
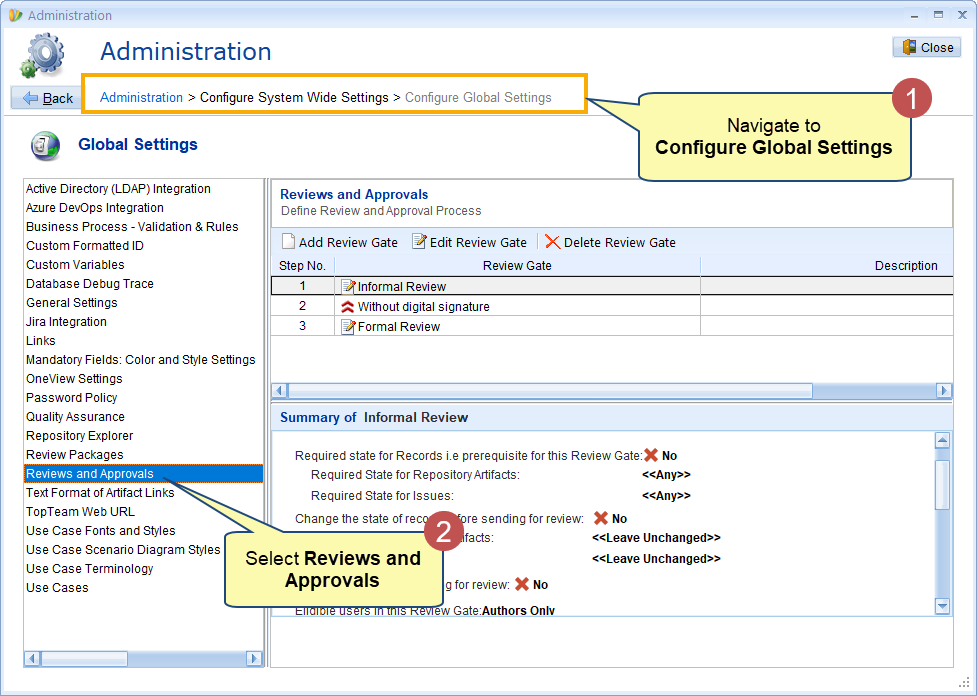
You can also create, edit, or delete custom review gates by navigating to:
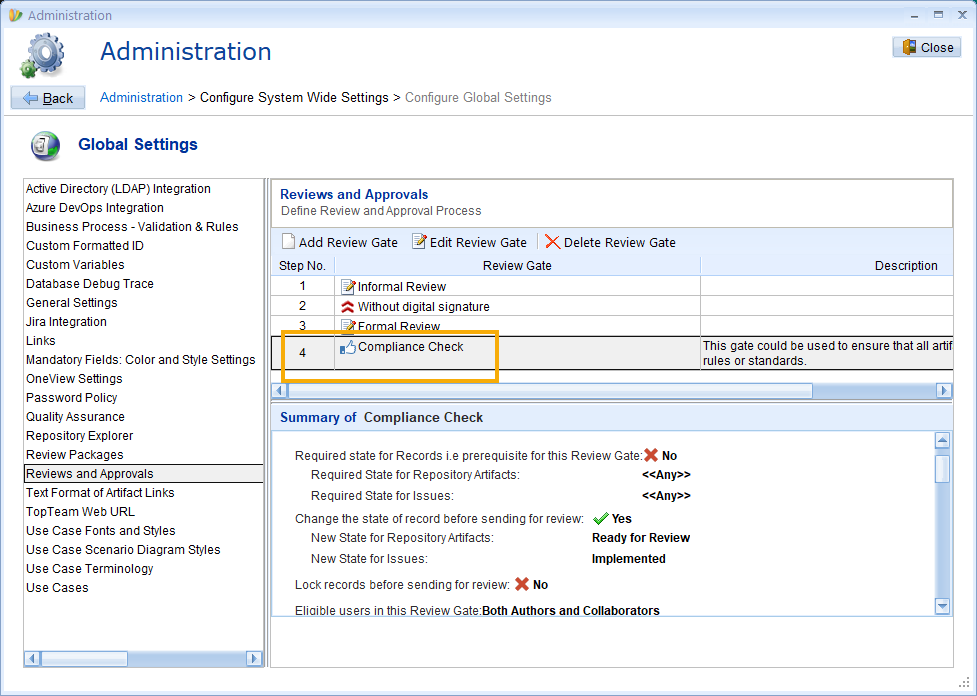
Global Settings > Reviews and Approvals
To learn more about how review process work, refer to the Reviews & Approvals chapter in the Concepts Guide.
Prerequisites
You must have TopTeam Administrator permissions to work with review gates.
Below are step-by-step instructions for creating and managing Review Gates in both the Web App and the Desktop App. Use the tabs to follow instructions for your preferred interface.
This article is divided into two sections:
- Creating a Review Gate – Learn how to configure a new review gate and set up review parameters.
- Managing Review Gates – Learn how to edit or delete existing review gates.
1. Creating a Review Gate
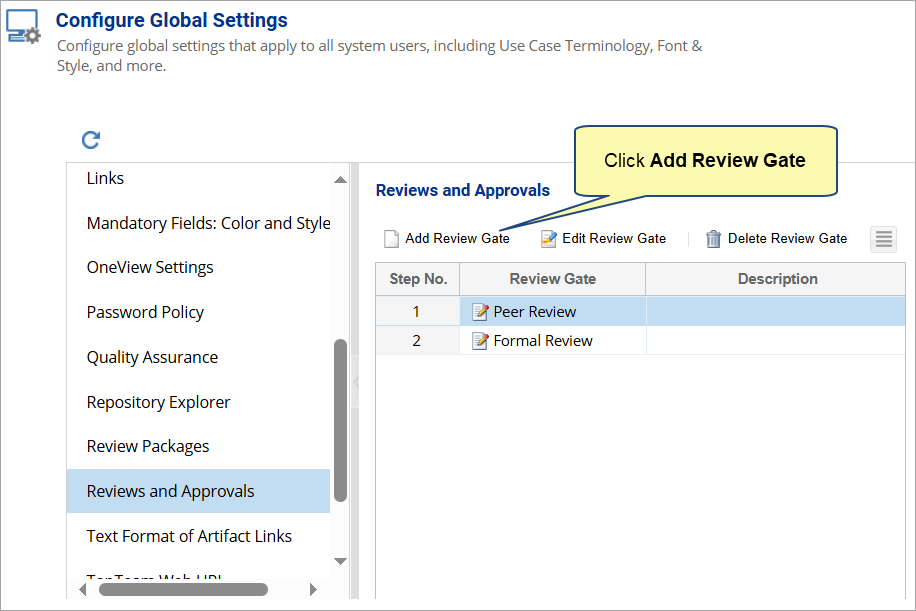
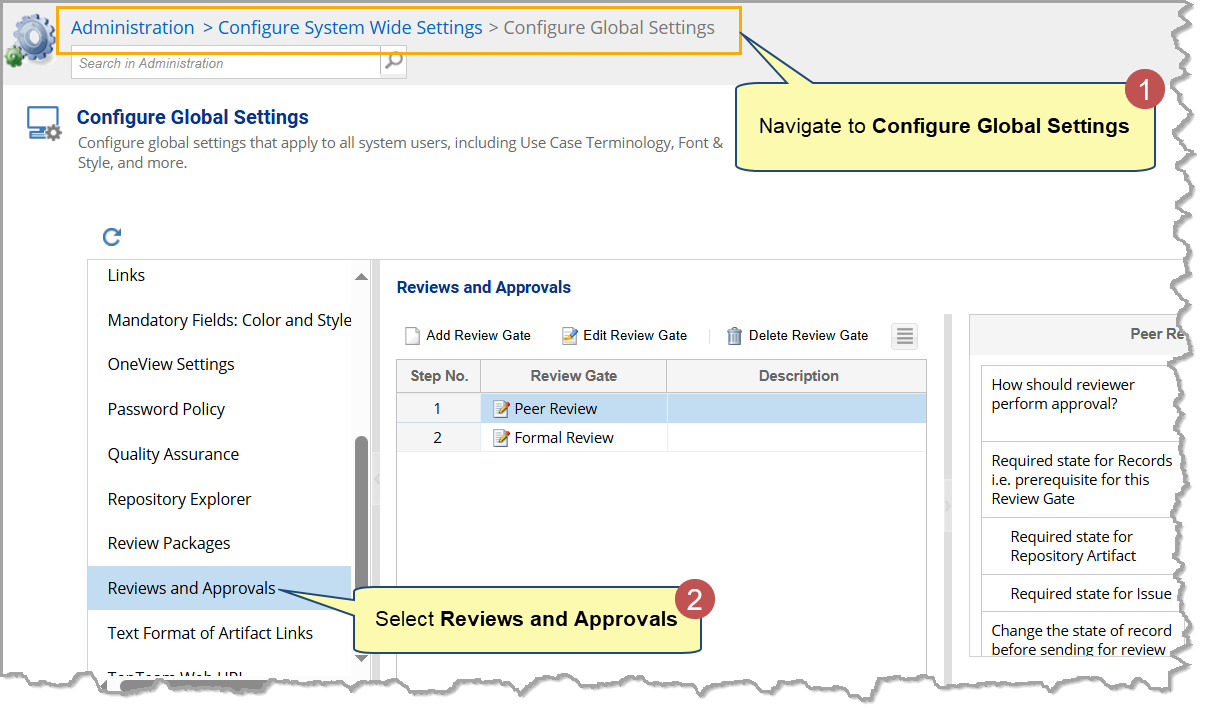
Step 1. Navigate to Reviews and Approvals settings in Global Settings

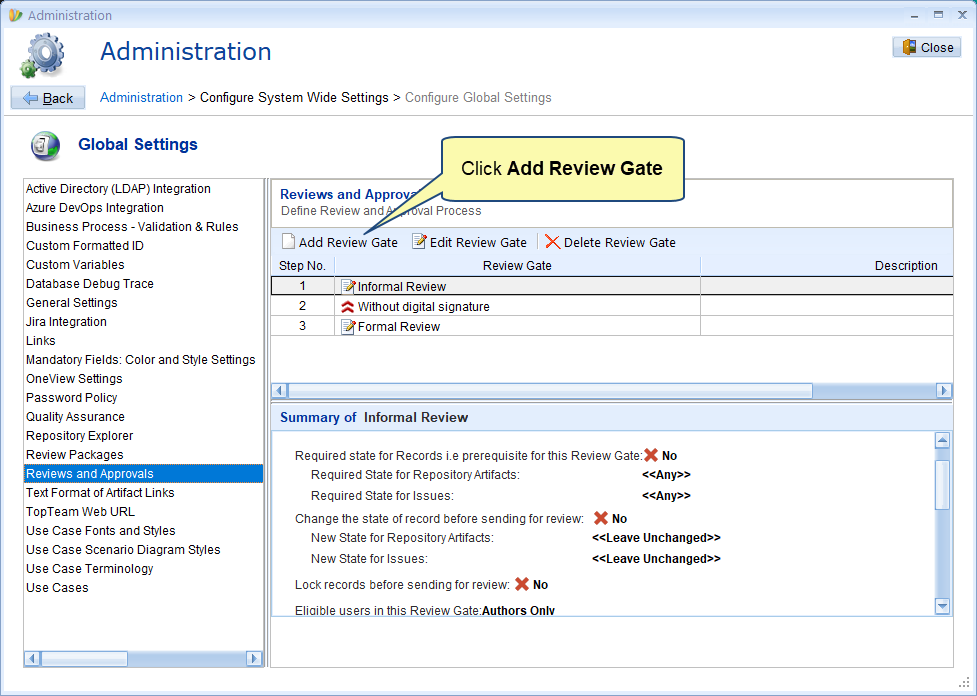
Step 2. Add a new Review Gate
Click Add Review Gate to launch the Define Review Gate wizard.
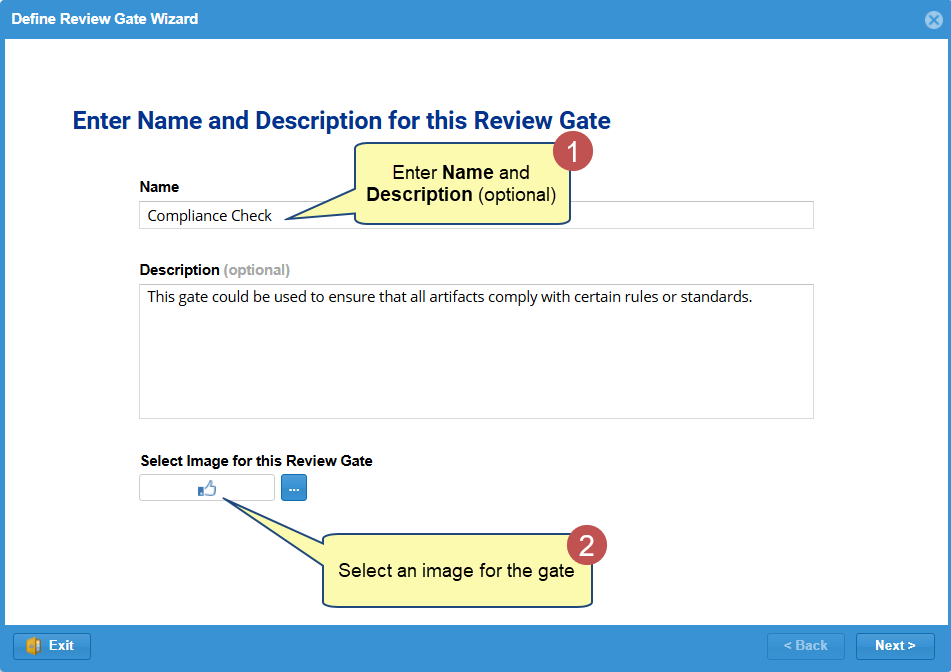
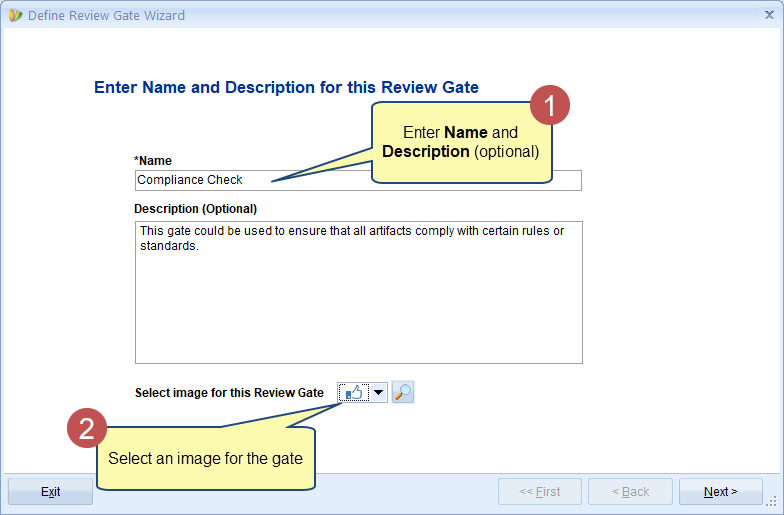
Step 3. Name the Review Gate in Define Review Gate Wizard
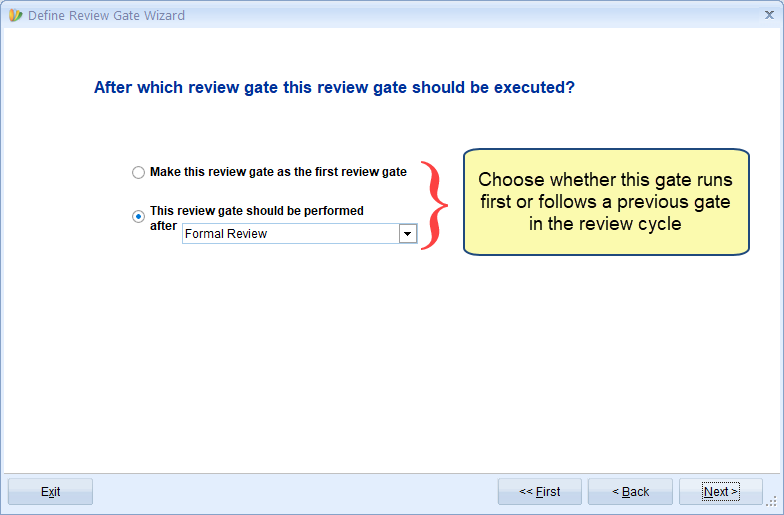
Step 4. Choose when to execute this review gate
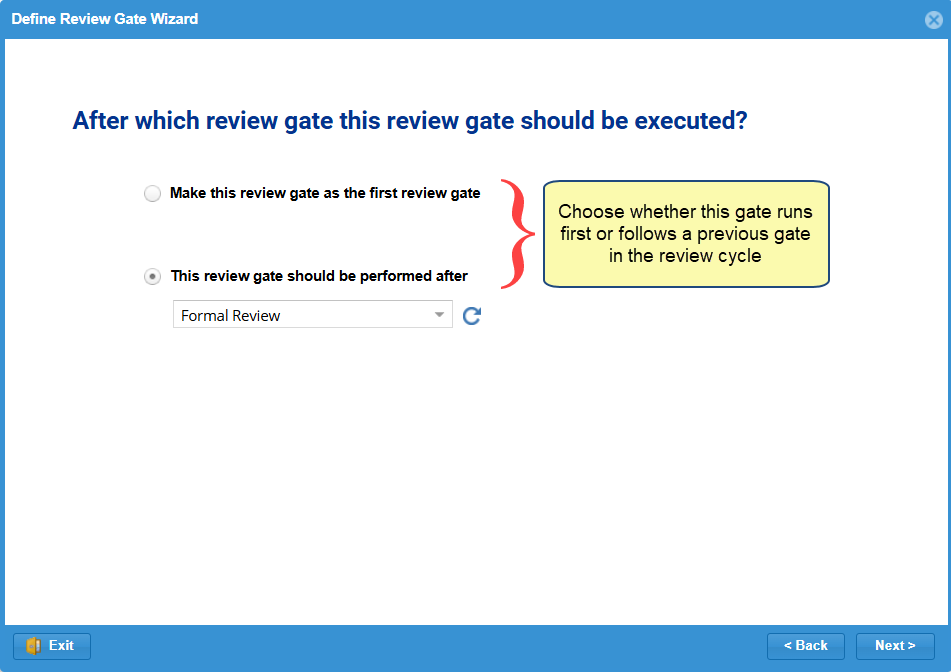
There are two options:
- Make this review gate as the first review gate: Choose this option to execute this review gate as the initial review gate.
- This review gate should be performed after: Choose this option to execute this gate after the selected preceding review gate.
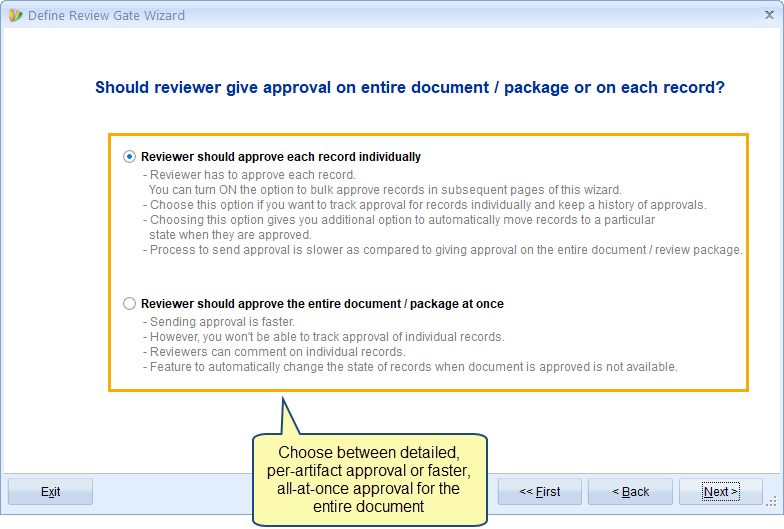
Step 5. Choose how artifacts will be approved
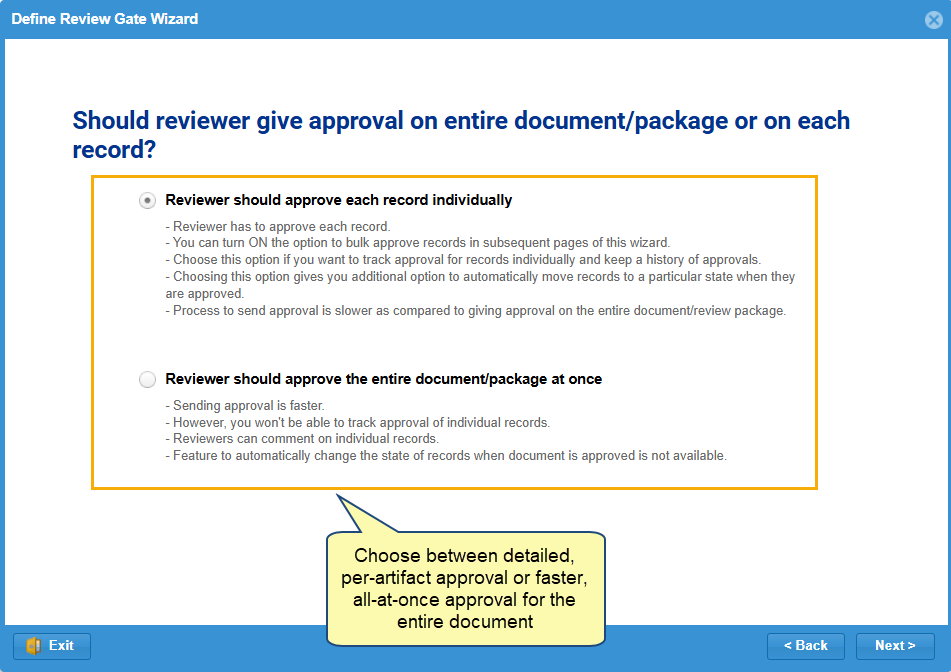
There are two options:
- Reviewer should approve each record individually: Choose this option if you want reviewers to approve each record (artifact) in a review document or package. This allows you to track the review progress of each record. However, review may take a longer time.
- Reviewer should approve the entire document / package at once: Choose this option if you want reviewers to approve a whole review document or package at once. This method is faster but doesn’t track individual artifact progress.
If you choose the first option, the following wizard page will display. If you choose the second option, proceed to step 8.
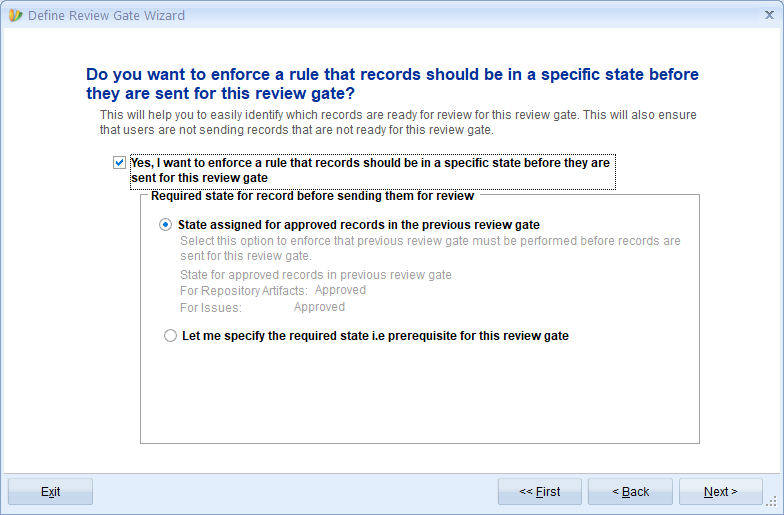
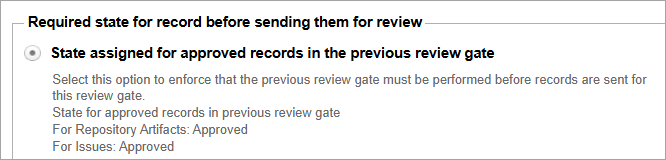
Step 6. Enforce a rule for artifacts to be in a specific state before sending them for review
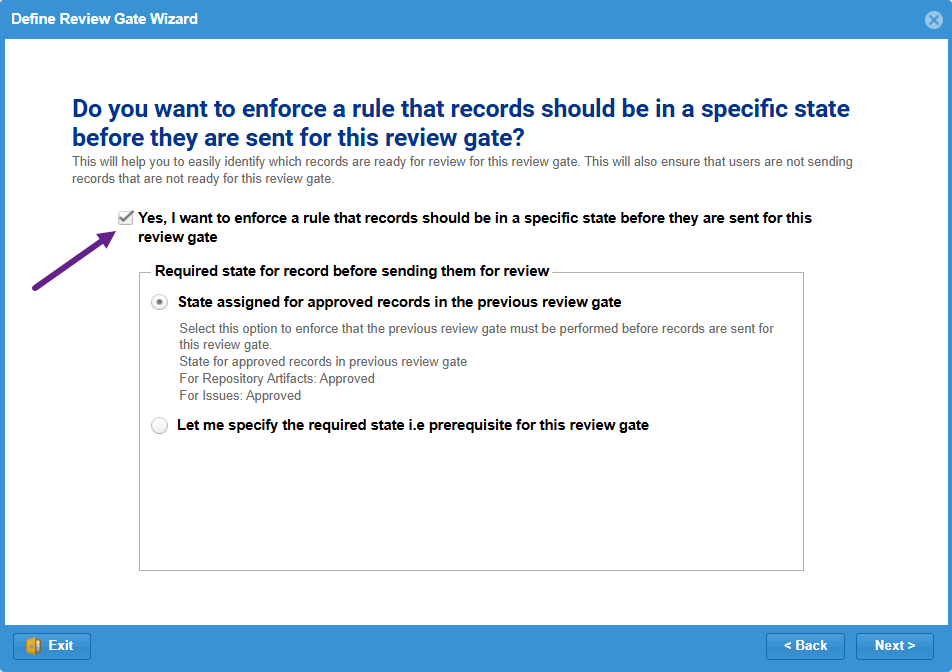
Enable this rule to ensure only artifacts in a specific state are eligible for review. This option is available only when this gate follows another review gate – step 4.
Once enabled, you can choose one of two options:
- State assigned for approved records in the previous review gate: Use state from previous review gate – Only artifacts marked as approved in the previous gate will be reviewed here.

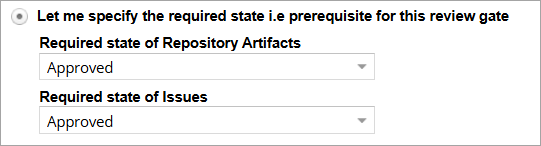
- Let me specify the required state i.e. prerequisite for this review gate: Specify a required state manually – Define the minimum state artifacts must be in to enter this review. You’ll select:
- Required state for Repository Artifacts
- Required state for Issues
If you do not specify a state, proceed to step 7. If you specify a state, proceed to step 8.
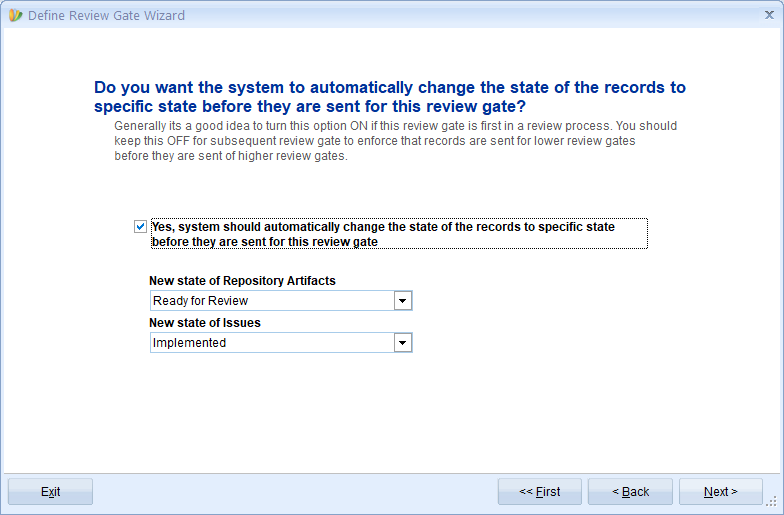
Step 7. Auto-change artifacts and issues state before review
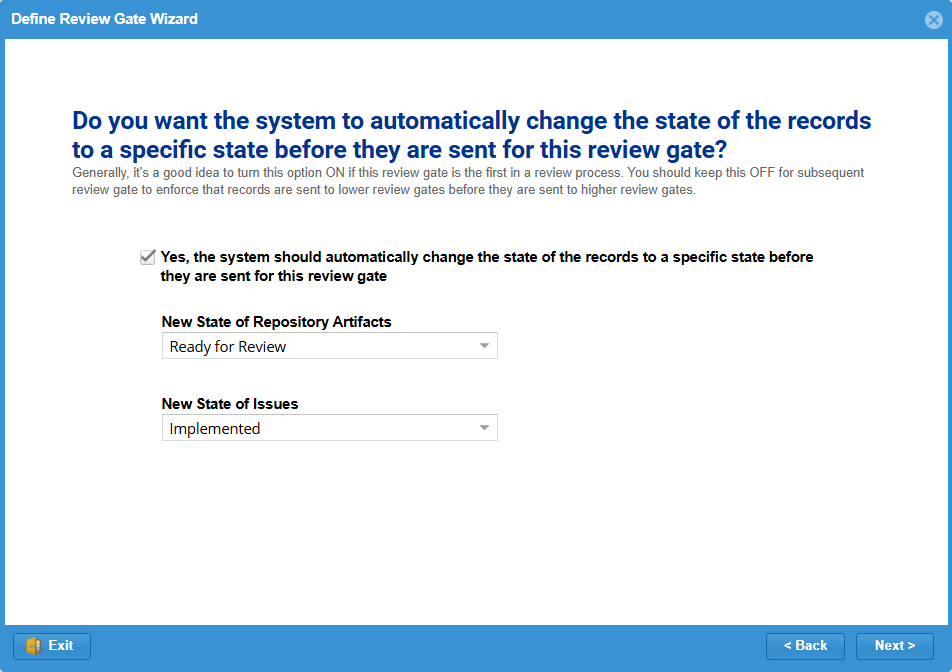
Select Yes if you want to automatically update the state of artifacts and issues before the review begins.
You’ll need to specify:
- The new state for Repository Artifacts
- The new state for Issues
This ensures all artifacts are transitioned into a consistent, review-ready state automatically.
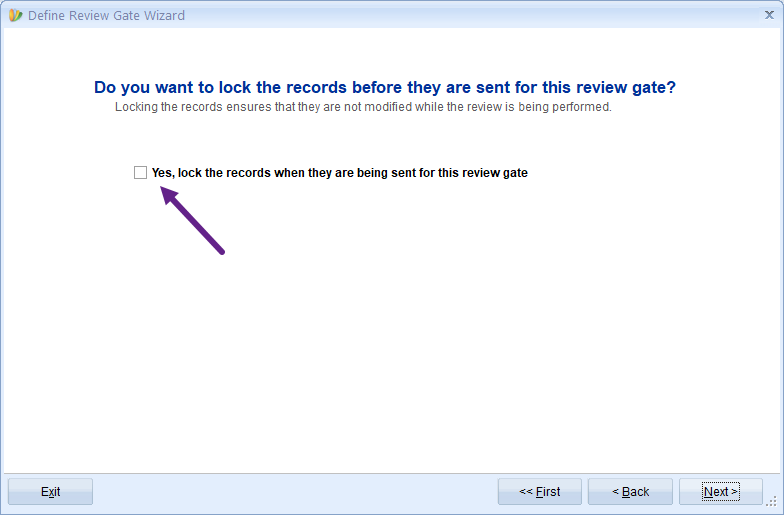
Step 8. Lock artifacts before review
Enable this option to prevent any changes to artifacts while the review is in progress.

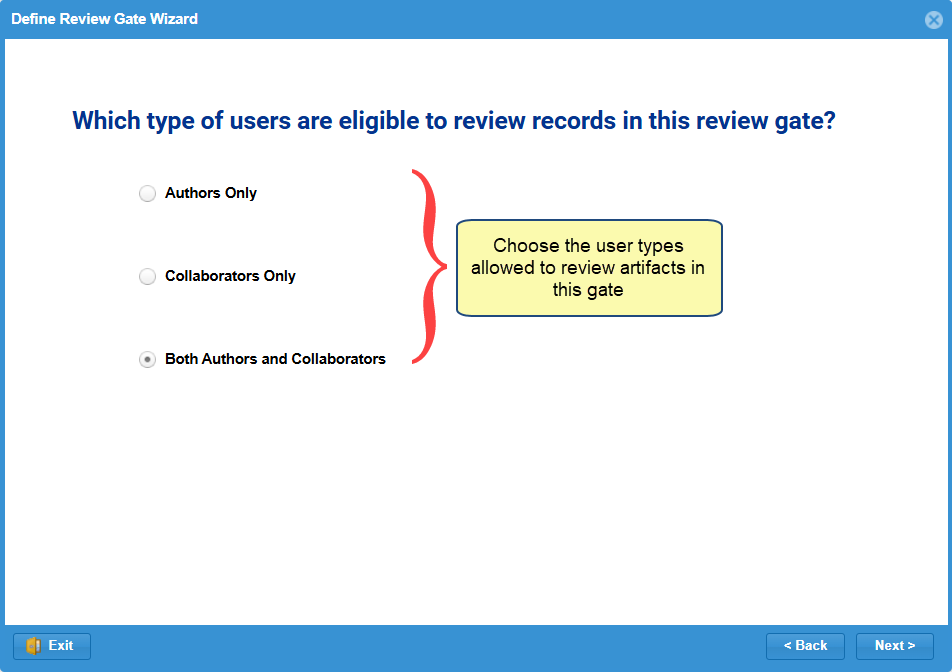
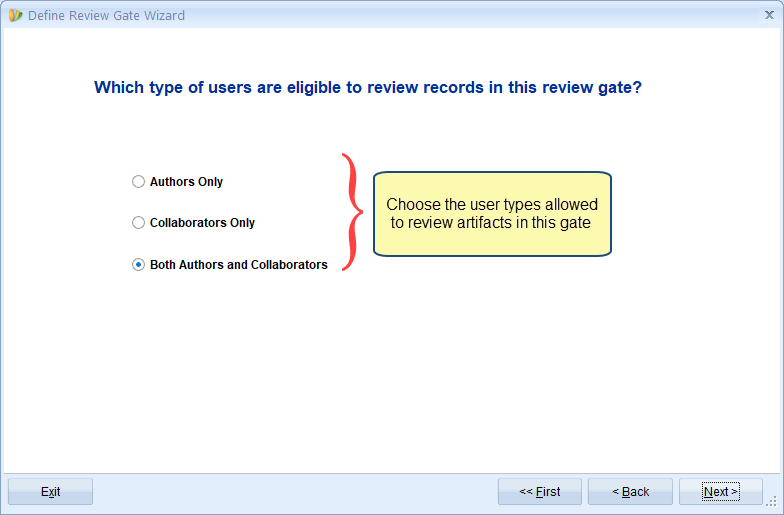
Step 9. Choose who can review artifacts
Select which user types are allowed to act as reviewers in this gate. This controls reviewer eligibility for the current review gate.
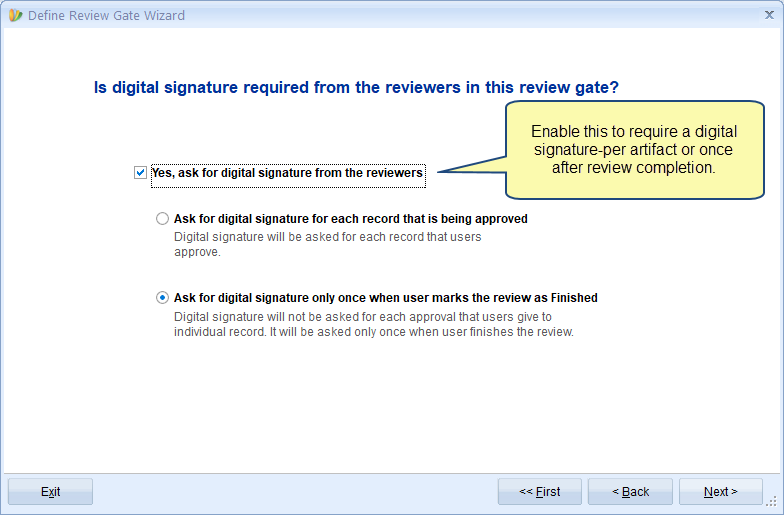
Step 10. Specify if a digital signature is required from reviewers
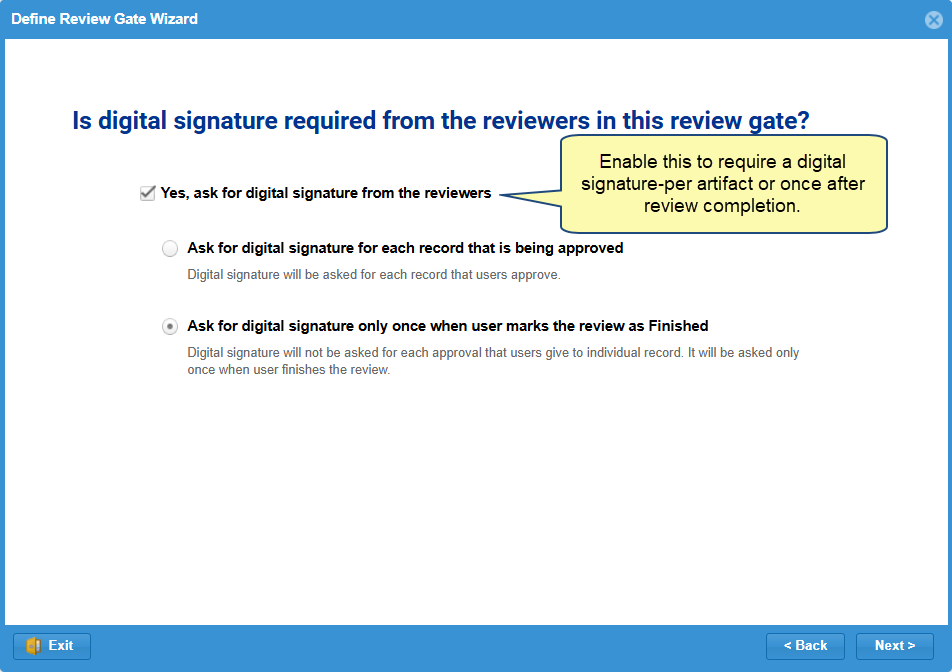
If you want reviewers to digitally confirm their approval, select Yes, then choose one of the following options:
- Ask for digital signature for each record that is being approved: Requires reviewers to sign each artifact individually as they approve it.
- Ask for digital signature only once when user marks the review as Finished: Requires a single signature after completing the review.
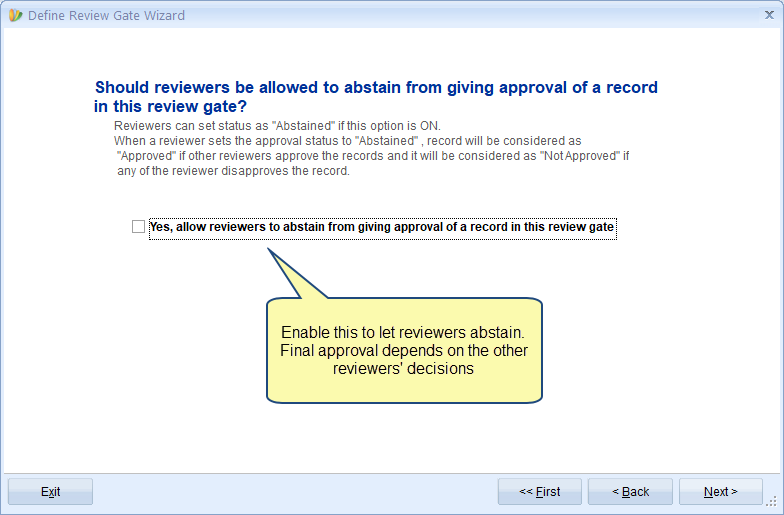
Step 11. Specify whether reviewers can abstain from approving an artifact
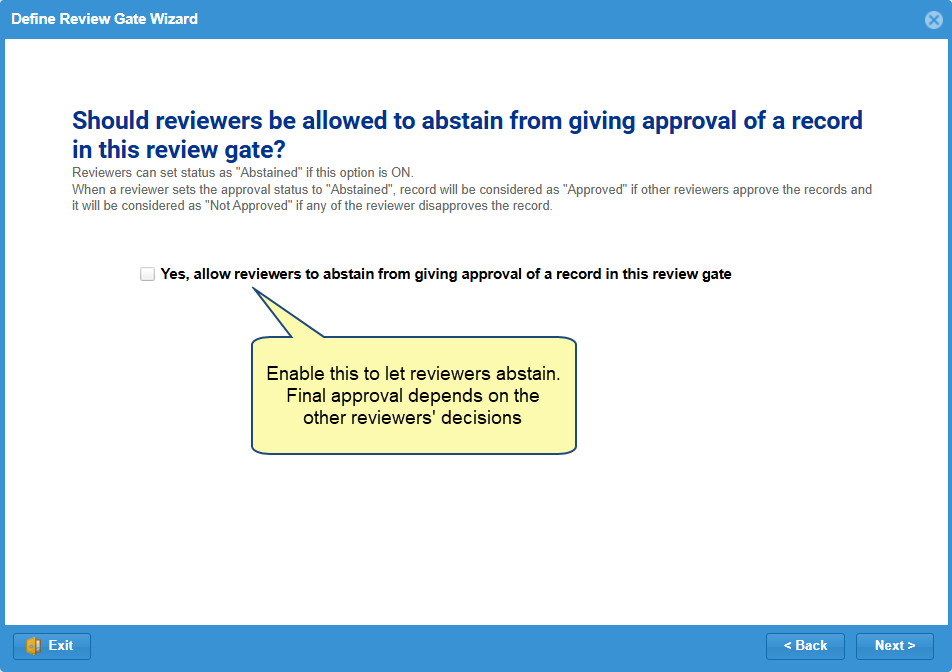
Enable this option if you want to allow reviewers to choose Abstained instead of explicitly approving or disapproving a record.
When a reviewer selects Abstained:
- If other reviewers approve the artifact → it is marked as Approved.
- If any reviewer disapproves the artifact → it is marked as Not Approved.
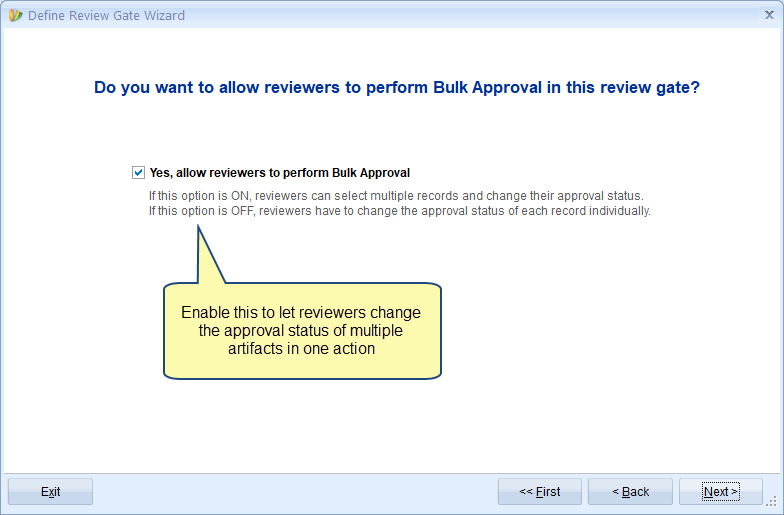
Step 12. Specify whether reviewers can bulk-approve artifacts

Enable this option to allow reviewers to approve or disapprove multiple artifacts at once during the review.
If disabled, reviewers must set the status of each artifact individually.
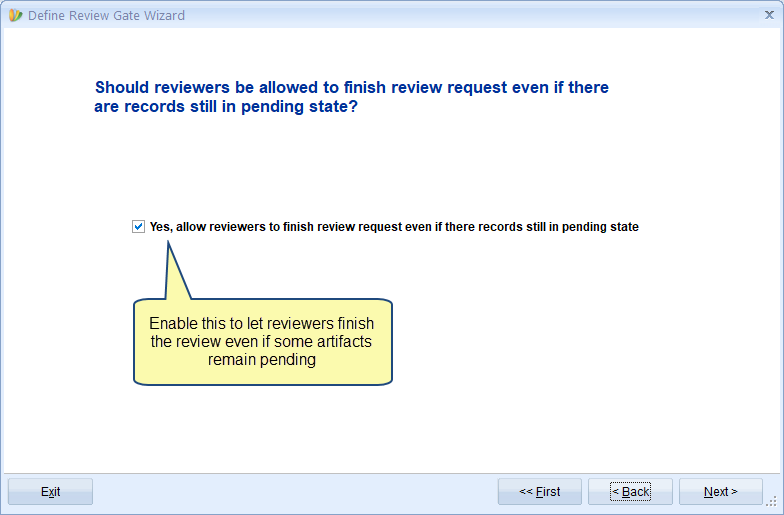
Step 13. Specify if reviewers can finish the review with pending artifacts
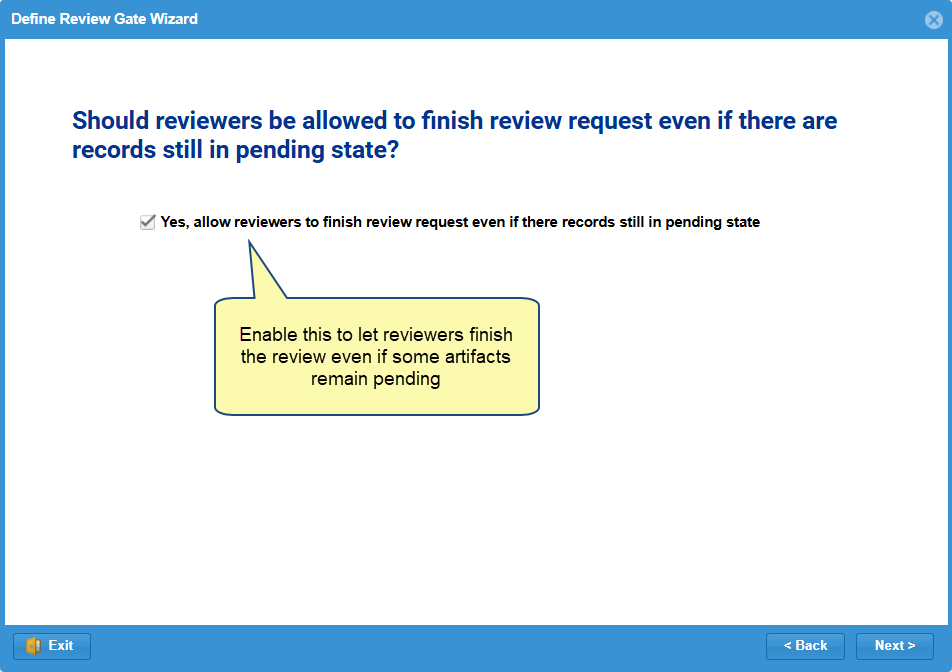
Enable this option to allow reviewers to complete their review even if some artifacts are still in the Pending state.
This gives reviewers flexibility to finish without acting on every artifact.
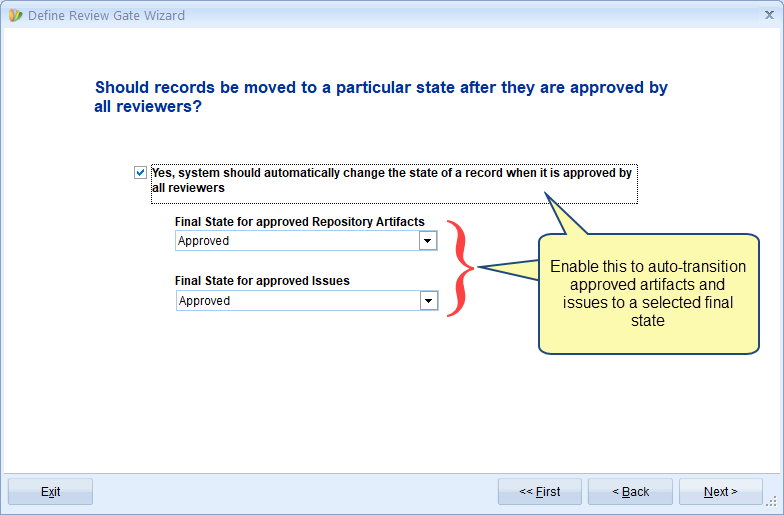
Step 14. Specify if you want to change artifacts’ state after they are approved
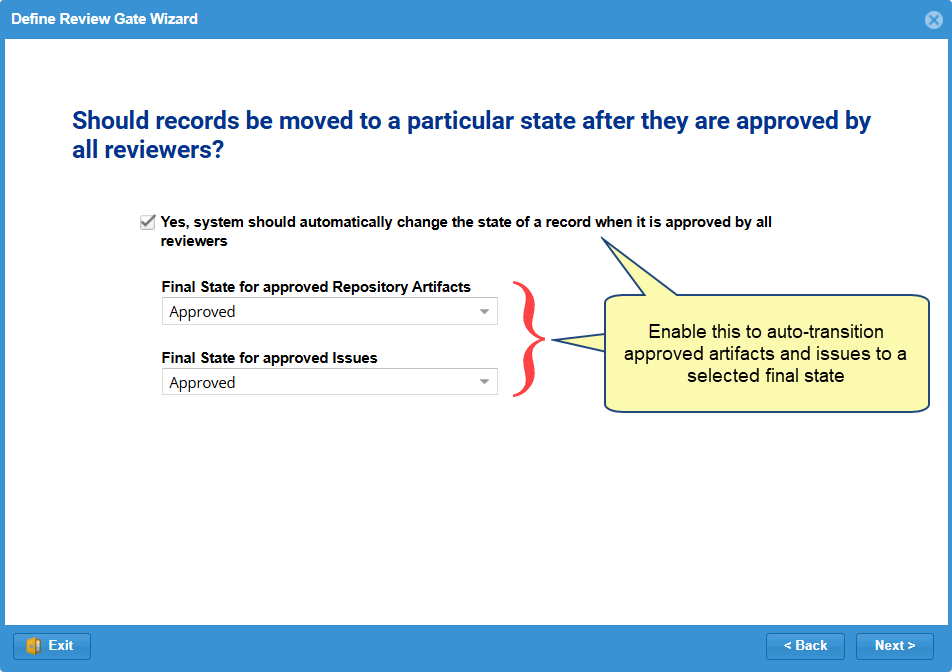
Enable this option to automatically change the state of artifacts and issues once they are approved by all reviewers.
You’ll need to select:
- The final state for approved Repository Artifacts
- The final state for approved Issues
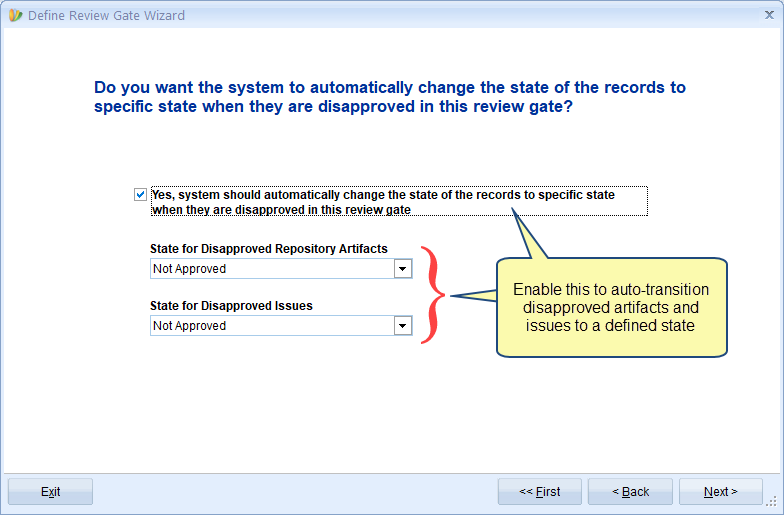
Step 15. Specify if you want to change artifacts’ state after they are disapproved (optional)
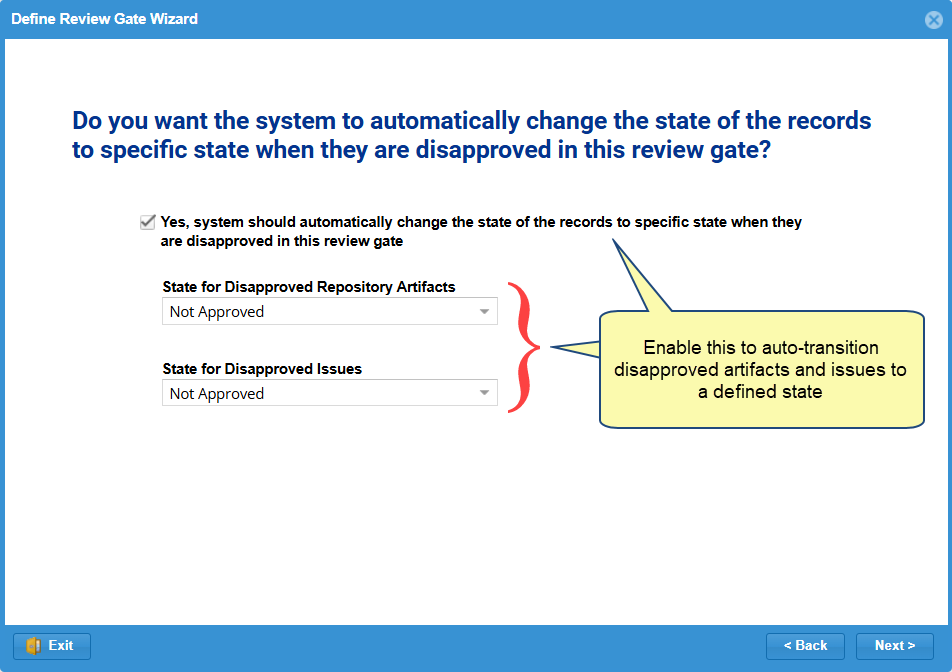
Enable this option to automatically update the state of artifacts and issues that are disapproved in this review gate.
You’ll need to select:
- The state for Disapproved Repository Artifacts
- The state for Disapproved Issues
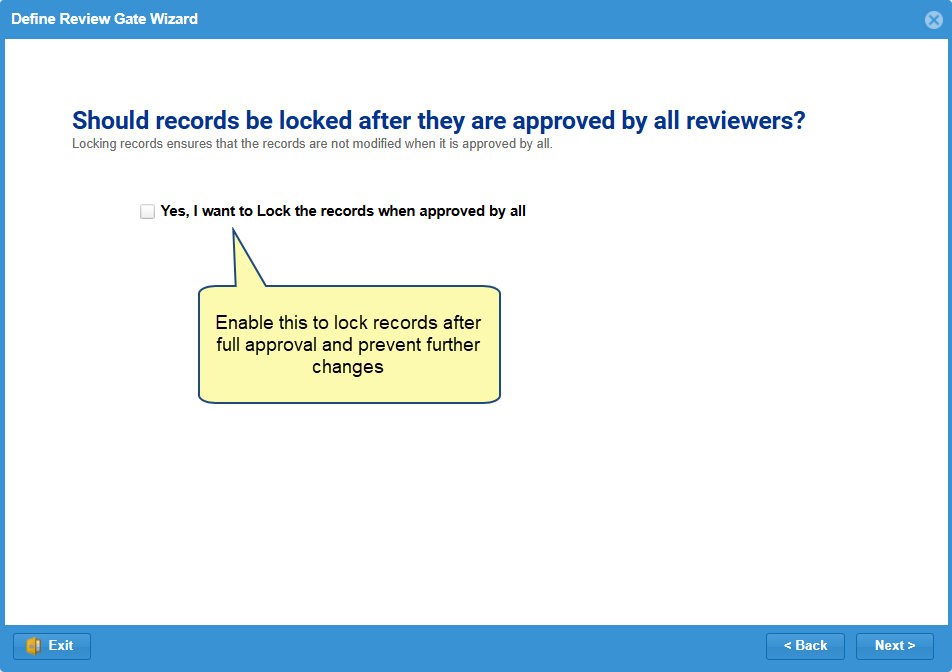
Step 16. Specify if you want to lock artifacts after approval by all reviewers
Enable this option to lock artifacts automatically once they are approved by all reviewers.
This prevents further modifications and ensures review integrity.
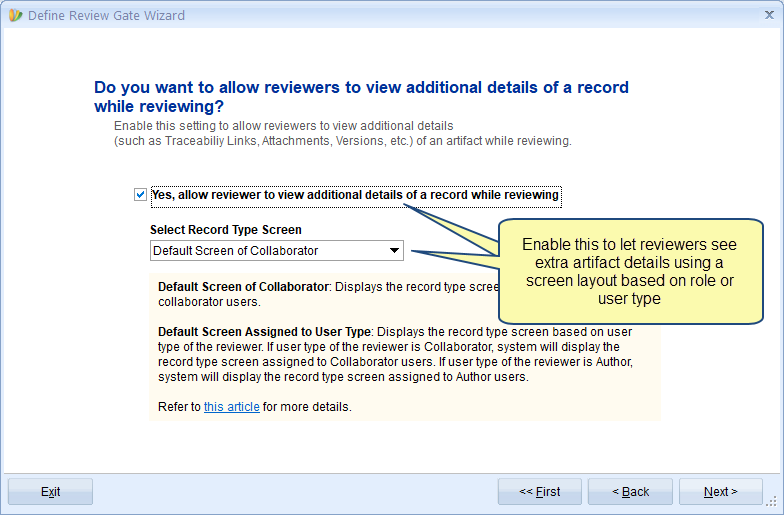
Step 17. Specify whether to show additional details of artifacts during reviewing
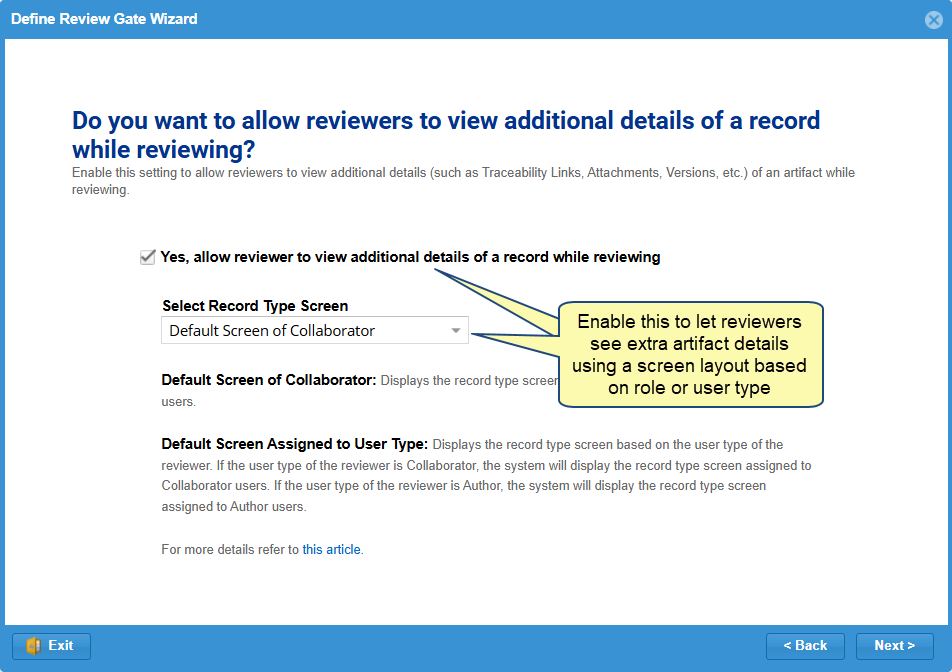
Enable this option to allow reviewers to view additional artifact details (such as traceability links, attachments, and versions) during the review.
You can then choose how the record type screen is displayed:
- Default Screen of Collaborator – Shows the screen layout assigned to collaborator users.
- Default Screen Assigned to User Type – Displays a layout based on each reviewer’s user type (e.g., Author, Collaborator).
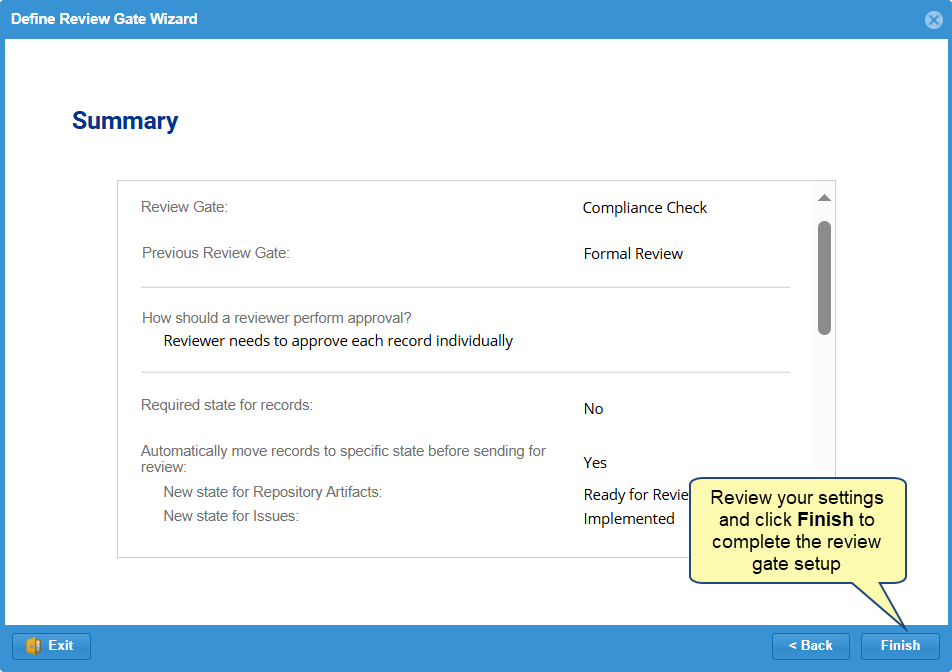
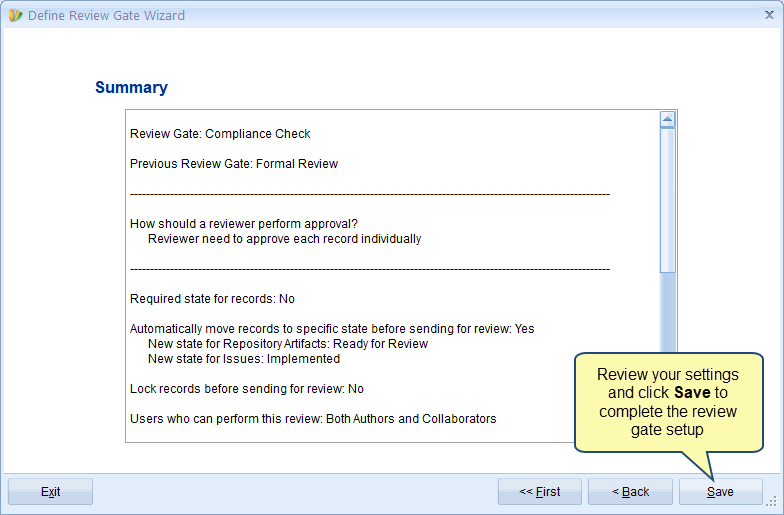
Step 18. View Summary and click Save
Review all the configuration details you’ve selected in the wizard.
Once you’re satisfied, click Finish to create the review gate.
Step 19. Review Gate has been added
2. Managing Review Gates
Step 1. Navigate to Reviews and Approvals settings in Global Settings
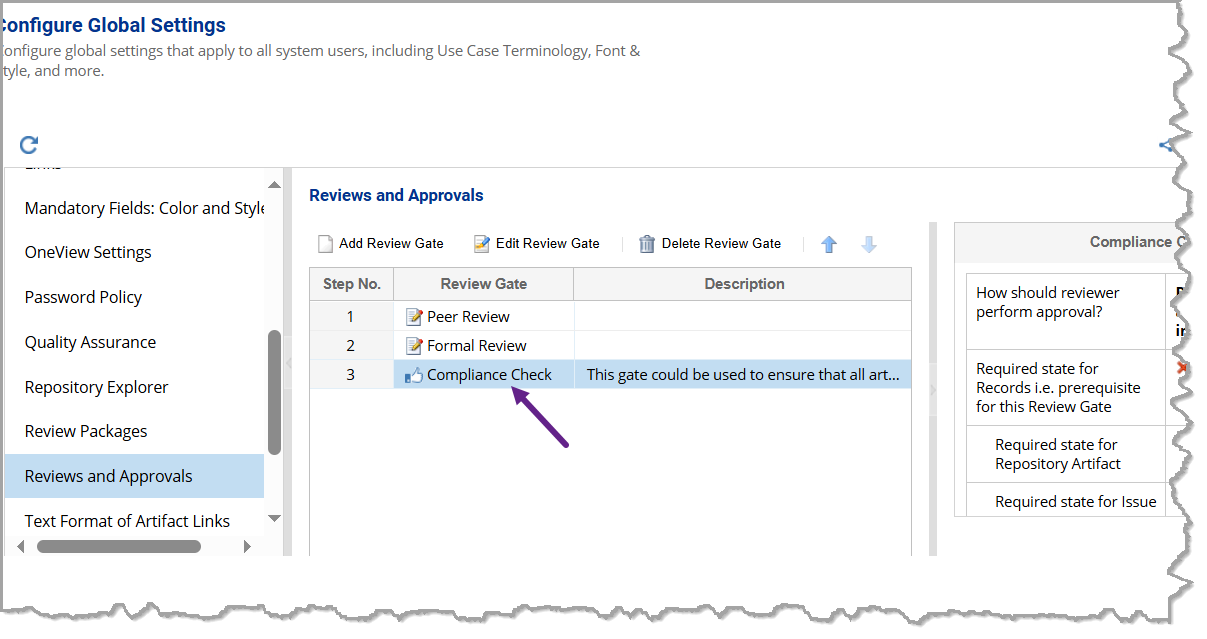
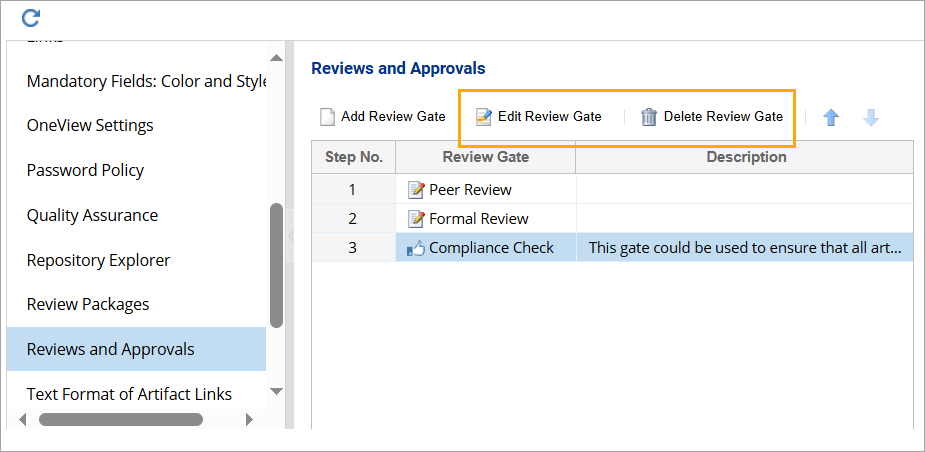
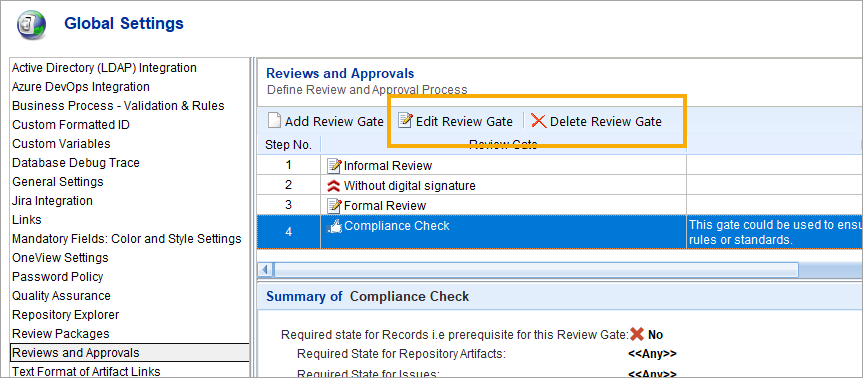
Step 2. Modify or Delete a Review Gate
In the list of review gates, select the one you want to modify.
- Click Edit Review Gate to open the same wizard used for creating a review gate.
Update any configuration as needed.
- To remove a review gate, click Delete Review Gate and confirm the action.
This article is divided into two sections:
- Creating a Review Gate – Learn how to configure a new review gate and set up review parameters.
- Managing Review Gates – Learn how to edit or delete existing review gates.
1. Creating a Review Gate
Step 1. Navigate to Reviews and Approvals settings in Global Settings

Step 2. Add a new Review Gate
Click Add Review Gate to launch the Define Review Gate wizard.
Step 3. Name the Review Gate in Define Review Gate Wizard
Step 4. Choose when to execute this review gate
There are two options:
- Make this review gate as the first review gate: Choose this option to execute this review gate as the initial review gate.
- This review gate should be performed after: Choose this option to execute this gate after the selected preceding review gate.
Step 5. Choose how artifacts will be approved
There are two options:
- Reviewer should approve each record individually: Choose this option if you want reviewers to approve each record (artifact) in a review document or package. This allows you to track the review progress of each record. However, review may take a longer time.
- Reviewer should approve the entire document / package at once: Choose this option if you want reviewers to approve a whole review document or package at once. This method is faster but doesn’t track individual artifact progress.
If you choose the first option, the following wizard page will display. If you choose the second option, proceed to step 8.
Step 6. Enforce a rule for artifacts to be in a specific state before sending them for review
Enable this rule to ensure only artifacts in a specific state are eligible for review. This option is available only when this gate follows another review gate – step 4.
Once enabled, you can choose one of two options:
- State assigned for approved records in the previous review gate: Use state from previous review gate – Only artifacts marked as approved in the previous gate will be reviewed here.
- Let me specify the required state i.e. prerequisite for this review gate: Specify a required state manually – Define the minimum state artifacts must be in to enter this review. You’ll select:
- Required state for Repository Artifacts
- Required state for Issues

If you do not specify a state, proceed to the next step. If you specify a state, proceed to step 8.
Step 7. Auto-change artifacts and issues state before review
Select Yes if you want to automatically update the state of artifacts and issues before the review begins.
You’ll need to specify:
- The new state for Repository Artifacts
- The new state for Issues
This ensures all artifacts are transitioned into a consistent, review-ready state automatically.
Step 8. Lock artifacts before review
Enable this option to prevent any changes to artifacts while the review is in progress.
Step 9. Choose who can review artifacts
Select which user types are allowed to act as reviewers in this gate. This controls reviewer eligibility for the current review gate.
Step 10. Specify if a digital signature is required from reviewers
If you want reviewers to digitally confirm their approval, select Yes, then choose one of the following options:
- Ask for digital signature for each record that is being approved: Requires reviewers to sign each artifact individually as they approve it.
- Ask for digital signature only once when user marks the review as Finished: Requires a single signature after completing the review.
Step 11. Specify whether reviewers can abstain from approving an artifact
Enable this option if you want to allow reviewers to choose Abstained instead of explicitly approving or disapproving a record.
When a reviewer selects Abstained:
- If other reviewers approve the artifact → it is marked as Approved.
- If any reviewer disapproves the artifact → it is marked as Not Approved.
Step 12. Specify whether reviewers can bulk-approve artifacts
Enable this option to allow reviewers to approve or disapprove multiple artifacts at once during the review.
If disabled, reviewers must set the status of each artifact individually.
Step 13. Specify if reviewers can finish the review with pending artifacts
Enable this option to allow reviewers to complete their review even if some artifacts are still in the Pending state.
This gives reviewers flexibility to finish without acting on every artifact.
Step 14. Specify if you want to change artifacts’ state after they are approved
Enable this option to automatically change the state of artifacts and issues once they are approved by all reviewers.
You’ll need to select:
- The final state for approved Repository Artifacts
- The final state for approved Issues
Step 15. Specify if you want to change artifacts’ state after they are disapproved (optional)
Enable this option to automatically update the state of artifacts and issues that are disapproved in this review gate.
You’ll need to select:
- The state for Disapproved Repository Artifacts
- The state for Disapproved Issues
Step 16. Specify if you want to lock artifacts after approval by all reviewers
Enable this option to lock artifacts automatically once they are approved by all reviewers.
This prevents further modifications and ensures review integrity.

Step 17. Specify whether to show additional details of artifacts during reviewing
Enable this option to allow reviewers to view additional artifact details (such as traceability links, attachments, and versions) during the review.
You can then choose how the record type screen is displayed:
- Default Screen of Collaborator – Shows the screen layout assigned to collaborator users.
- Default Screen Assigned to User Type – Displays a layout based on each reviewer’s user type (e.g., Author, Collaborator).
Step 18. View Summary and click Save
Review all the configuration details you’ve selected in the wizard.
Once you’re satisfied, click Save to create the review gate.
Step 19. Review Gate has been added
2. Managing Review Gates
Step 1. Navigate to Reviews and Approvals settings in Global Settings
Step 2. Modify or Delete a Review Gate
In the list of review gates, select the one you want to modify.
- Click Edit Review Gate to open the same wizard used for creating a review gate. Update any configuration as needed.
- To remove a review gate, click Delete Review Gate and confirm the action.
Revised: May 27th, 2025